CALIBRATE MACBOOK PRO APPLE
COMPLETE GUIDE TO MacBook Pro DISPLAY CALIBRATION AND COLOR CALIBRATION
In this guide I’ll show you how to properly calibrate and profile the Liquid Retina XDR (Mini-LED) display of your MacBook Pro (M1 / M2 / M3 / M4 / M5 and all models with Mini-LED panel) using Calibrite Display Plus HL, with P3 / D65 / Gamma 2.2 settings and a 120 nits target. By the end you’ll have a validated ICC profile (DeltaE) and a consistent color calibration workflow for photo, video, and print.
Follow these steps to get accurate, consistent color for photography, video editing, and professional post-production.
Some screens or options may vary slightly on previous or future macOS versions.
Last updated: May 26, 2026.
Quick troubleshooting (before you start)
- Colors shift / display looks “warm”: turn off True Tone and Night Shift.
- Brightness changes during measurement: disable Automatically adjust brightness and calibrate on power adapter.
- Inconsistent readings or high DeltaE: remove reflections, let the display warm up for 30 minutes, then re-measure.
- Preset mismatch: set P3 / D65 / Gamma 2.2 and 120 nits before profiling.
- The probe reads poorly: re-position it in the center, ensure full contact, and avoid point light sources hitting the panel.
- ICC profile “doesn’t show” in apps: ensure the app is color-managed and the profile is active in Display settings.
Goal: stable luminance and white point before creating the ICC profile, for consistent and repeatable results.
1. Mac preparation
Before calibrating, it’s essential to prepare your MacBook Pro to avoid interference during measurement. These steps create a stable baseline and help you get reliable color results.
Open System Settings and double-check the options below. To speed things up, use Spotlight by pressing CMD + Space.

Tip: always calibrate with the MacBook Pro plugged into power.
System settings to check
- Displays: turn off Automatically adjust brightness.
- Displays: disable True Tone and ensure Night Shift is off.
- Desktop & Dock: turn off Close windows when quitting an application
- Accessibility → Display: disable Increase contrast.
- Battery / Energy: disable Slightly dim the display while on battery.
- Battery → On power adapter: select High Power Mode (if available).
- Disconnect any external monitors.
Reflections and ambient light control
During calibration, it’s critical that the display has no reflections from lamps or windows. Any reflection on the screen can affect the colorimeter reading and reduce ICC profile accuracy.
Make sure that:
- there are no windows or direct light sources in front of or behind the display;
- spotlights or small point lights do not create visible reflections on the panel;
- your room lighting is consistent, diffused, and controlled.
Mini-LED display warm-up
Turn on the MacBook Pro and keep the display on for at least 30 minutes. This helps the Mini-LED XDR panel stabilize thermally under real working conditions.
Cleaning the display
Make sure the display is clean and free of dust or fingerprints. Ideally use the Apple polishing cloth. Alternatively, a soft, dry microfiber cloth is fine. Avoid chemicals or aggressive cleaners that could damage the panel surface.
Proper preparation ensures reliable measurements, a consistent ICC profile, and repeatable results over time.
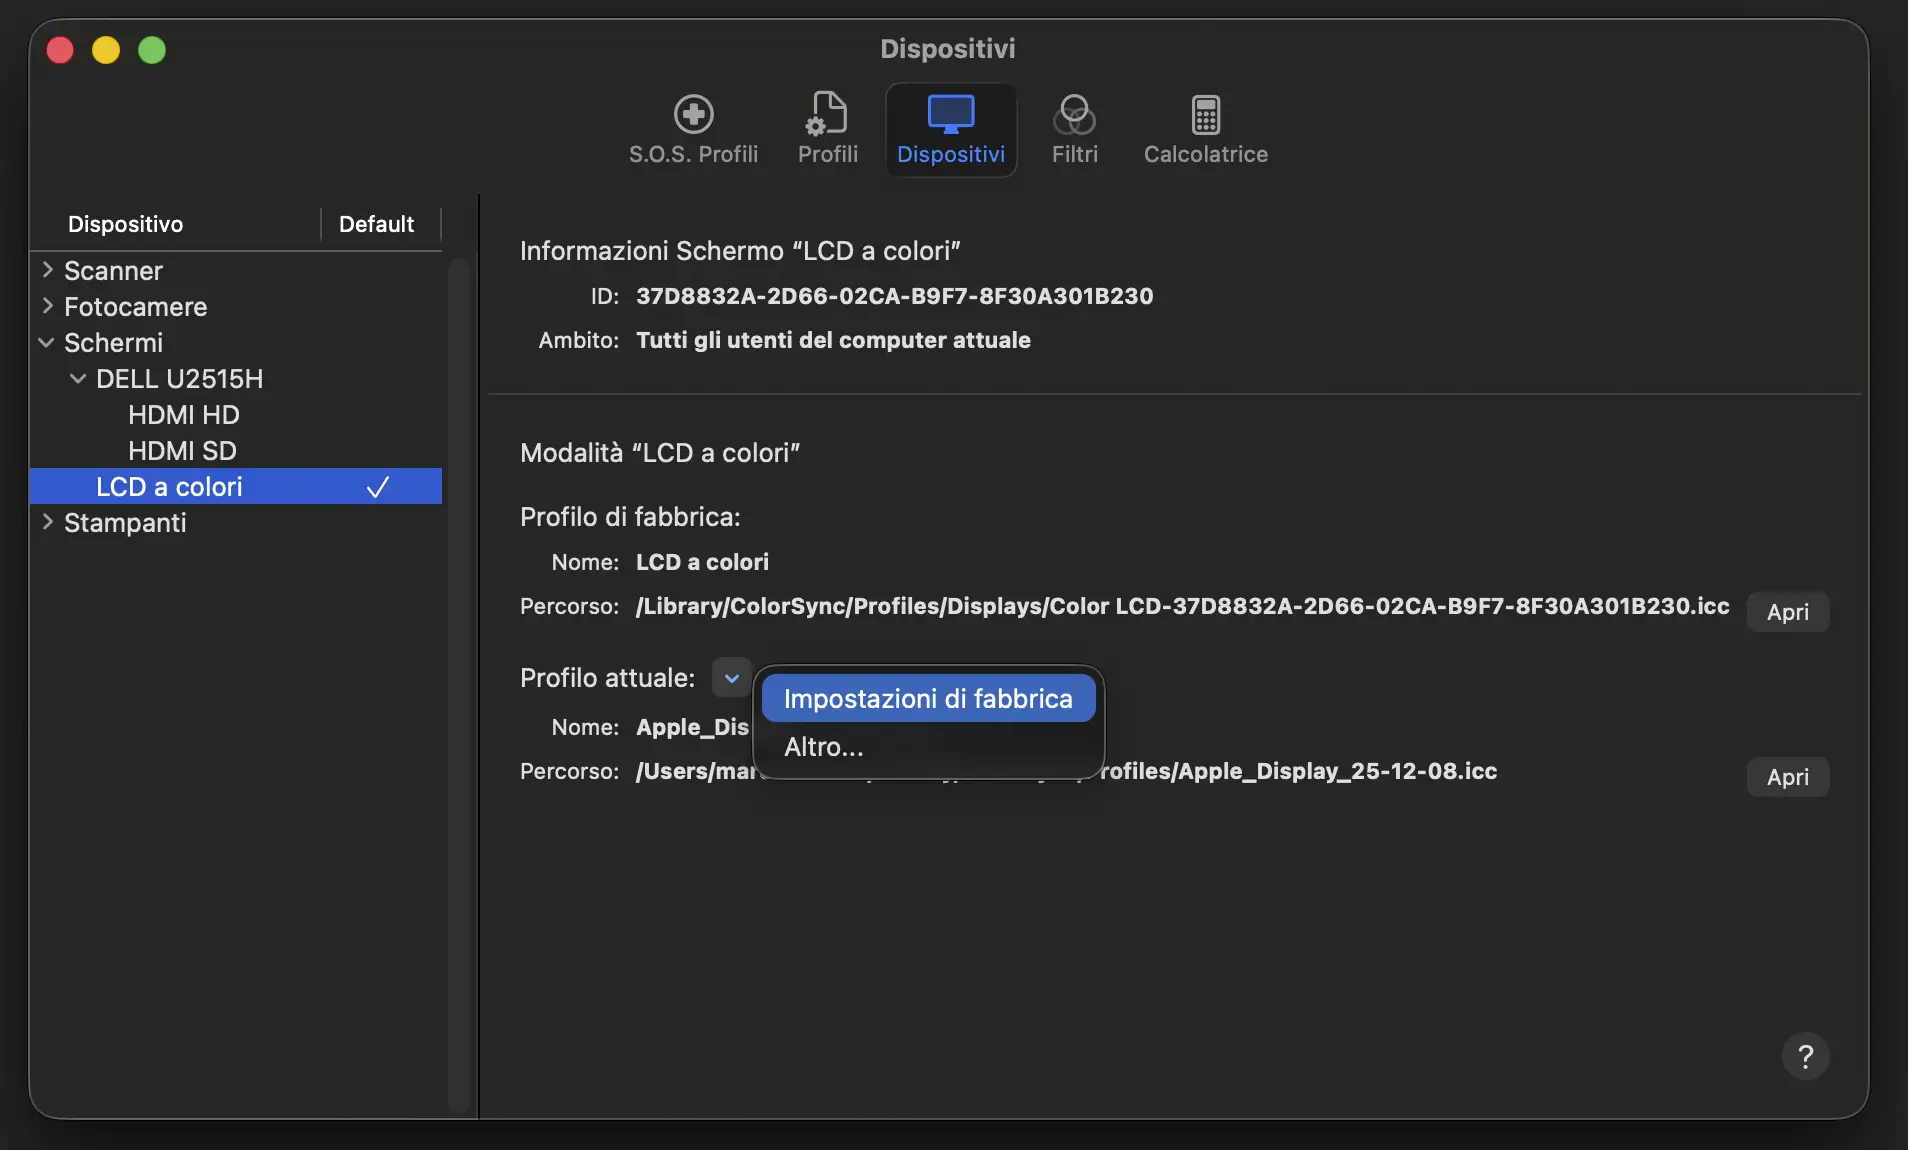
2. Check the factory profile
Open ColorSync Utility, select the built-in display (Color LCD), and confirm the active profile matches the factory one. If it doesn’t, click Set to Factory. This ensures you start from a known baseline before calibration.
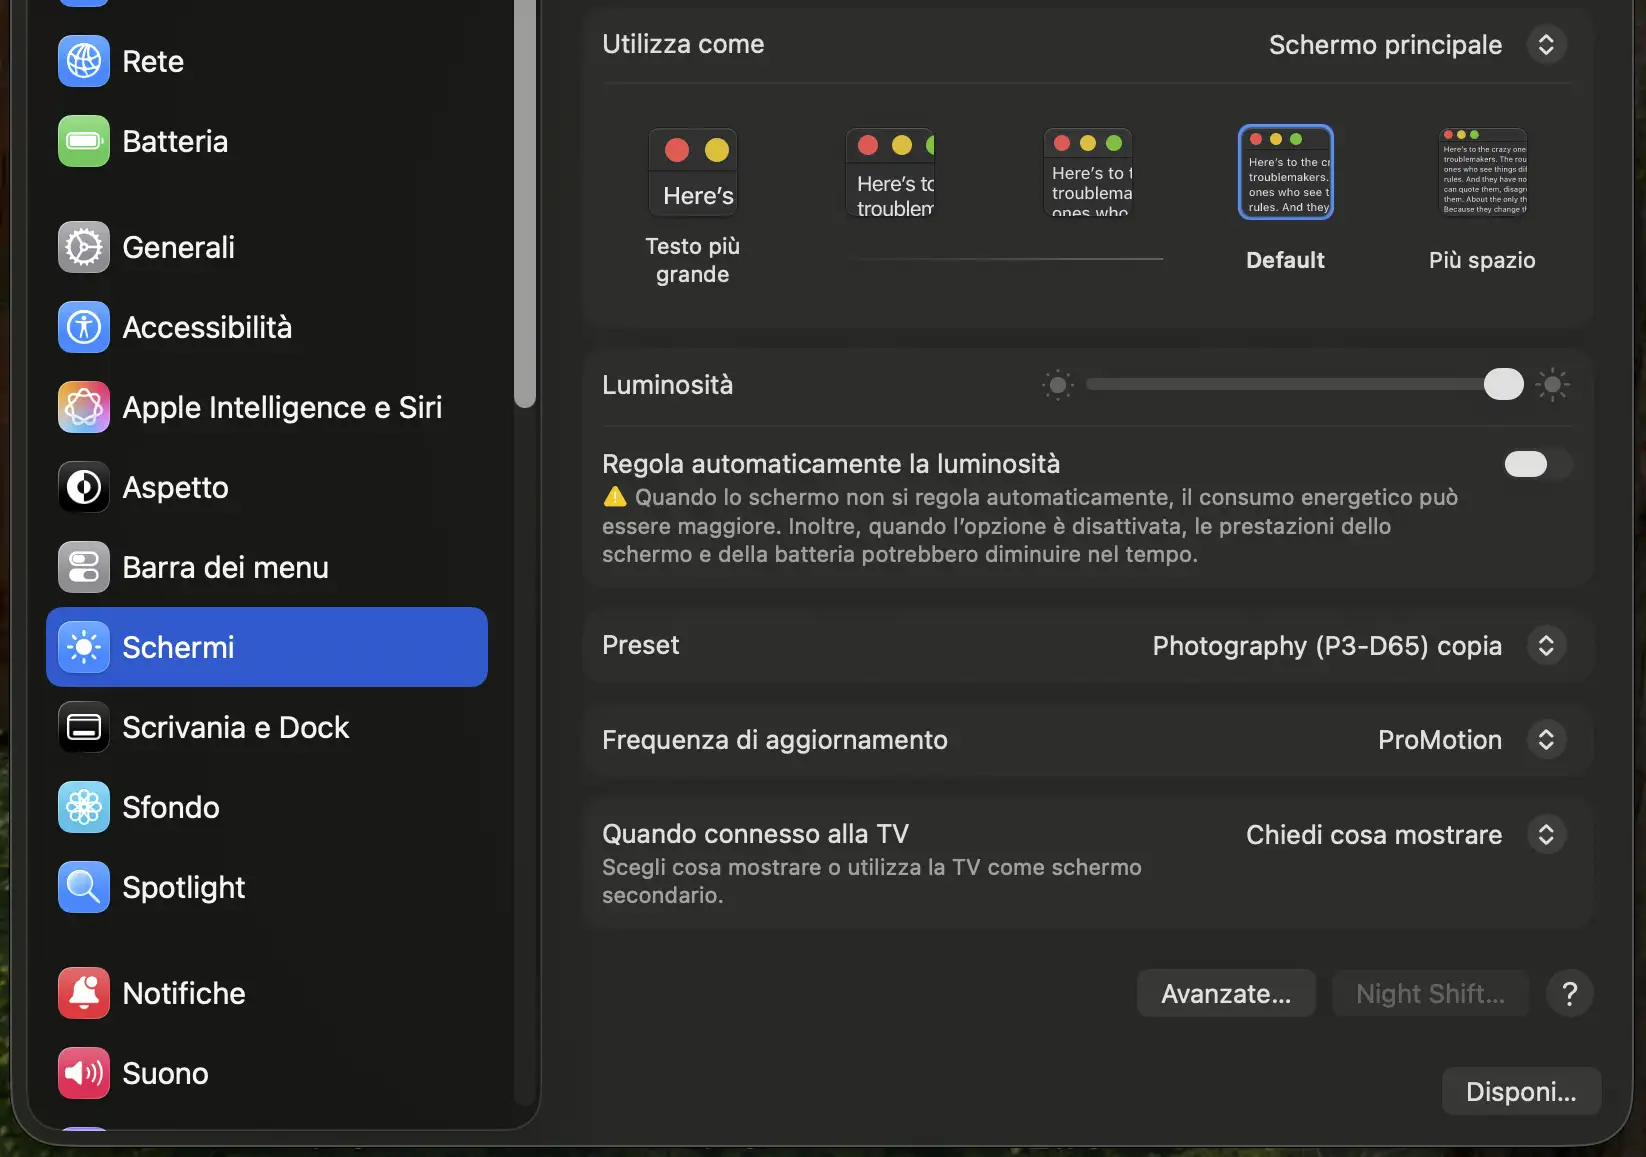
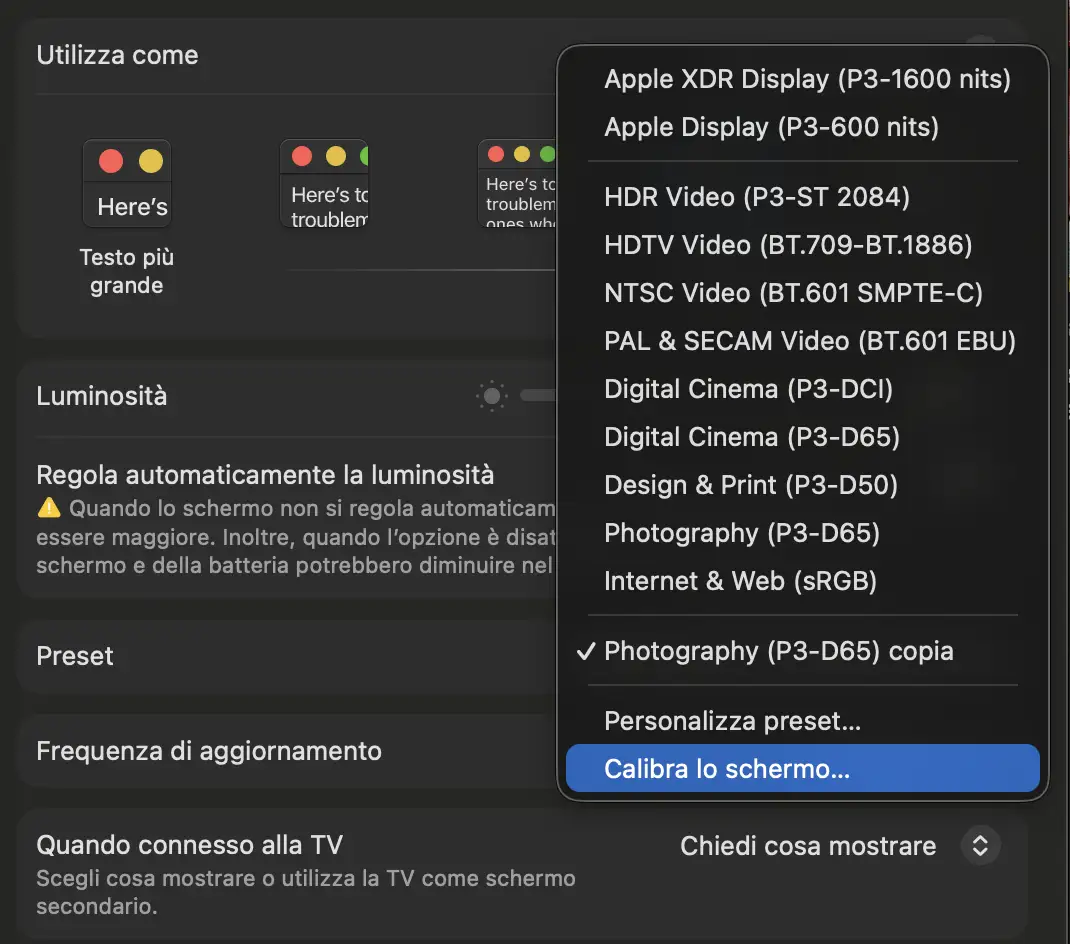
3. Set a professional preset
Go to System Settings → Displays, open the Presets tab, and choose Customize Preset.
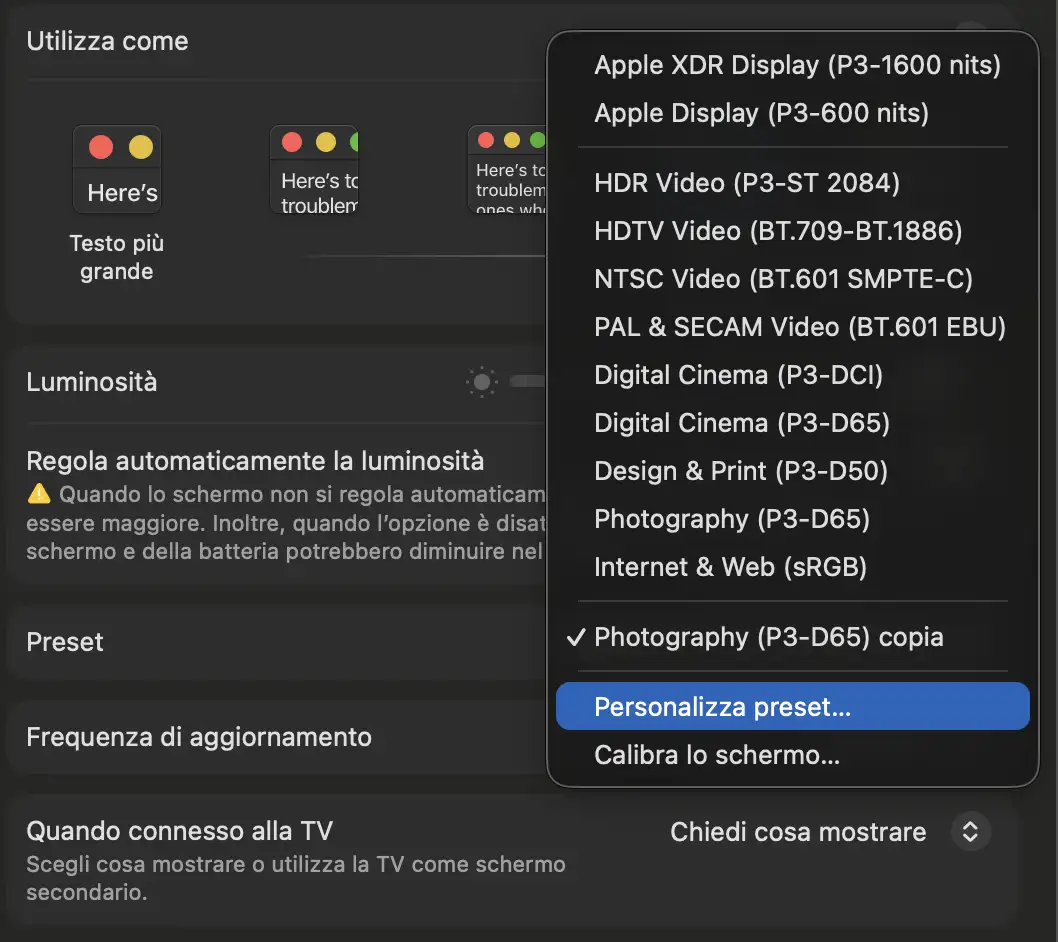
Click once to highlight Photography P3 D65 as your starting point, then click the “+” button (bottom left). Set:
- Color Gamut: P3.
- White Point: D65.
- Gamma/SDR Transfer Function: Pure Power 2.20.
- SDR Luminance: 120 nits (a solid target for photo/video in controlled lighting).

Tip: save it with a clear name, e.g. Photography P3 D65 120. The display may dim slightly and True Tone will be disabled automatically.
Now go back to the Presets drop-down and select “Calibrate…”.
On the next screen click “Adjust calibration” to open a new window.
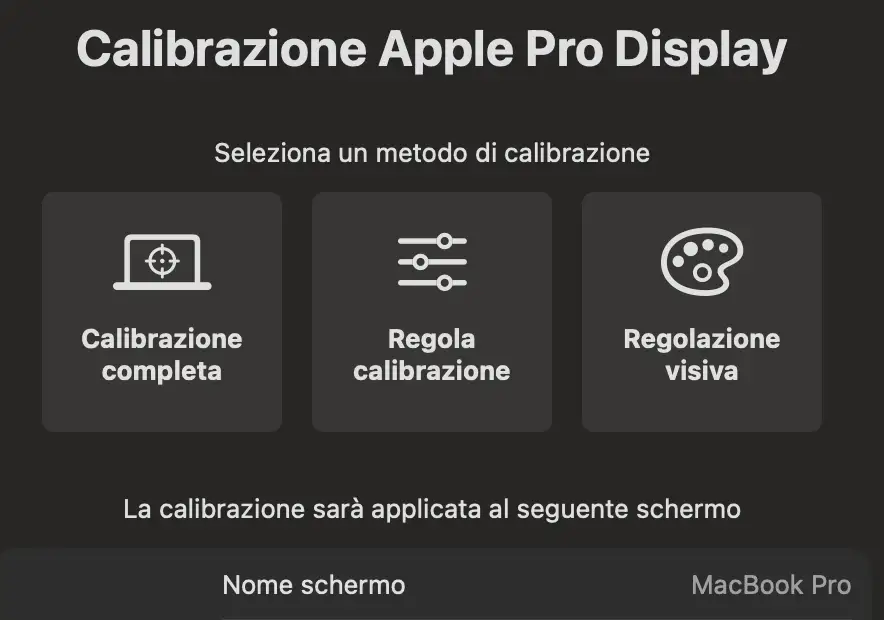
Leave this window open for now, we’ll use it in the next steps.
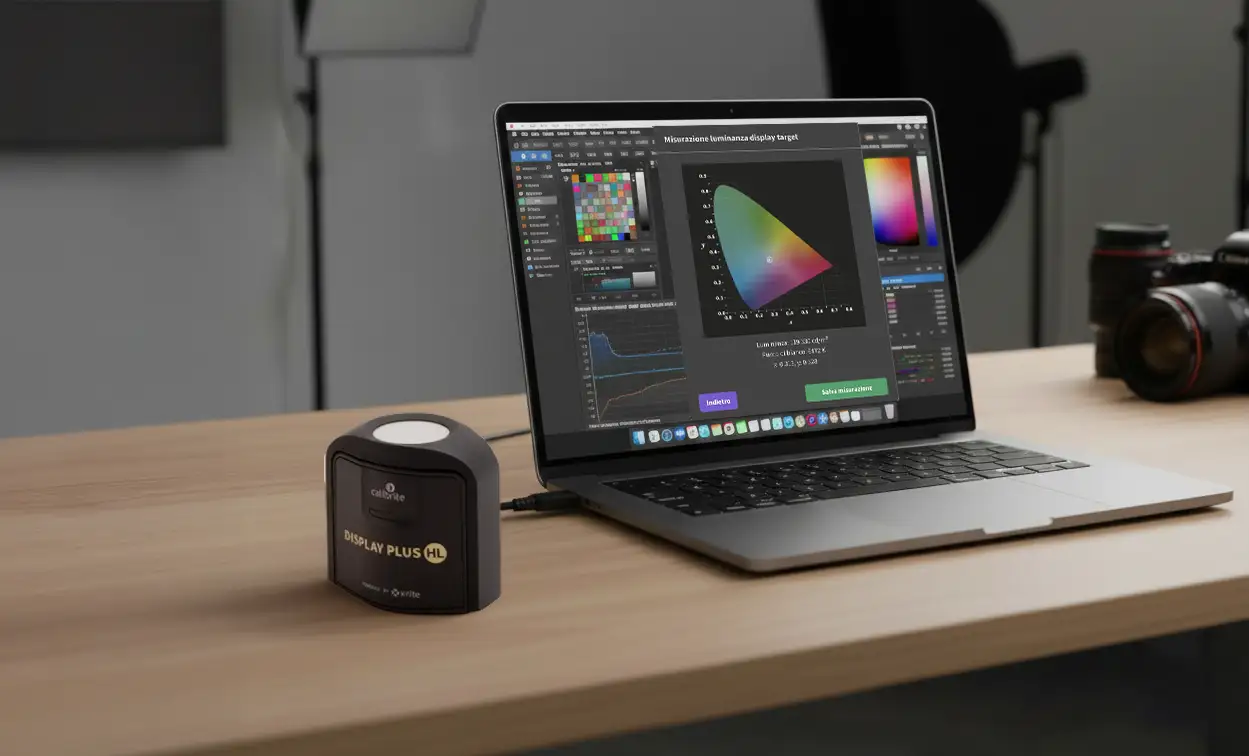
4. Advanced calibration with Calibrite Display Plus HL

Connect the Calibrite Display Plus HL to your MacBook Pro via USB.
If you don’t have it yet, you can buy it on Amazon HERE.
Then open Calibrite Profiler (Calibrite’s official app), also available from HERE.
The software will detect the probe and lets you configure the parameters needed for the Mini-LED XDR panel.
In Calibrite Profiler, choose Advanced Mode and click the green Next button.

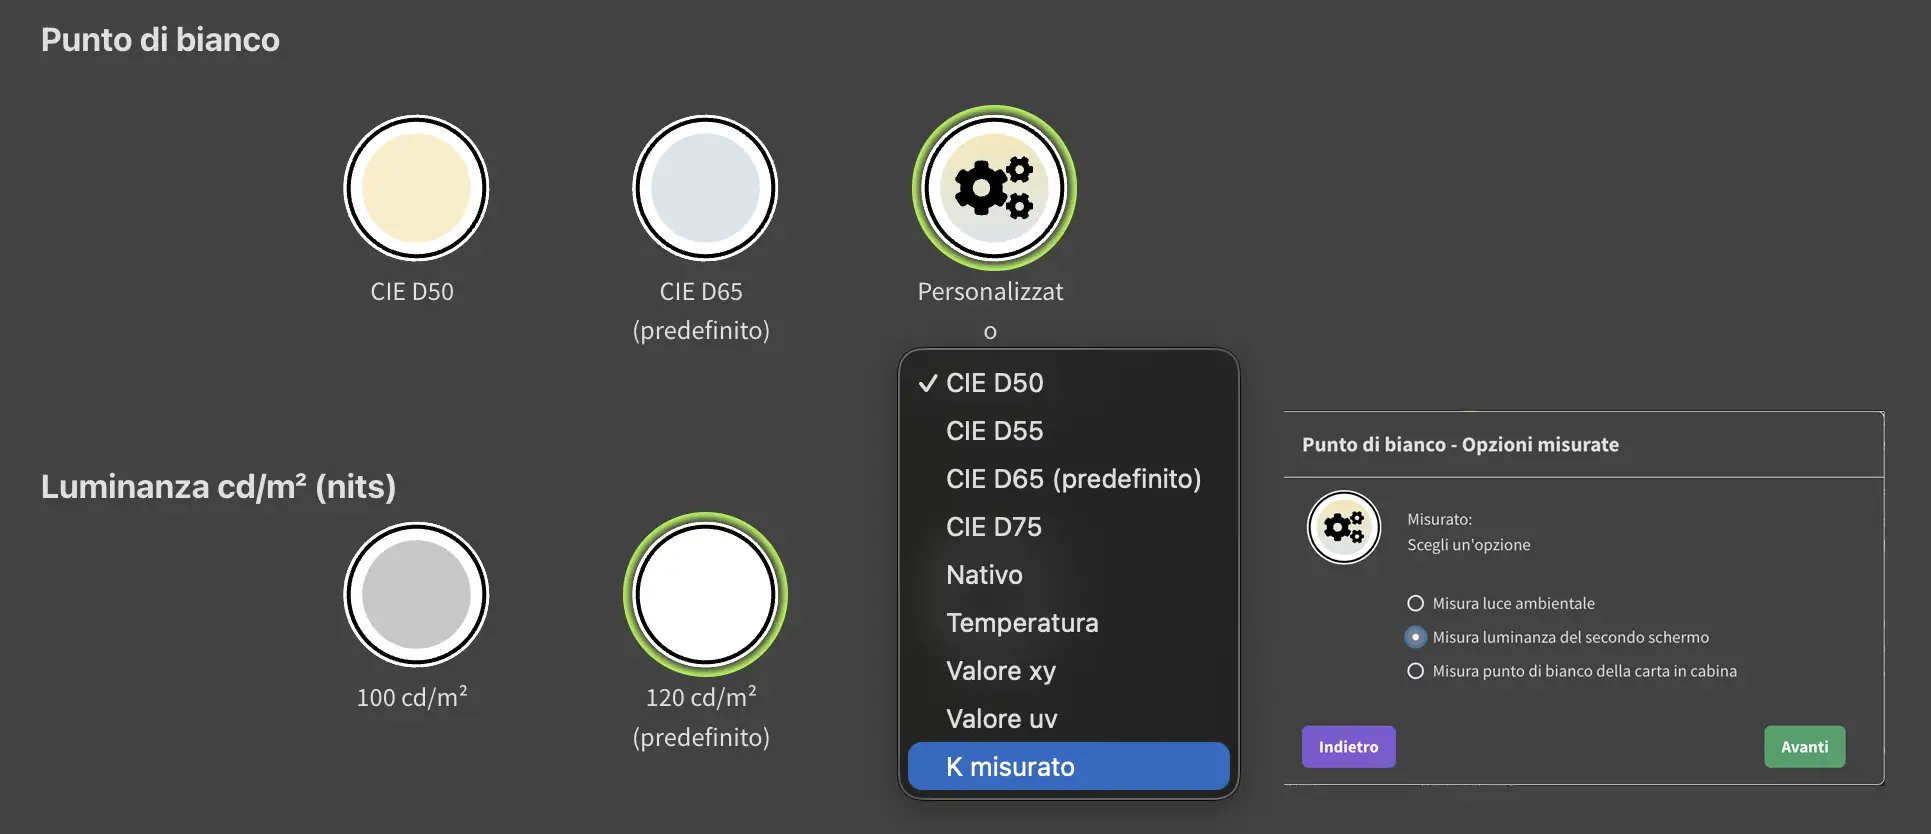
Select the Mini-LED panel type and the Photography preset. At the top, click CIE D65 to customize white point measurement.
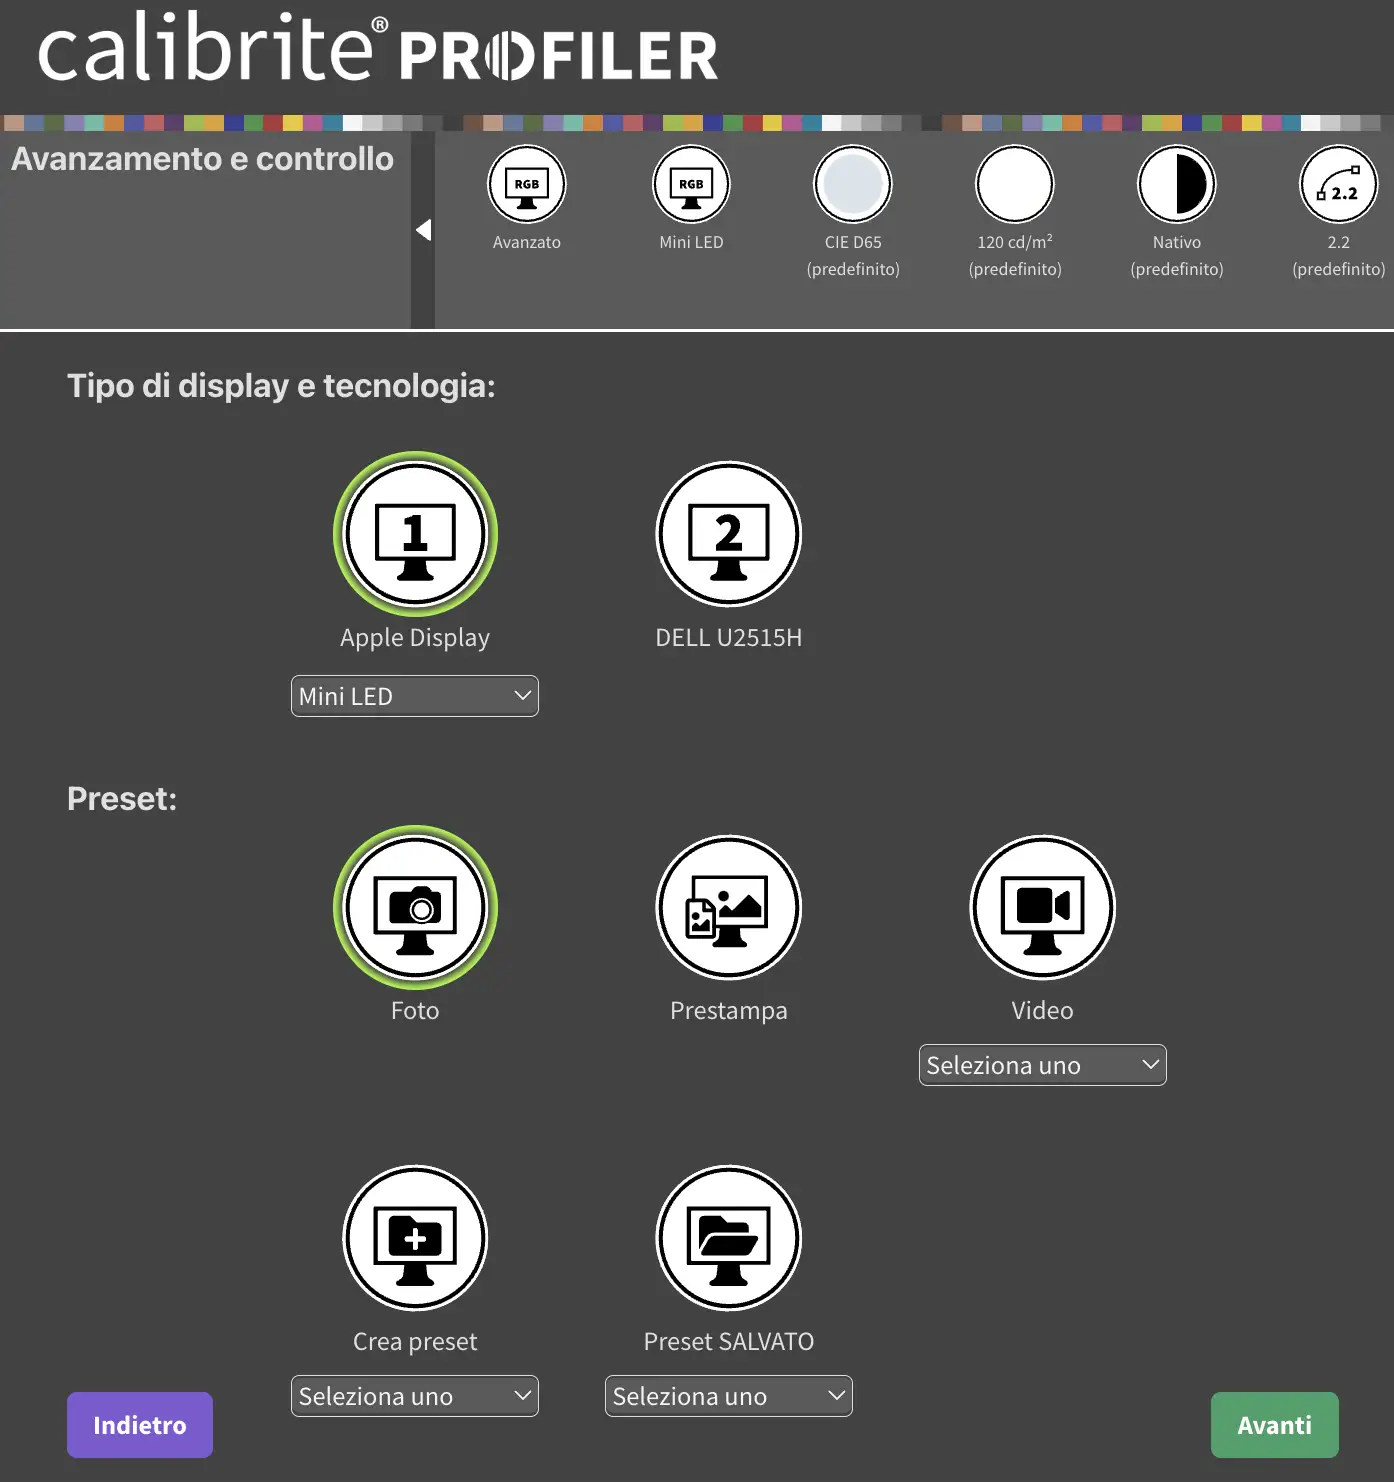
- Choose Custom, then Measured K, and select “Measure luminance of second display” to read your panel accurately.
-
- Follow the on-screen instructions to activate the probe by lifting and rotating the diffuser. Tilt the screen so the probe sits flush; adjust the counterweight on the cable if needed.
- Click “White patch”, place the probe on the white square, then click “Measure” and wait for completion.
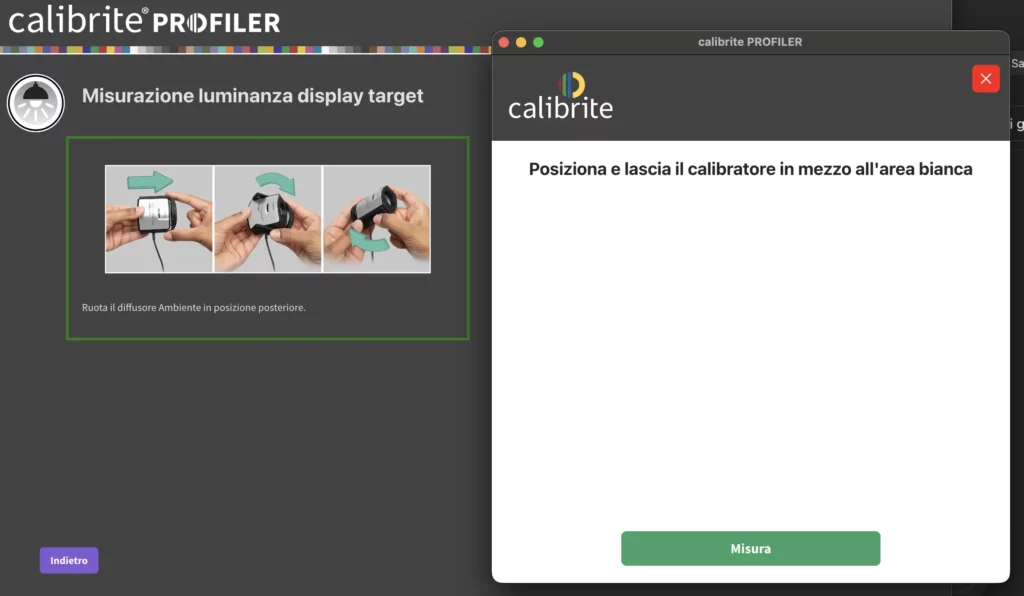
- Write down the measured X / Y and luminance values.
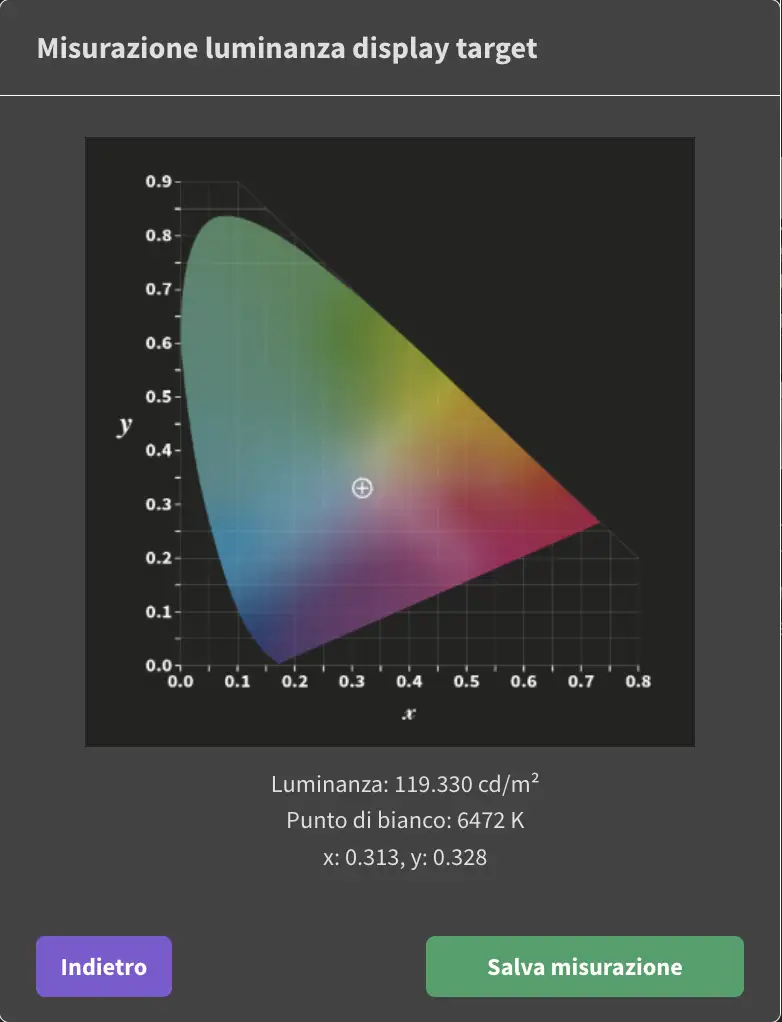
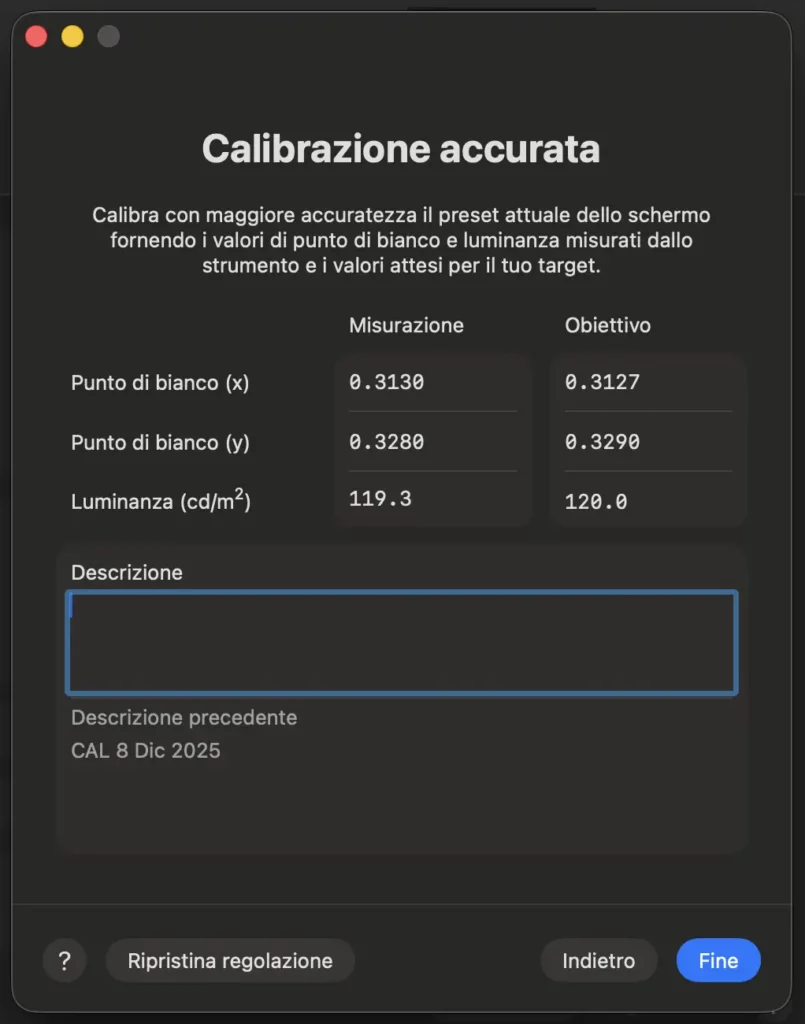
Now go back to the Adjust calibration window we left open earlier.
In the “Measurement” row, enter your measured x, y, and luminance. The numbers in this guide are examples, yours will differ slightly. In the “Target” row, enter these exact values: x = 0.3127, y = 0.3290, Luminance = 120. Click OK, your display may change slightly while the settings apply. At this point the monitor is correctly calibrated and ready to be profiled with an ICC profile for accurate color.
5. ICC profiling for the Mini-LED display
Now we can move on to display profiling.
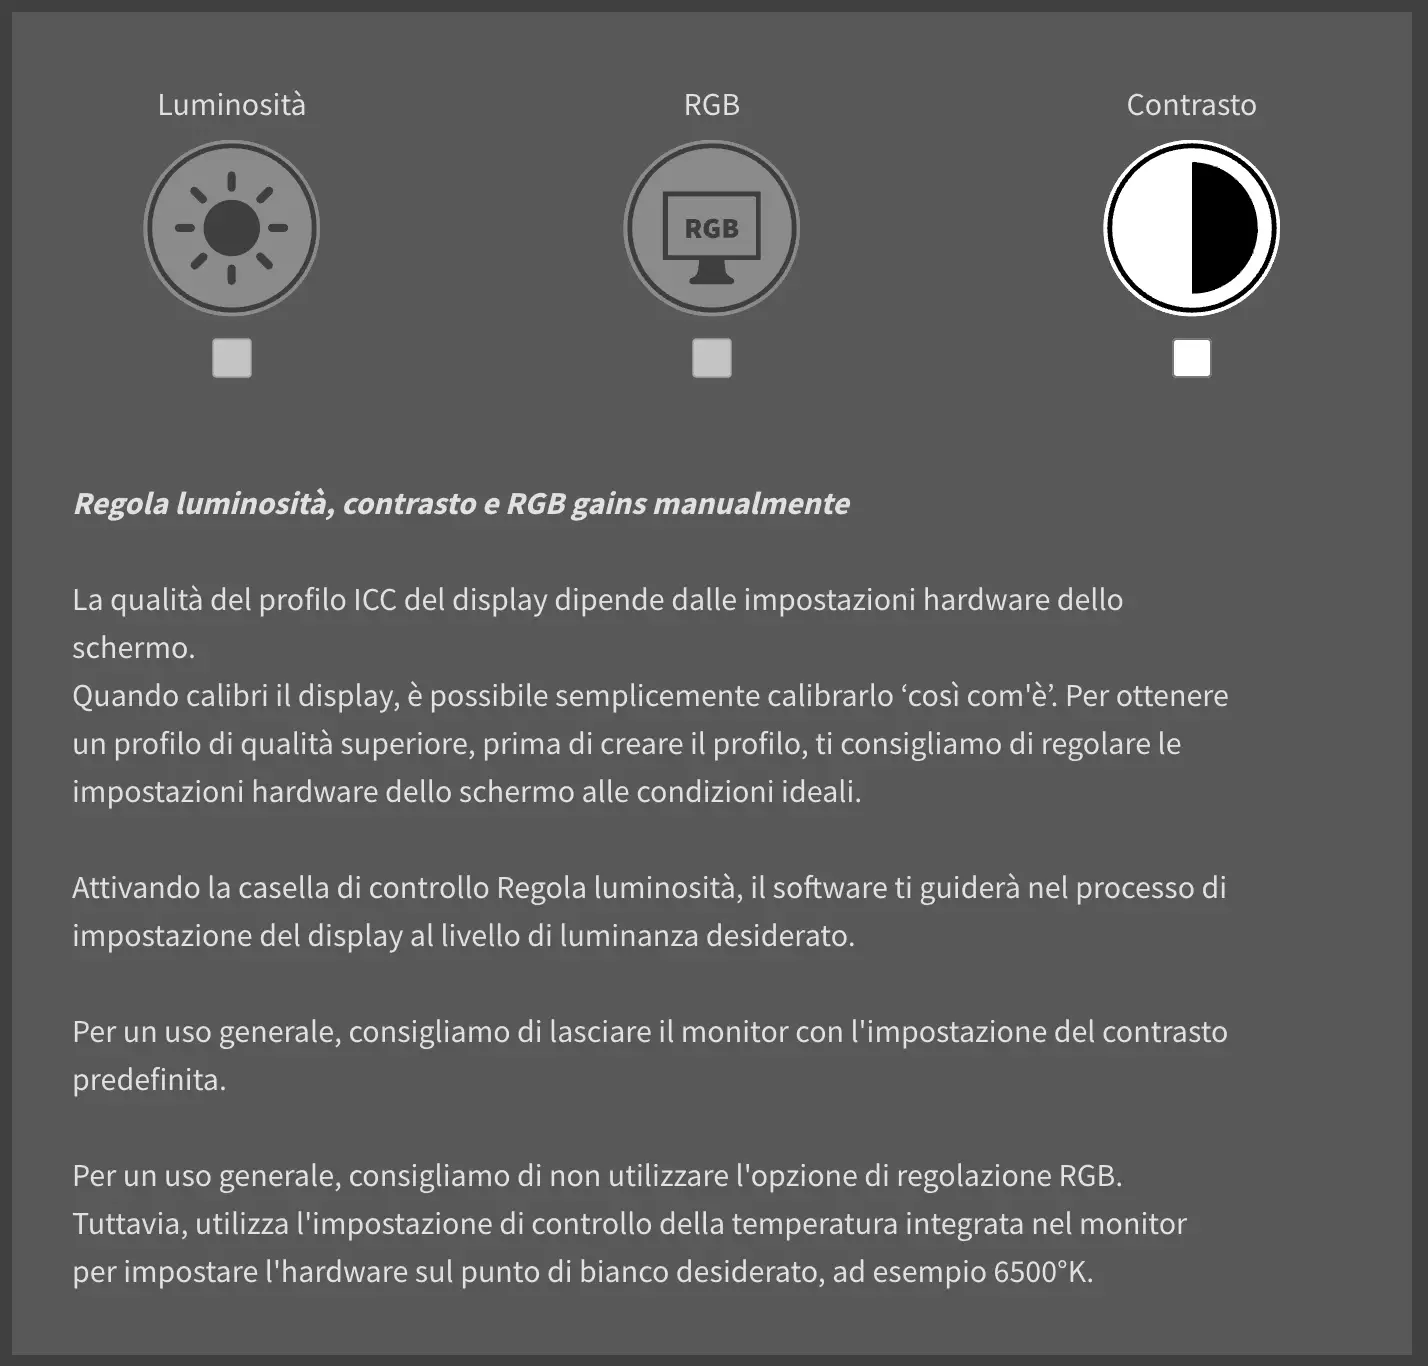
In Calibrite Profiler, customize the ICC profile settings. Since we already refined the white point during calibration, there’s no reason to change it again.
For White Point, choose Custom and set it to Native.
Do the same for Luminance: choose Custom and set it to Native.

Keep all other settings at their default values (including Gamma and contrast ratio), as they work well with the software defaults.
In advanced profile options, set: Ambient light auto-adjust OFF, Flare Correct OFF, Chromatic adaptation “Bradford”, ICC Version “v2”, Profile type “matrix-based”.

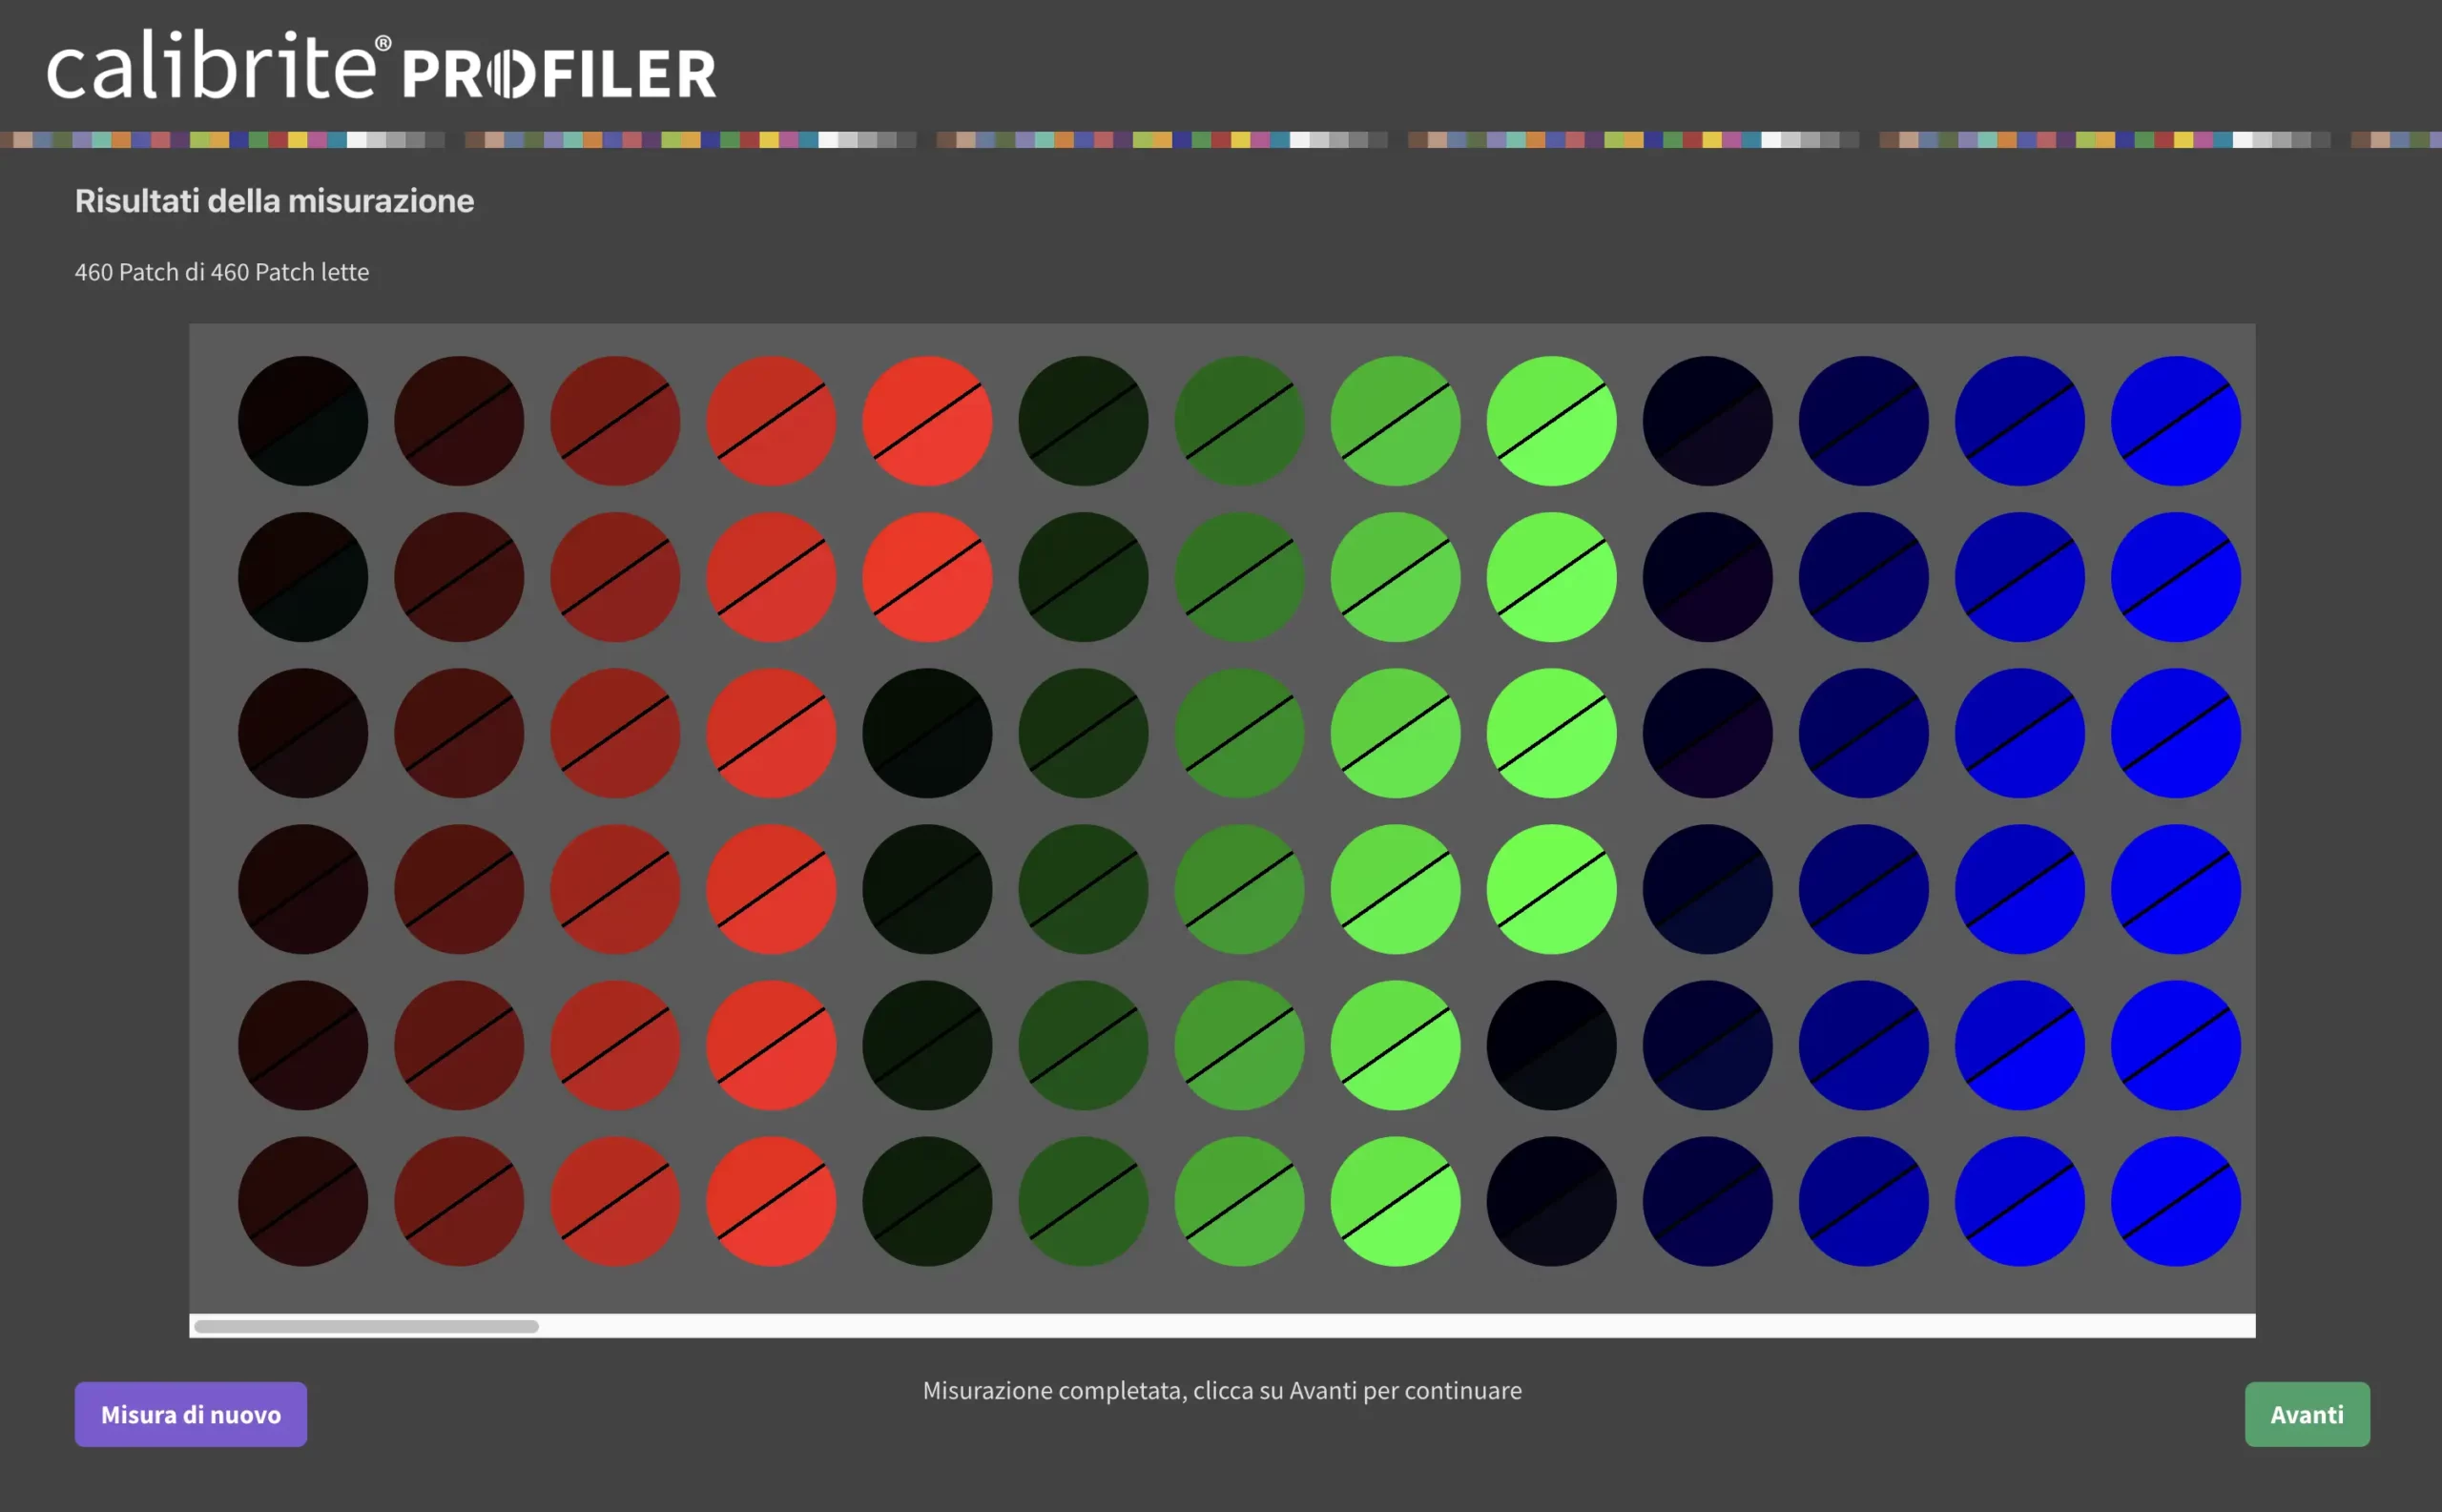
For Advanced patch set options, select the 461-patch set. It takes longer, but the final profile is more accurate.
Click Next and on the following screen uncheck all options, the software will handle the settings.
Start the measurement and position the probe as instructed. Let it finish without changing room lighting or touching the Mac.
When it’s done, the software creates the ICC profile. Name it (or use the calibration date) and save.
6. Profile validation & management
After profiling, you may notice a slight color shift. That’s normal and means the ICC profile is applied. The key step now is to validate the newly created profile, don’t close this screen.
In Calibrite Profiler, open Validation and start an ICC profile check. Use the industry reference Target 24 patches.
Re-position the probe in the center, click Next, and start the procedure. Make sure to click Start Measurement, otherwise it won’t run.
Once finished, click Next and review the results. In my test on a new Apple Mini-LED XDR MacBook Pro, I got:
- All patches – Average: 0.3
- Lowest 90% – Average: 0.2
- Highest 10% – Average: 0.7
- All patches – Max: 0.7
- Lowest 90% – Max: 0.6
- Std. deviation (all patches): 0.2
- Lowest 90%: 0.1
- Highest 10%: 0.0
These numbers indicate very uniform color with no significant deviations. Generally, DeltaE less than 1 is excellent, less than 2 is fully professional, and up to 3-3.5 is acceptable for many non-print workflows. With results like these, the MacBook Pro Mini-LED XDR display is accurately calibrated and profiled for ongoing professional work.
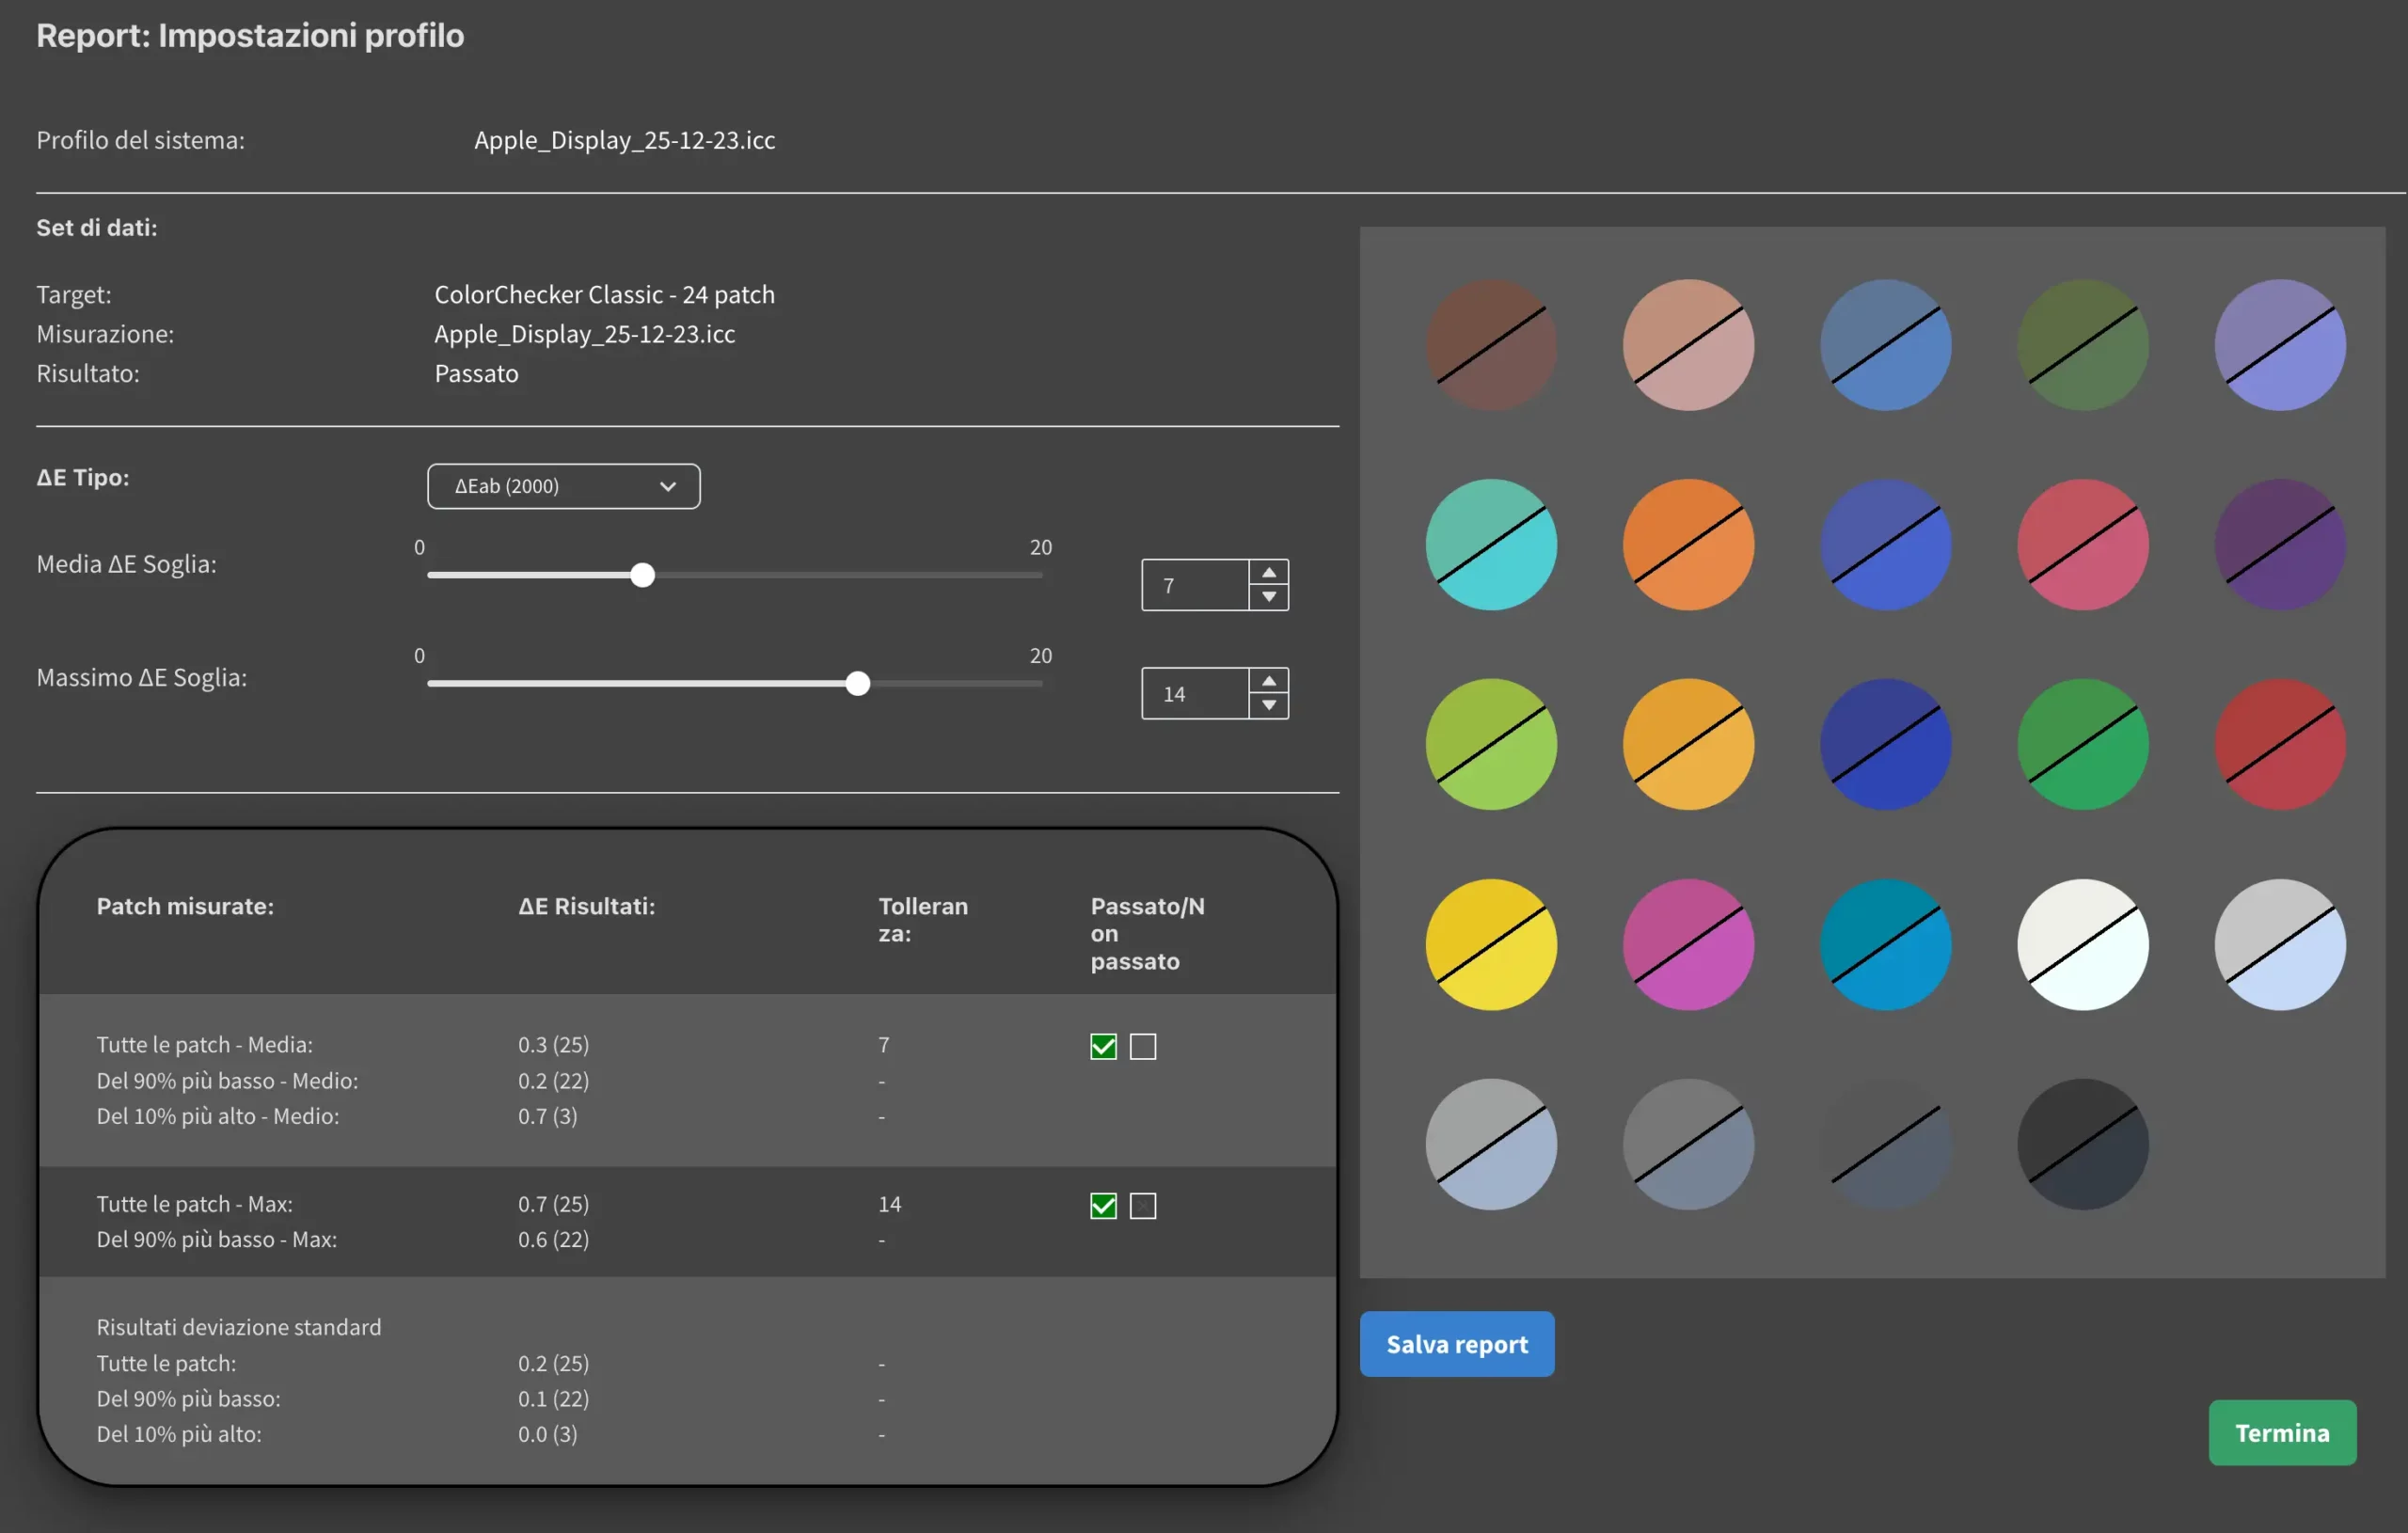
You can save the validation report for future comparisons. Finally, click Finish to close the procedure.
Conclusion on ICC calibration
By following this guide you’ll get accurate, consistent color on your MacBook Pro Mini-LED XDR. Display calibration and profiling are essential to view images correctly and keep a reliable workflow from web publishing to print.
The Liquid Retina XDR calibration process requires a slightly different approach than traditional monitors, but with these steps you can achieve high-accuracy calibration without stress. The time invested gives you full control over color and confidence in professional results.
7. Apple hardware calibration: the new method (macOS Tahoe 26.4+)
Software ICC calibration vs Apple hardware calibration: what is the difference
Until macOS Tahoe 26.3, the only way to calibrate an Apple display with a consumer colorimeter was to create a software ICC profile using Calibrite Profiler: the profile is applied by the GPU as a correction layer on top of the display. This method works well and is what the previous steps in this guide describe.
With macOS Tahoe 26.4, Apple introduced something fundamentally different: hardware calibration. Corrections are not applied on top of the display. They are written directly into the internal LUTs (Look-Up Tables) of the monitor hardware, adjusting the display at the source. This is the same type of calibration that until now required industrial spectroradiometers costing thousands of euros.
| Software ICC calibration | Apple hardware calibration | |
|---|---|---|
| Where it acts | Software layer on top of the display (GPU) | Internal hardware LUTs of the monitor |
| Requirements | Any macOS + Calibrite Profiler | macOS Tahoe 26.4+ + Apple Pro Display Calibrator |
| Portability | Profile tied to the Mac it was created on | Saved in the display firmware: follows the monitor to any compatible Mac |
| HDR | Does not cover HDR | SDR and HDR simultaneously, up to 2,000 nits |
| Reference Modes | Updates only the active profile | Full Calibration updates all Reference Modes simultaneously |
| Print and soft proofing | ICC profile needed for Lightroom, Photoshop, RIP | Does not generate an ICC profile for print |
| Time | About 1 hour | Up to 2 hours (30 min warm-up + measurement) |
| Color standard | CIE 1931 | CIE 1931 (MacBook Pro) — Apple CMF 2026 (Studio Display XDR only) |
Apple CMF 2026: what it is and which displays it affects
Apple CMF 2026 (Color Matching Function 2026) is Apple’s updated color matching framework, designed specifically for the emission characteristics of modern XDR displays. It is important to be precise about which hardware it applies to.
Apple CMF 2026 applies only to Studio Display XDR. According to Apple’s official documentation: “Studio Display XDR is calibrated to a new color matching function, Apple CMF 2026, designed to improve visual consistency across different displays.” MacBook Pro displays use CIE 1931 as their calibration standard, including when using Full Calibration via Apple Pro Display Calibrator.
Expected D65 white point values by standard (source: Apple):
| Color matching function | x target | y target |
|---|---|---|
| CIE 1931 (MacBook Pro) | 0.3127 | 0.3290 |
| Apple CMF 2026 (Studio Display XDR only) | 0.3144 | 0.3302 |
Full Calibration vs Fine-Tune Calibration: Apple’s two distinct processes
Apple’s Pro Display Calibrator offers two separate hardware calibration processes. Understanding the difference prevents running a 2-hour session when a faster procedure is sufficient.
| Full Calibration | Fine-Tune Calibration | |
|---|---|---|
| What it does | Completely replaces the display hardware calibration from scratch | Adjusts white point and luminance to match measured target values |
| Time required | Up to 2 hours including 30 min warm-up | Faster, quicker alternative to Full Calibration |
| When to use it | First-time setup, after major drift, after firmware updates | Routine maintenance, minor white point or luminance drift |
| Reference Modes updated | All Reference Modes simultaneously | MacBook Pro and Studio Display XDR: selected preset only. Pro Display XDR and Studio Display: all presets |
| After Full Calibration | Apple recommends running a separate Fine-Tune Calibration for each Reference Mode on MacBook Pro and Studio Display XDR to achieve optimal color accuracy per preset | |
Which Apple preset to choose for your workflow
Before running hardware calibration, you must select the preset that Apple Pro Display Calibrator will optimise. This is not cosmetic, it determines the color gamut, white point and transfer function written into the hardware LUTs. Choose based on your primary workflow.
| Preset | Color space | Best for |
|---|---|---|
| Photography (P3-D65) | Display P3, D65, gamma 2.2 | Photography, retouching, web publishing |
| Design and Print (P3-D50) | Display P3, D50, gamma 2.2 | Print preparation, soft proofing, prepress |
| HDTV Video | Rec. 709, D65, gamma 2.4 | SDR video editing, broadcast |
| HDR Video (P3-D65 ST 2084) | Display P3, D65, PQ (HDR10) | HDR color grading, HDR10 delivery |
| Digital Cinema (P3-DCI) | DCI-P3, D63 white, gamma 2.6 | Cinema production, DCI mastering |
| Internet (sRGB) | sRGB, D65, gamma 2.2 | Web design, UI, social media |
Supported displays and system requirements
Apple hardware calibration (Full Calibration) is available for:
- Apple Pro Display XDR
- Apple Studio Display XDR
- Apple Studio Display
- 14-inch MacBook Pro (2021 or later)
- 16-inch MacBook Pro (2021 or later)
Required instruments, Full Calibration supports the following spectroradiometers and colorimeters:
- Calibrite: Display Plus HL (consumer colorimeter)
- Photo Research: PR-740, PR-745, PR-788, PR-1050 (professional spectroradiometers)
- Colorimetry Research: CR-300, CR-250, CR-100
The process in 5 steps
The process uses Apple Pro Display Calibrator, the native tool built into macOS, together with the Calibrite Display Plus HL connected via USB. Make sure your Mac is connected to power before starting.
Step 1: Choose your preset
Go to System Settings → Displays. Click the display you want to recalibrate, click the Preset menu, select the preset for your workflow (Photography P3 D65, Design and Print, or Video), then click “Calibrate Display”.
Step 2: Select Full Calibration
In Apple Pro Display Calibrator, click “Full Calibration”, then click Next. Verify that the display and preset shown are correct before continuing.
Step 3: Check requirements
Make sure the room is dim or dark and the Calibrite Display Plus HL is connected before clicking “Next”. Full Calibration measures and completely replaces the current hardware calibration of the display.
Step 4: Confirm the device
macOS shows the detected measurement device: manufacturer, name (Calibrite Display Plus HL), firmware and serial number. Verify it is correct and click “Next”.
Step 5: Position, measure, done
Place the Calibrite Display Plus HL on the screen and follow the on-screen instructions. The display runs a stabilisation period, then colour patch measurement begins. The full process takes up to 2 hours. When complete, click Done. Note: during stabilisation the display may go black for a period — this is normal.
Hardware calibration vs ICC profile: which one to use
The two methods are not in competition. They serve different purposes and complement each other.
Use Apple hardware calibration if you work on a video or HDR workflow, if you use the same external display with multiple Macs, or if you want the highest reference-grade panel accuracy across all Reference Modes simultaneously.
Use ICC profiling with Calibrite Profiler (the method described in steps 1-6 of this guide) if you need an ICC profile for print and soft proofing in Lightroom, Photoshop or a print RIP. Apple hardware calibration does not generate an ICC profile. For print workflows, the ICC profile remains essential.
For the most complete professional workflow: run Apple Full Calibration first to establish the hardware baseline, then run Fine-Tune Calibration for each Reference Mode preset you use, then use Calibrite Profiler to build the ICC profile on top. The methods are fully complementary and each adds a distinct layer of precision.
If you have questions or want clarification on any step, contact me via the form below. I’ll be happy to help you get the best out of your Mini-LED XDR calibration workflow.
MacBook Pro Mini-LED XDR Calibration FAQ
Do you really need to calibrate the MacBook Pro Liquid Retina XDR?
Calibration vs ICC profiling: what’s the difference?
Why do you recommend 120 nits (and not 160/200)?
Is an “HL” colorimeter necessary for Mini-LED XDR?
How often should I recalibrate my MacBook Pro?
Can I use the same ICC profile on another MacBook Pro?
Do True Tone and Night Shift affect calibration?
What DeltaE should I consider “good” in validation?
Does Apple hardware calibration replace the ICC profile?
Which MacBook Pro models support Apple hardware calibration?
Is Calibrite Profiler still needed after hardware calibration?
How long does Apple hardware calibration take?
Does hardware calibration also work with Apple Studio Display and Pro Display XDR?
Is the calibration lost if I disconnect the display from the Mac?
Learn how to set up Photoshop color settings, ICC profiles and Camera Raw for a professional, consistent color workflow with your calibrated monitor, including soft proofing for print.
Read the full guide → Color management in Photoshop: ICC profiles and correct workflow
A calibrated monitor makes a real difference when correcting the color casts introduced by ND filters in long exposure photography, from ND64 and ND1000 to GND and CPL stacking in the field.
Read the full guide → Long exposure photography: complete guide to ND filters and seascape
Once your display is calibrated, choosing the right color profile for Photoshop, Lightroom and web export is the next critical step for a consistent, accurate result.
Read the full guide → sRGB vs Adobe RGB vs ProPhoto RGB: complete guide
The difference between RAW and JPEG becomes immediately visible on a calibrated monitor: RAW gives you the full latitude to correct exposure, white balance and color casts with precision.
Read the full guide → RAW vs JPEG: which format to use? Complete guide with examples
WebP delivers smaller file sizes with no visible quality loss when you export from Lightroom, ideal for maintaining color accuracy from a calibrated display to the web.
Read the full guide → Lightroom Classic WebP export: free plugin guide