Long Exposure Photography
Complete Guide: ND Filters, GND, Seascape and Field Techniques
ND filters, circular polarizer CPL, camera settings and field techniques.
Seascape locations in Liguria, Cinque Terre, Golfo dei Poeti and Portovenere
with original photographs.
Among the photographs that convinced me to keep shooting long exposures, there is one I will never forget. Vernazza, March, sunset.
ND64, 3-stop medium GND and circular polarizer, 180 seconds of exposure. That photograph ended up on the National Geographic channels.
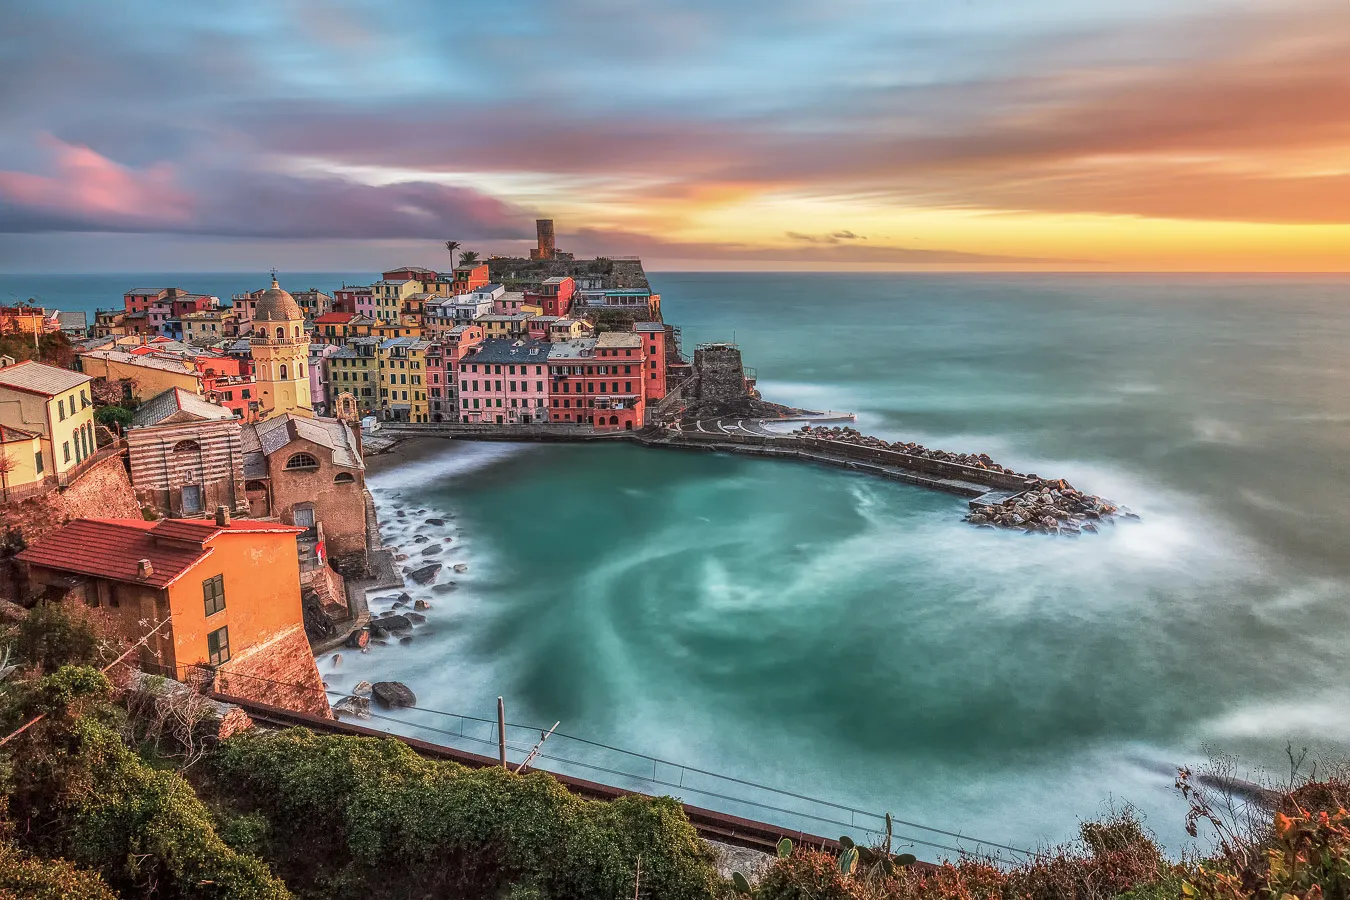
Vernazza, Cinque Terre, long exposure seascape © Marco De Maio
A year of continuous attempts to get the shot I had in mind. After dozens of location scouting sessions, I knew exactly how I wanted to photograph Vernazza: the movement of the sea, the clouds lit by the setting sun, the warm light on the village. I returned to that spot almost obsessively, searching for the conditions I had imagined. So many times I came back empty-handed: sea too flat, overcast sky, clouds in the wrong position. Then, that March evening, everything aligned.
When I read the email from the National Geographic editor, I could not believe it. I thought it was a joke.
Long exposure photography, and landscape photography in general, is also this. It is not the most complicated technique in the world, but it requires preparation, patience and the willingness to return. Even when the first five attempts fail.
In this guide you will find what I have learned over years of seascape photography between the Cinque Terre and the Golfo dei Poeti: what you really need (and what you do not), how to calculate exposure times with ND filters, how to work with the circular polarizer, where to photograph in Liguria, and the mistakes I made at the beginning, so you can start with an advantage.

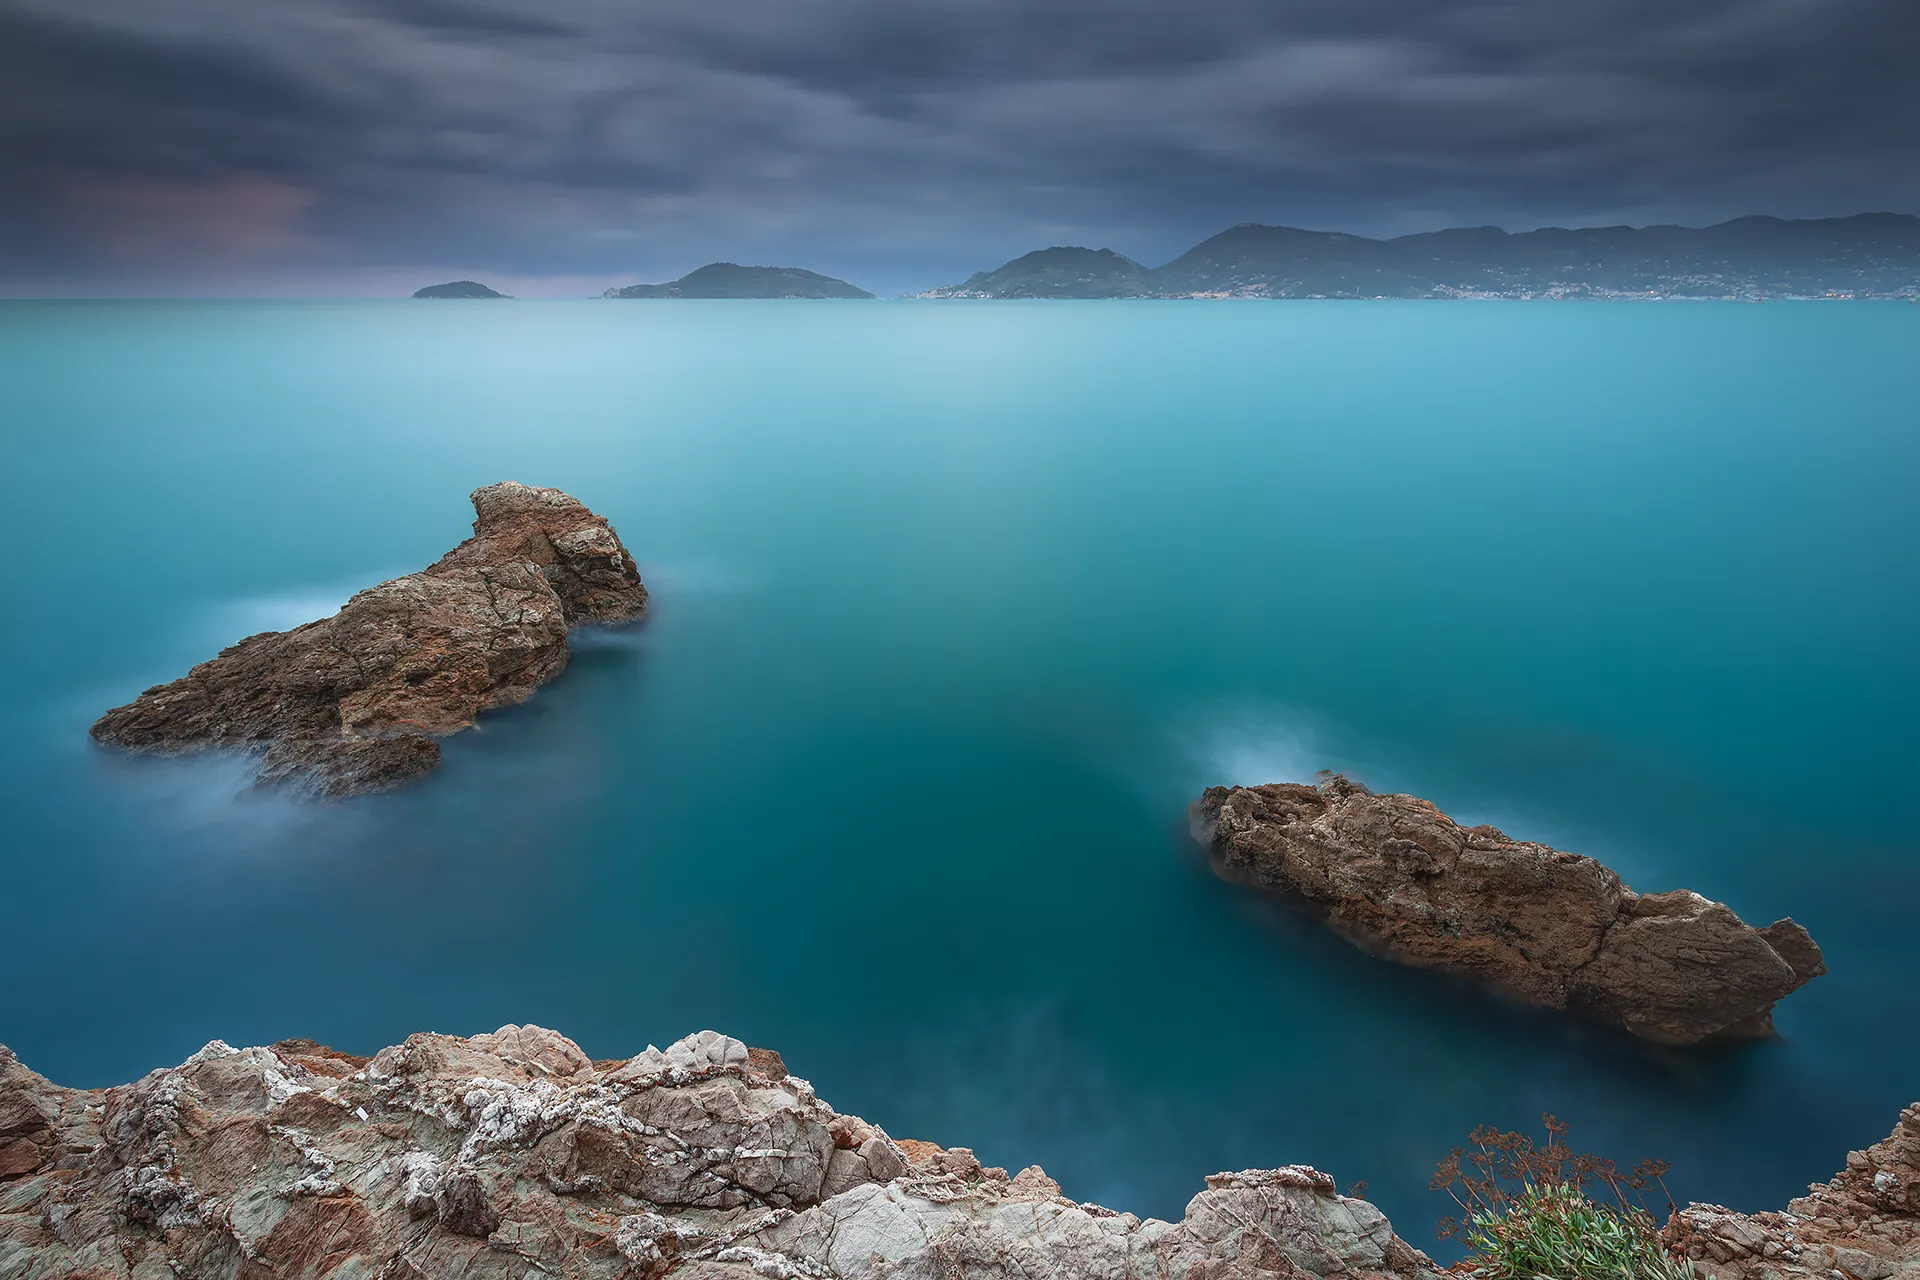
Faraglioni Le Due Sorelle, Torre dell’Orso, Puglia, long exposure seascape at sunset © Marco De Maio
1. What is long exposure photography
Long exposure is a technique that uses slow shutter speeds, from fractions of a second to several minutes, to record motion. The sensor accumulates light over an extended period of time, and what the eye perceives as instantaneous (a wave, moving clouds, cars in the city) becomes visible as a trace.
The result is what we call controlled motion blur: the sea turns to silk, waterfalls soften, clouds leave streaks across the sky, cars at night become lines of light. This is not a post-processing trick, it is simply a technical and artistic choice: leaving the camera sensor exposed to light longer than normal.
When do we talk about long exposure? There is no officially agreed threshold, it depends on the context and the subject. In practice, we talk about long exposure when the shutter speed is long enough to record motion in the scene: from a few seconds up to several minutes. ND filters make these exposure times easily achievable even in full daylight.
Long exposure applies practically everywhere: seascape and coastal photography, waterfalls, urban nightscapes, architecture, astrophotography. But the field where it produces the most powerful results, from direct experience, is coastal photography. That is why this guide focuses mainly on seascape examples: it is the context where I have worked the most, and where the technique truly makes the difference between a good photograph and a memorable one.
Historical note: did you know that photography was born through long exposure? In 1826, Niépce needed 8 hours to produce the first heliograph. In 1839, Daguerre’s daguerreotype brought that threshold down to 15 minutes. What we achieve today in 180 seconds on the rocks of Vernazza, the pioneers of photography accomplished over an entire day.
Guide Contents
- What is long exposure photography
- Gear: what you actually need
- ND, GND and CPL filters, how to choose and use them
- Camera settings
- Field technique, step by step
- Use cases: seascape, waterfalls, nightscapes
- Locations: Cinque Terre and Golfo dei Poeti
- Common mistakes, the ones I made
- Before setting up the tripod on the rocks
- RAW post-processing
- FAQ, frequently asked questions

Fiascherino, Golfo dei Poeti, Liguria © Marco De Maio
2. Gear: what you actually need
The good news: you do not need expensive gear. The less good news: you need the right gear, and above all stable gear. I have seen more sessions ruined by a shaky tripod than by an entry-level camera.
Essential
Tripod
The only truly essential accessory. It does not need to be the most expensive, but it must support the weight of camera, lens and filters against wind and uneven surfaces. In the field in Liguria I use an aluminium tripod, not the lightest, not the newest, but it has been with me for years. On the wet rocks of Vernazza, stability matters more than weight in the bag. I have watched ultra-light carbon tripods fall into the sea from instability.
Essential
ND and GND Filters
ND filters (Neutral Density): reduce light entering the lens uniformly, allowing you to extend shutter speeds even in full daylight. They are the core tool for achieving the silky water effect.
GND filters (Graduated ND): essential for managing contrast between a bright sky and a darker foreground. Darkened only in the upper half, they allow you to balance a bright sky without underexposing the foreground.
Recommended
Remote Shutter Release
A remote shutter release or cable release eliminates vibration from pressing the shutter button. Alternatively, the built-in 2-second or 10-second self-timer works well. You can also use the official camera app if available for your model.
Essential (for me)
Circular Polarizer CPL
The circular polarizing filter (CPL) eliminates reflections on water and saturates the sky. It adds 1-2 stops of exposure, I use it in almost every seascape session. Its effect on water rendering is definitive and, unlike many other corrections, cannot be replicated in post-processing.
What you do NOT need, despite what you read online: UV filters on digital cameras, the original optical function has been superseded by modern sensors. I do not use them. The photograph published by National Geographic was shot on a Canon 5D Mark II, now considered a dinosaur. Gear matters less than you think. What matters is knowing it well and using it effectively.
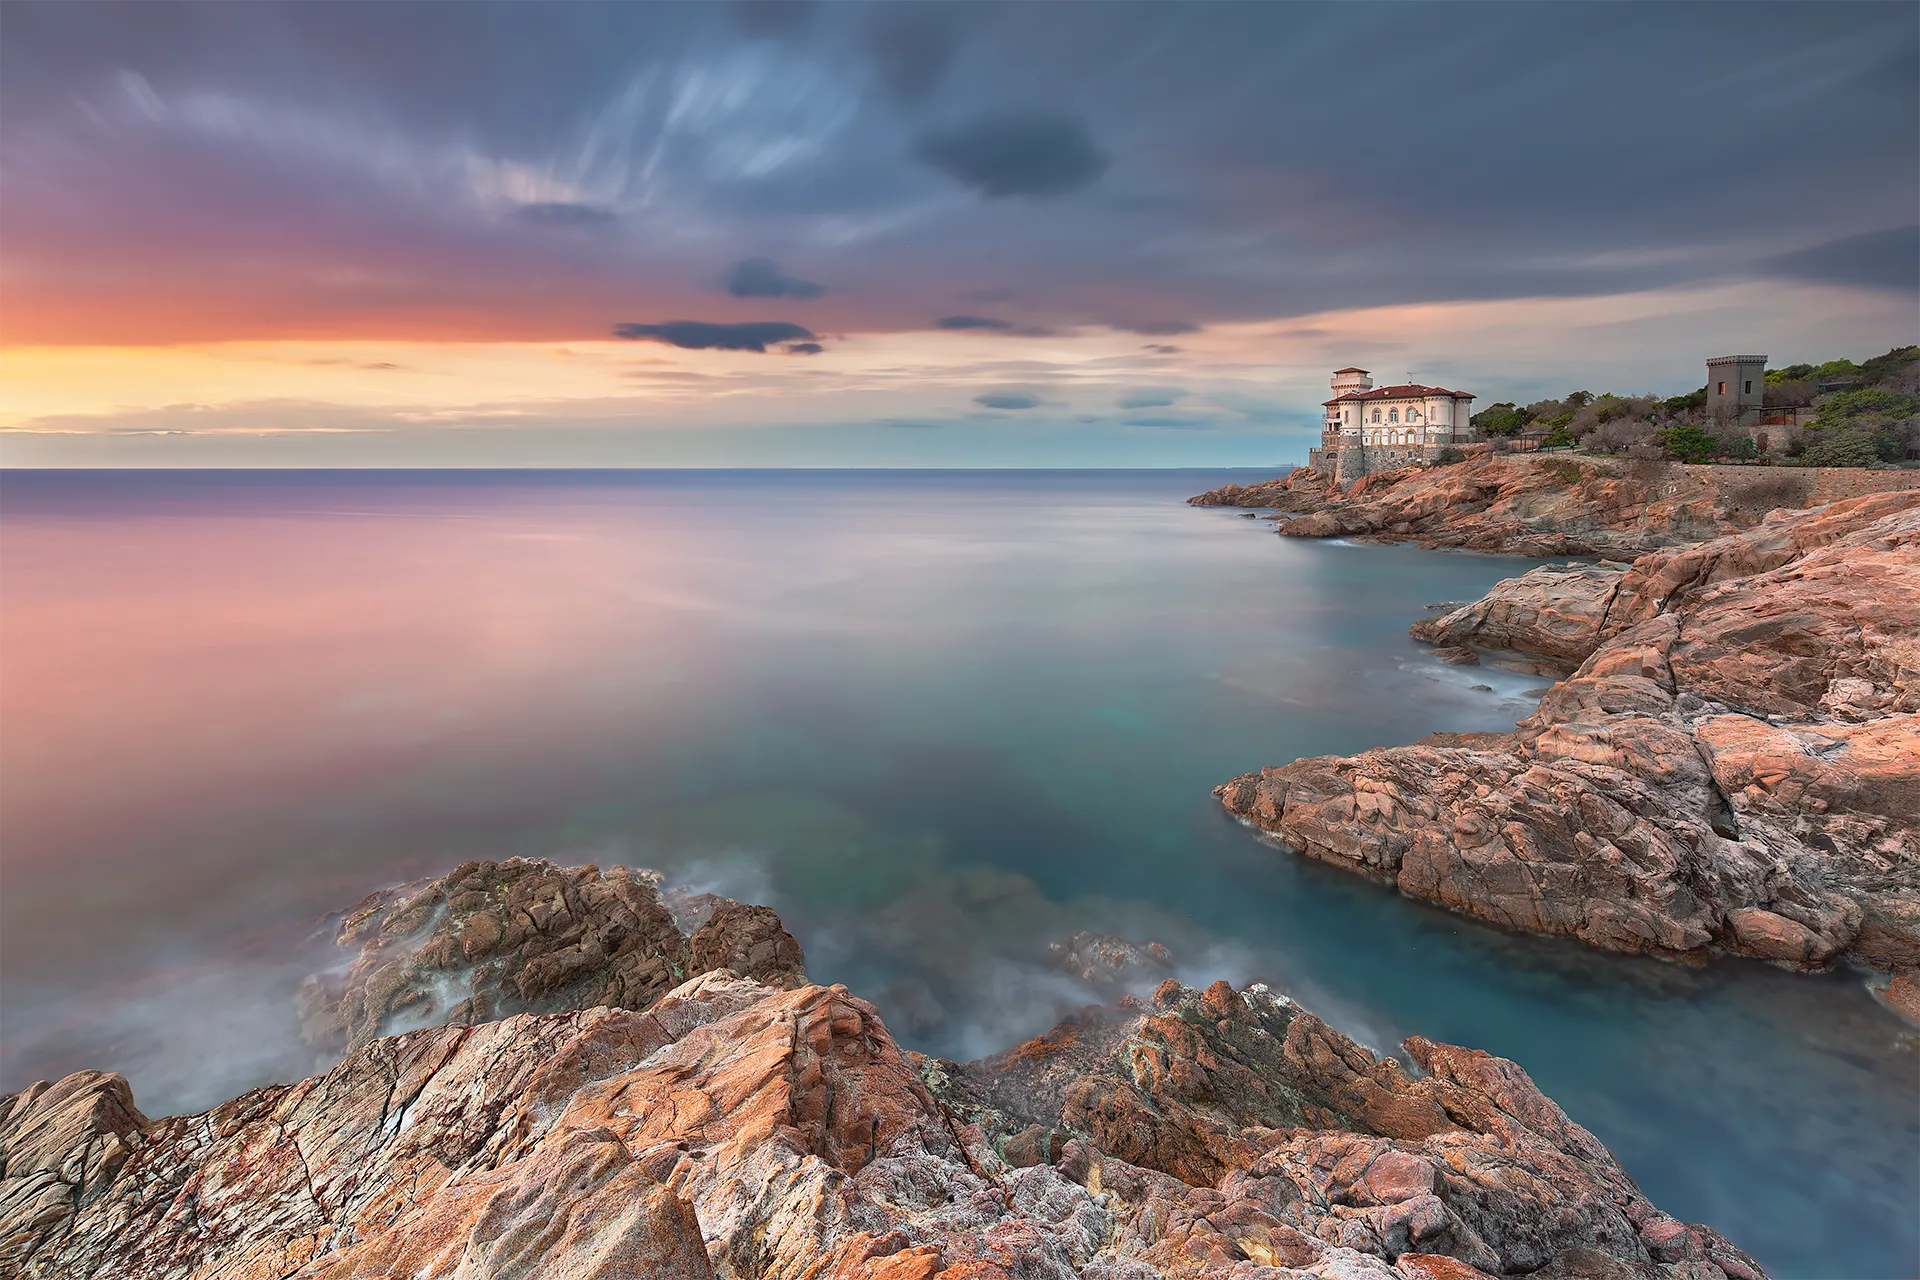
Castello del Boccale, Calafuria, Livorno, long exposure seascape at sunset © Marco De Maio
3. ND, GND and CPL Filters, how to choose and use them
ND filters are measured in stops. Each stop halves the light and doubles the exposure time. An ND64 (6 stops) multiplies the exposure time by 64: if your correct exposure is 1/60s, with an ND64 it becomes approximately 1 second. With an ND1000 (10 stops) you can reach exposures in the range of minutes in full daylight.
Essential ND filters for seascape photography
| Filter | Stops | Factor | Typical use |
|---|---|---|---|
| ND8 | 3 stops | ×8 | Waterfalls in shade, overcast conditions |
| ND64 | 6 stops | ×64 | Seascape — ideal for sunrise and sunset |
| ND1000 | 10 stops | ×1000 | Full silky water effect, full daylight |
| ND64 + ND8 | 9 stops | ×512 | Stacking — maximum flexibility in the field |
In the field I use the ND8 and ND64, combining them in stacking when I need more stops. You do not need ten different filters: these two cover the vast majority of situations. I use the ND64 most often because of its versatility: at sunrise and sunset, combined with the CPL and GND, it allows me to easily reach 2-minute exposures in Bulb mode, my preferred range for long exposure seascape work. The ND1000 comes into play when I want the full silky water effect in bright light or with slow-moving clouds: its use depends on the scene and the weather conditions.
Calculate your exposure time automatically
I developed a free calculator that handles single ND filters, stacking of two filters and CPL compensation in one step. Enter your base exposure time and the filter, and the final time is instant.
GND filters: what they are and when to use them
The GND (Graduated Neutral Density) filter is different from a standard ND filter: it does not reduce light uniformly across the entire frame, but has a graduated transition from dark to clear. It is used to balance the contrast between a bright sky and a darker foreground, without underexposing either. The reason is technical: the camera sensor, however advanced, still cannot match the human eye’s ability to handle high-contrast scenes. In a scene with a bright sky and a shaded foreground, the sensor must choose: expose for the sky and blow out the foreground, or expose for the foreground and blow out the sky. The GND filter intervenes before the shot, reducing sky luminosity and bringing the two values closer together, allowing the sensor to capture detail in both areas without blending multiple exposures in post-processing.
In the field I use three variants, each with a specific context:
Soft GND 2 stops, very gentle transition. I use this when the horizon is not clean: rocks, headlands or elements that break the skyline. It also works well outside seascape, in mountain or hilly landscapes.
Medium GND 3 stops, intermediate transition, the most versatile. Perfect when there are elements breaking the horizon but the light is sufficiently defined. This is the GND filter I use most often in mixed contexts, seascape and beyond. The Vernazza photograph published by National Geographic was taken with ND64 + Medium GND 3 stops + circular polarizer.
Hard GND 3 stops, sharp transition. I use this primarily in seascape when the horizon line is clean, sky on one side, sea on the other, with nothing in between to obstruct. Maximum control over balance, no ambiguity in the transition zone.
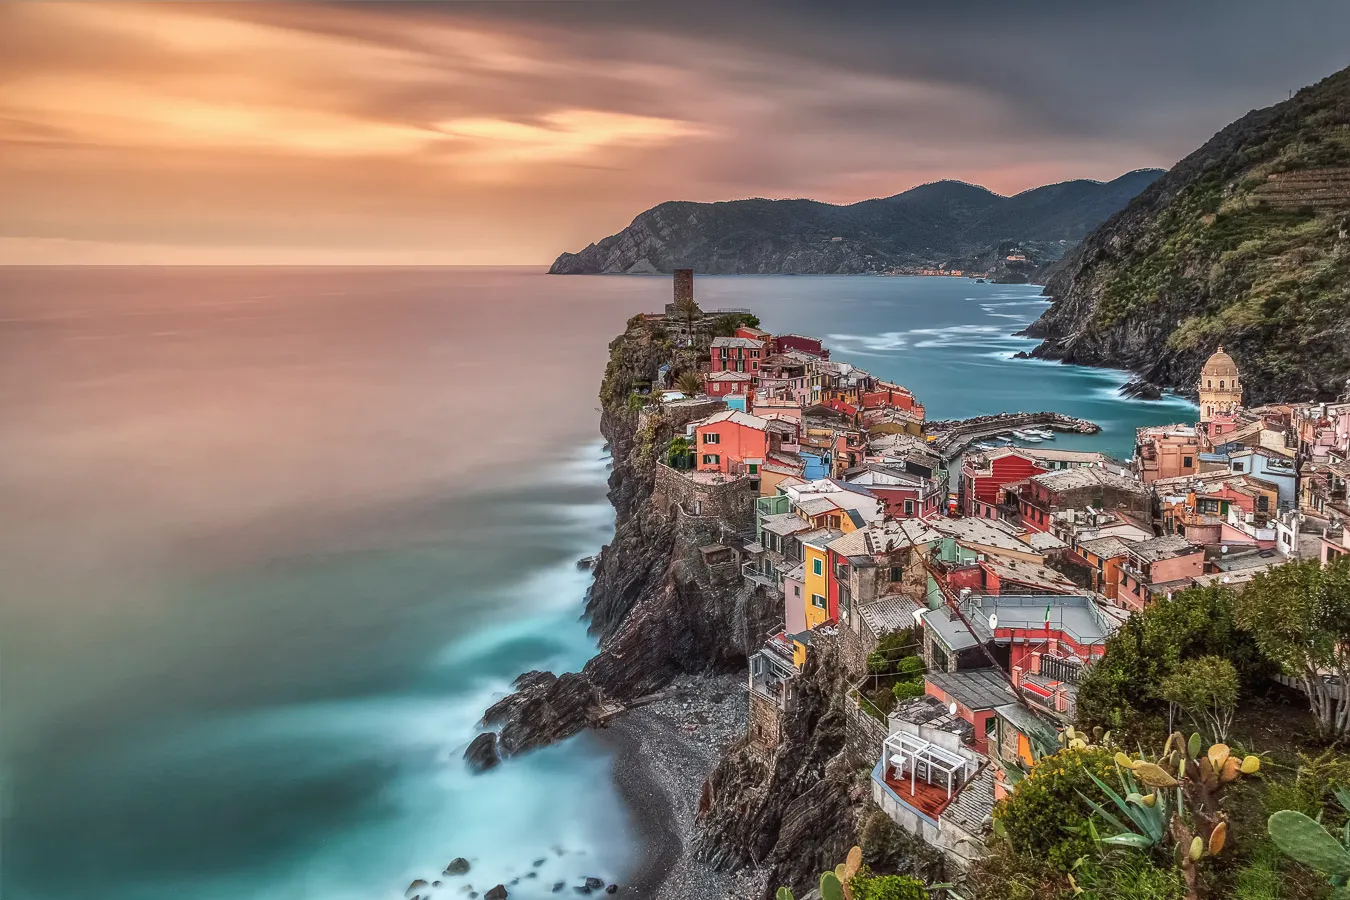
Vernazza, Cinque Terre, long exposure seascape at sunset © Marco De Maio
Circular Polarizer CPL: the filter I almost never remove
The circular polarizer is the filter I never remove in seascape. What it allows you to achieve on the water cannot be replicated by any other means, not in post-processing, not with any other filter.
The circular polarizing filter (CPL) eliminates reflections from non-metallic surfaces, water, wet rocks, leaves. On the sea this means something precise: it reveals the seabed near the shore, saturates the water, and shows the colors of submerged rocks that without a CPL you would never see. This is not an effect you can replicate in Lightroom. It is physical, you either capture it in camera or it does not exist.
What it does concretely in seascape photography:
- Eliminates reflections on the water surface
- Reveals rocks and the seabed near the shoreline
- Saturates the sky, blue becomes deeper and clouds gain contrast
- Removes atmospheric haze on the horizon
- Adds 1-2 stops of exposure, useful for extending shutter speeds
How to use it: the circular polarizer threads onto the main 82mm adapter ring, which in turn threads onto the lens via the correct step-up ring for your filter thread diameter. The filter holder attaches to this ring, behind the polarizer. Once the slot-in filters are mounted, the CPL is rotated via the dedicated wheel on the holder, without removing anything. You see the effect directly in live view as you rotate: find the point where reflections disappear or where the sky saturates best, then stop there.
The optimal position depends on the sun angle: it works best with the sun to the side, at approximately 90° relative to your shooting direction. With the sun directly in front of or behind you, the effect is significantly reduced. Do not push polarization to maximum in every situation, excessive polarization produces unnatural skies and uneven saturation. Experiment according to the scene you are photographing.
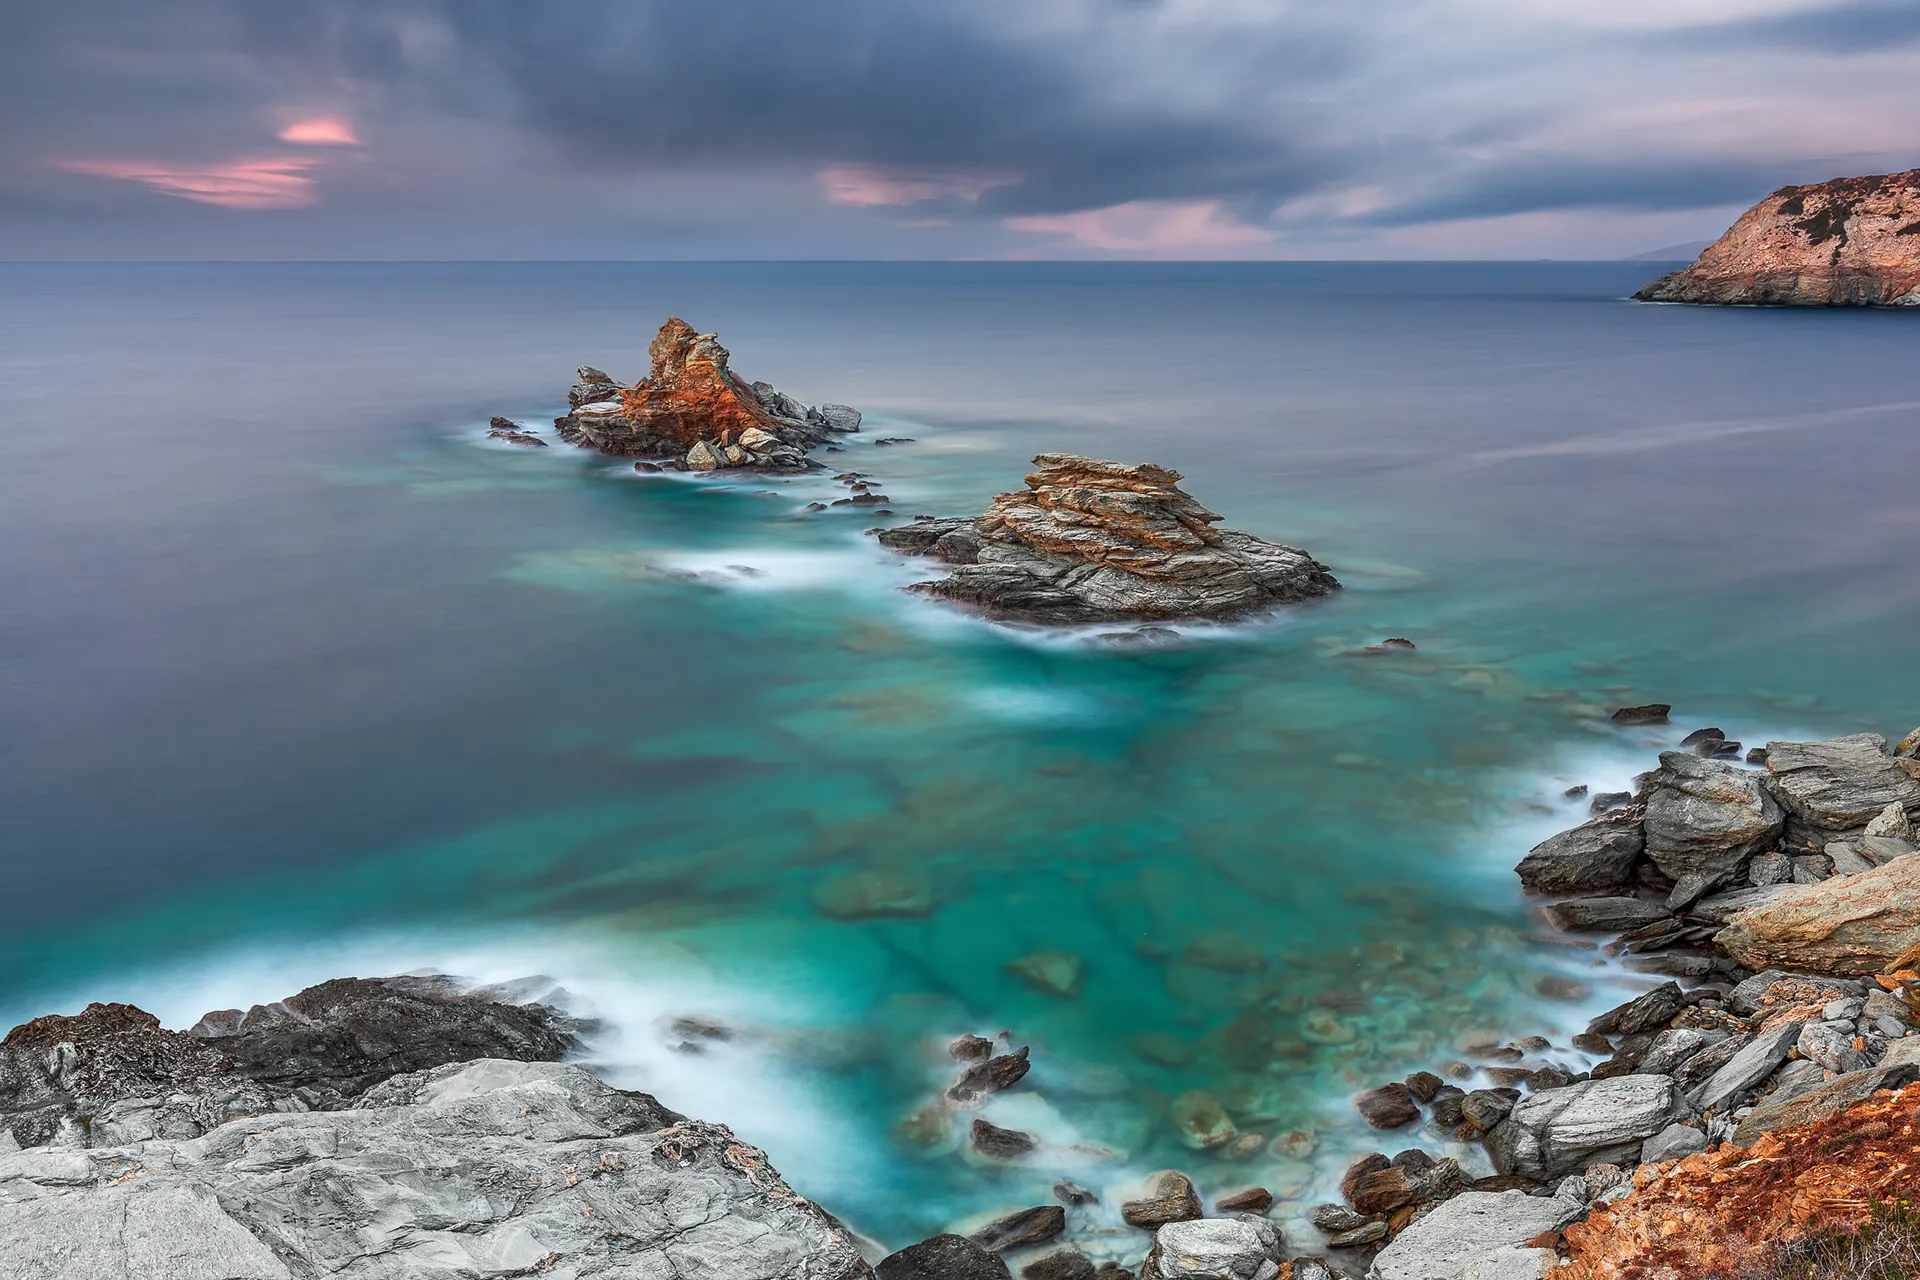
Agia Pelagia, Crete, Greece, long exposure seascape © Marco De Maio
CPL + GND + ND: my base seascape setup is CPL + GND already mounted before the test shot. This way my base exposure time already accounts for their combined stops. When I add the ND filter, I only enter its stops into the calculator.
Filter quality: the wrong filter ruins the right shot
A poor-quality filter introduces color casts, almost always magenta or green, that complicate your post-processing significantly. Invest in optical glass with anti-IR coating. Avoid resin filters for long exposures: they shift color in unpredictable ways and each shot requires different corrections. In the past I used resin ND filters that performed well at 30 seconds and introduced a monstrous green cast at 120 seconds. It is not worth saving money there.
For daytime long exposure, the most common scenario for seascape and waterfall photography, filter quality is the single factor that makes the difference between a file you can recover in Lightroom and one you throw away.

Tellaro, Golfo dei Poeti, La Spezia © Marco De Maio
If long exposure photography is your thing
Follow me on Instagram. I share the work behind the guide:
seascape and coastal light.
Photography · no ads, no spam
4. Camera settings for long exposure photography
The camera settings for long exposure are straightforward once you understand the reasoning behind them. These are my starting-point settings for every session, they work on any camera body.
Mode
Manual (M)
Full control. For exposures beyond 30s use Bulb mode and set the time via the camera menu, remote shutter release, or the official camera app.
ISO
ISO 100
Always the native minimum. Minimises thermal noise, a critical factor in long exposures.
Aperture
f/8 to f/11
The optimal sharpness range. Avoid f/16-f/22: diffraction kicks in and you lose micro-detail. The diffraction limit varies by sensor: on high-resolution cameras f/8 is often the practical maximum. Check the diffraction limit for your camera →
File format
RAW
Non-negotiable. JPEG compresses dynamic range data and lacks the correction latitude needed for ND filter color casts.
Stabilisation
OFF
On a tripod, image stabilisation searches for movement where there is none, and introduces it. Always disable it on a tripod.
Focus
MF after AF
Focus with autofocus, then switch to manual to lock. The camera must not hunt during the exposure.
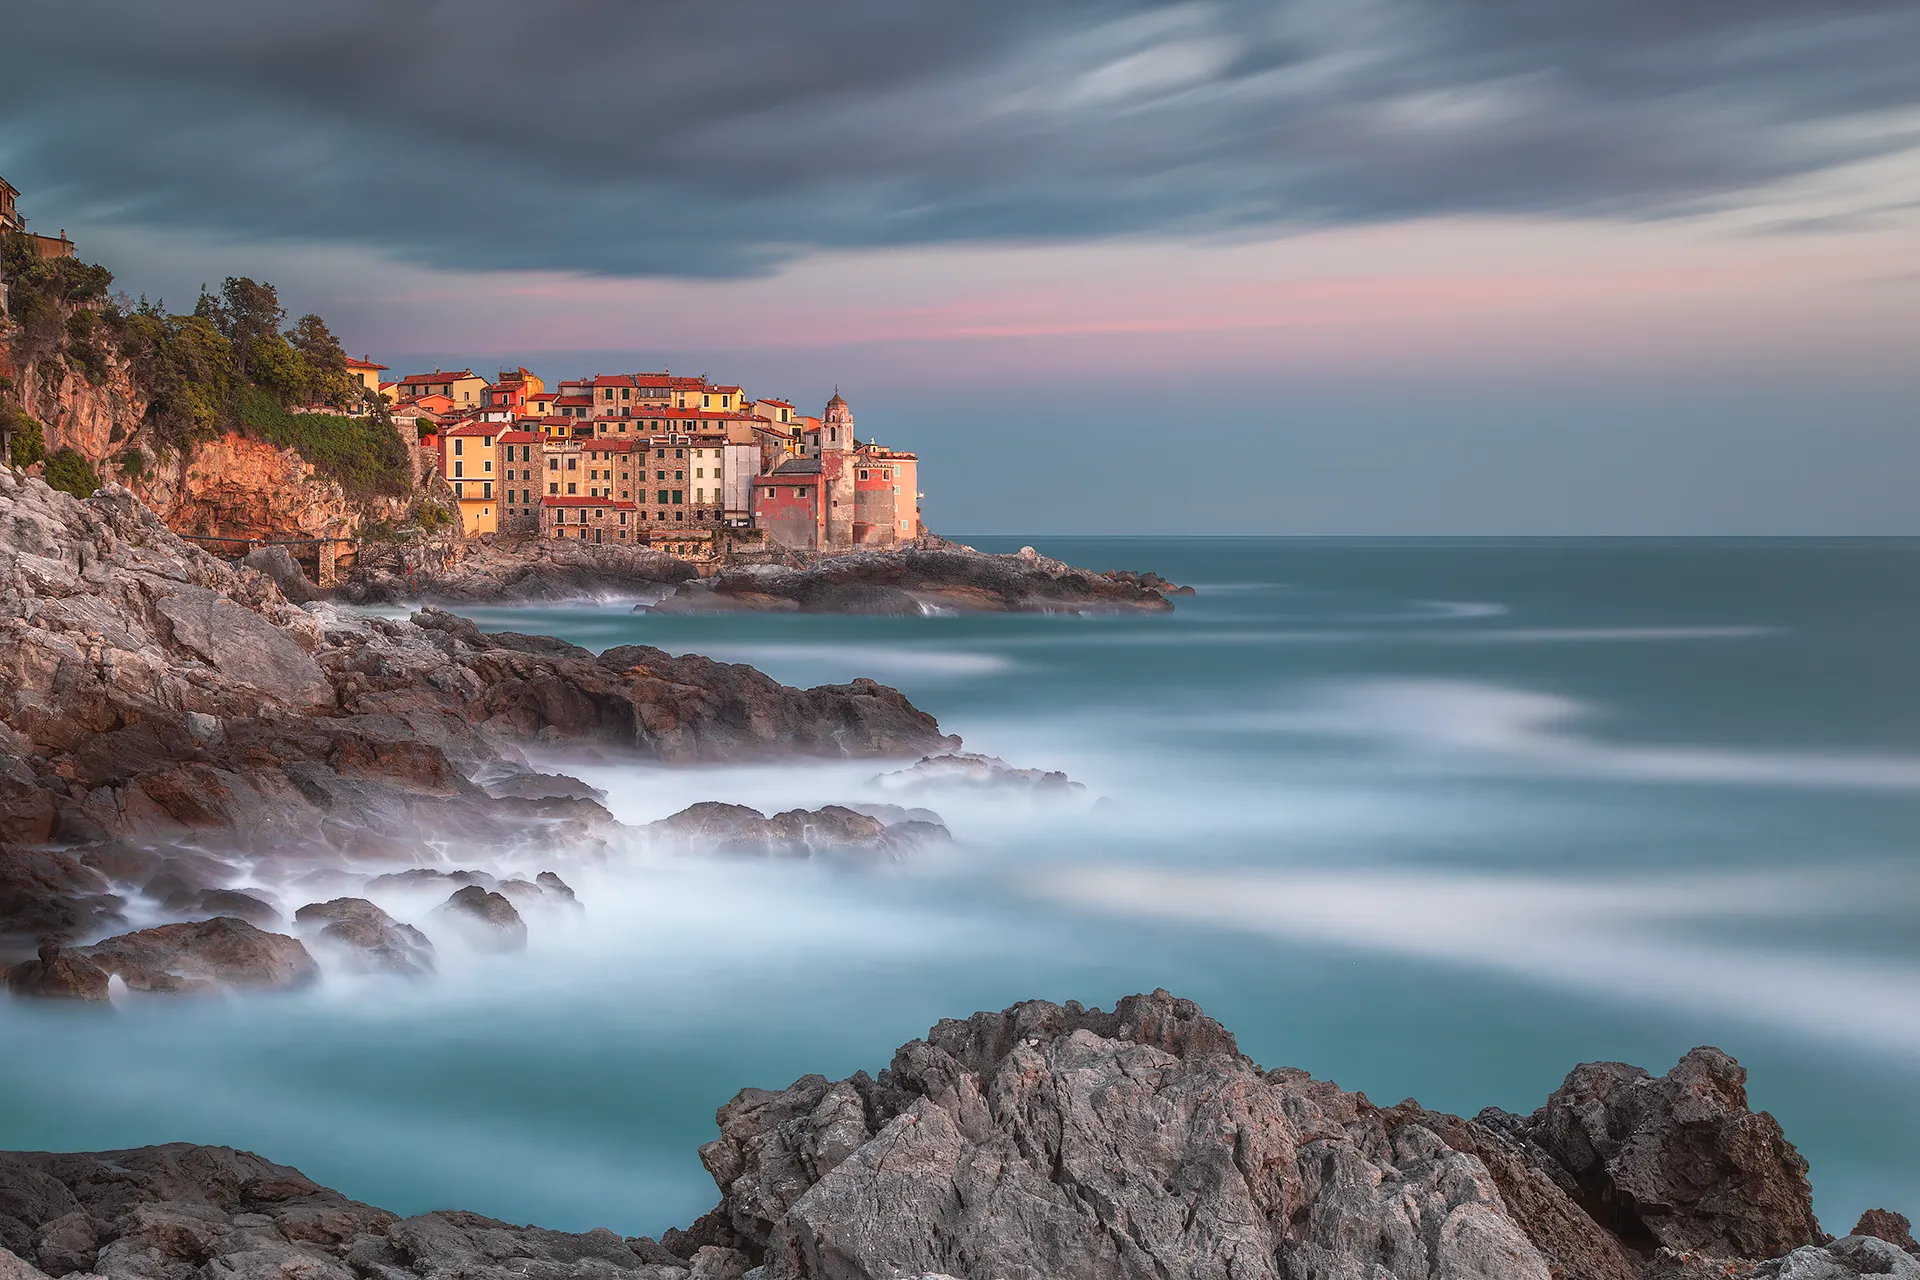
Tellaro, Golfo dei Poeti, La Spezia, long exposure seascape at sunset © Marco De Maio
5. Field technique step by step
This is the sequence I follow in every seascape session. I refined it over the years by skipping steps that seemed unnecessary, and then going back to include them after losing shots by leaving them out. Every step exists for a specific reason.
Arrive early, one hour, not half an hour
You do not arrive at a location at shooting time. You arrive early, make it a mantra. You need at least 30-45 minutes, ideally an hour or more if you do not know the spot well, to choose your composition, read the light, assess the sea state, and identify what to include and what to avoid. At Tellaro I lost shots because I set up the tripod in a hurry, too low, without checking the tide, ten minutes later my shoes were full of water and the shots were rubbish. Arriving early also means something less technical: it gives you time to be in the place, breathe it in, enjoy the beauty of the location before you even take out the camera.
Set up the camera without filters
ISO 100, f/8-f/11, Manual or Av mode. Find the base exposure time, the one that gives correct exposure without ND filters. This is the value you will enter into the calculator. Always take a test shot without filters: it lets you check the composition on a readable preview, before the ND filter makes everything difficult to see.
Focus BEFORE fitting the filter, use Live View
With an ND1000 in place the camera is nearly blind: autofocus struggles or fails completely. Focus with AF on the main subject or the area of the scene you want sharpest, then switch to MF to lock. Only then fit the filter. Enable Focus Peaking if available, it helps verify focus in live view. This is the mistake that causes the most damage: wrong focus in a 90-second exposure means a wasted shot.
For landscape with a distant horizon, the optimal strategy is to focus at the hyperfocal distance: everything from half that distance to infinity will be sharp, with no focus stacking required. The value changes with every combination of focal length, aperture and sensor. Calculate the hyperfocal distance for your camera and lens →
Calculate the final exposure time
I mount the CPL and GND during the test shot, so the base time I measure already accounts for their combined stops. In the ND calculator I only enter the stops for the ND filter I am adding. For seascape my typical setup is GND + CPL already mounted, then I add the ND64: if the base time is 2s, the final exposure is approximately 2 minutes.
Shoot without touching the camera
Even a micro-vibration is visible in a 60-second exposure. To trigger the shot I use the built-in self-timer, set to 10 seconds is best, especially with less stable tripods. Alternatively use a remote shutter release or the official camera app.
For long exposures I always work in Bulb mode: I set the correct shutter time from the camera menu, start the self-timer and do not touch anything else. No button to hold, no risk of micro-vibration.
Check the histogram, not the preview
The LCD preview lies. The only objective reference is the histogram: a mathematical graph showing the pixel distribution by luminosity across the scene, independent of the ambient light around you.
What to look for: a curve distributed without peaks clipped at either edge. If the curve touches the right edge, highlights are blown, information that is unrecoverable even in RAW. If it touches the left edge, shadows are clipped. If it is shifted, correct the time and reshoot.
Note: the in-camera histogram is generated from a JPEG preview, not from the raw file. If you use highly contrasty Picture Style profiles, the histogram may look more critical than the actual file. Keep a neutral picture style in-camera for a more reliable reading.
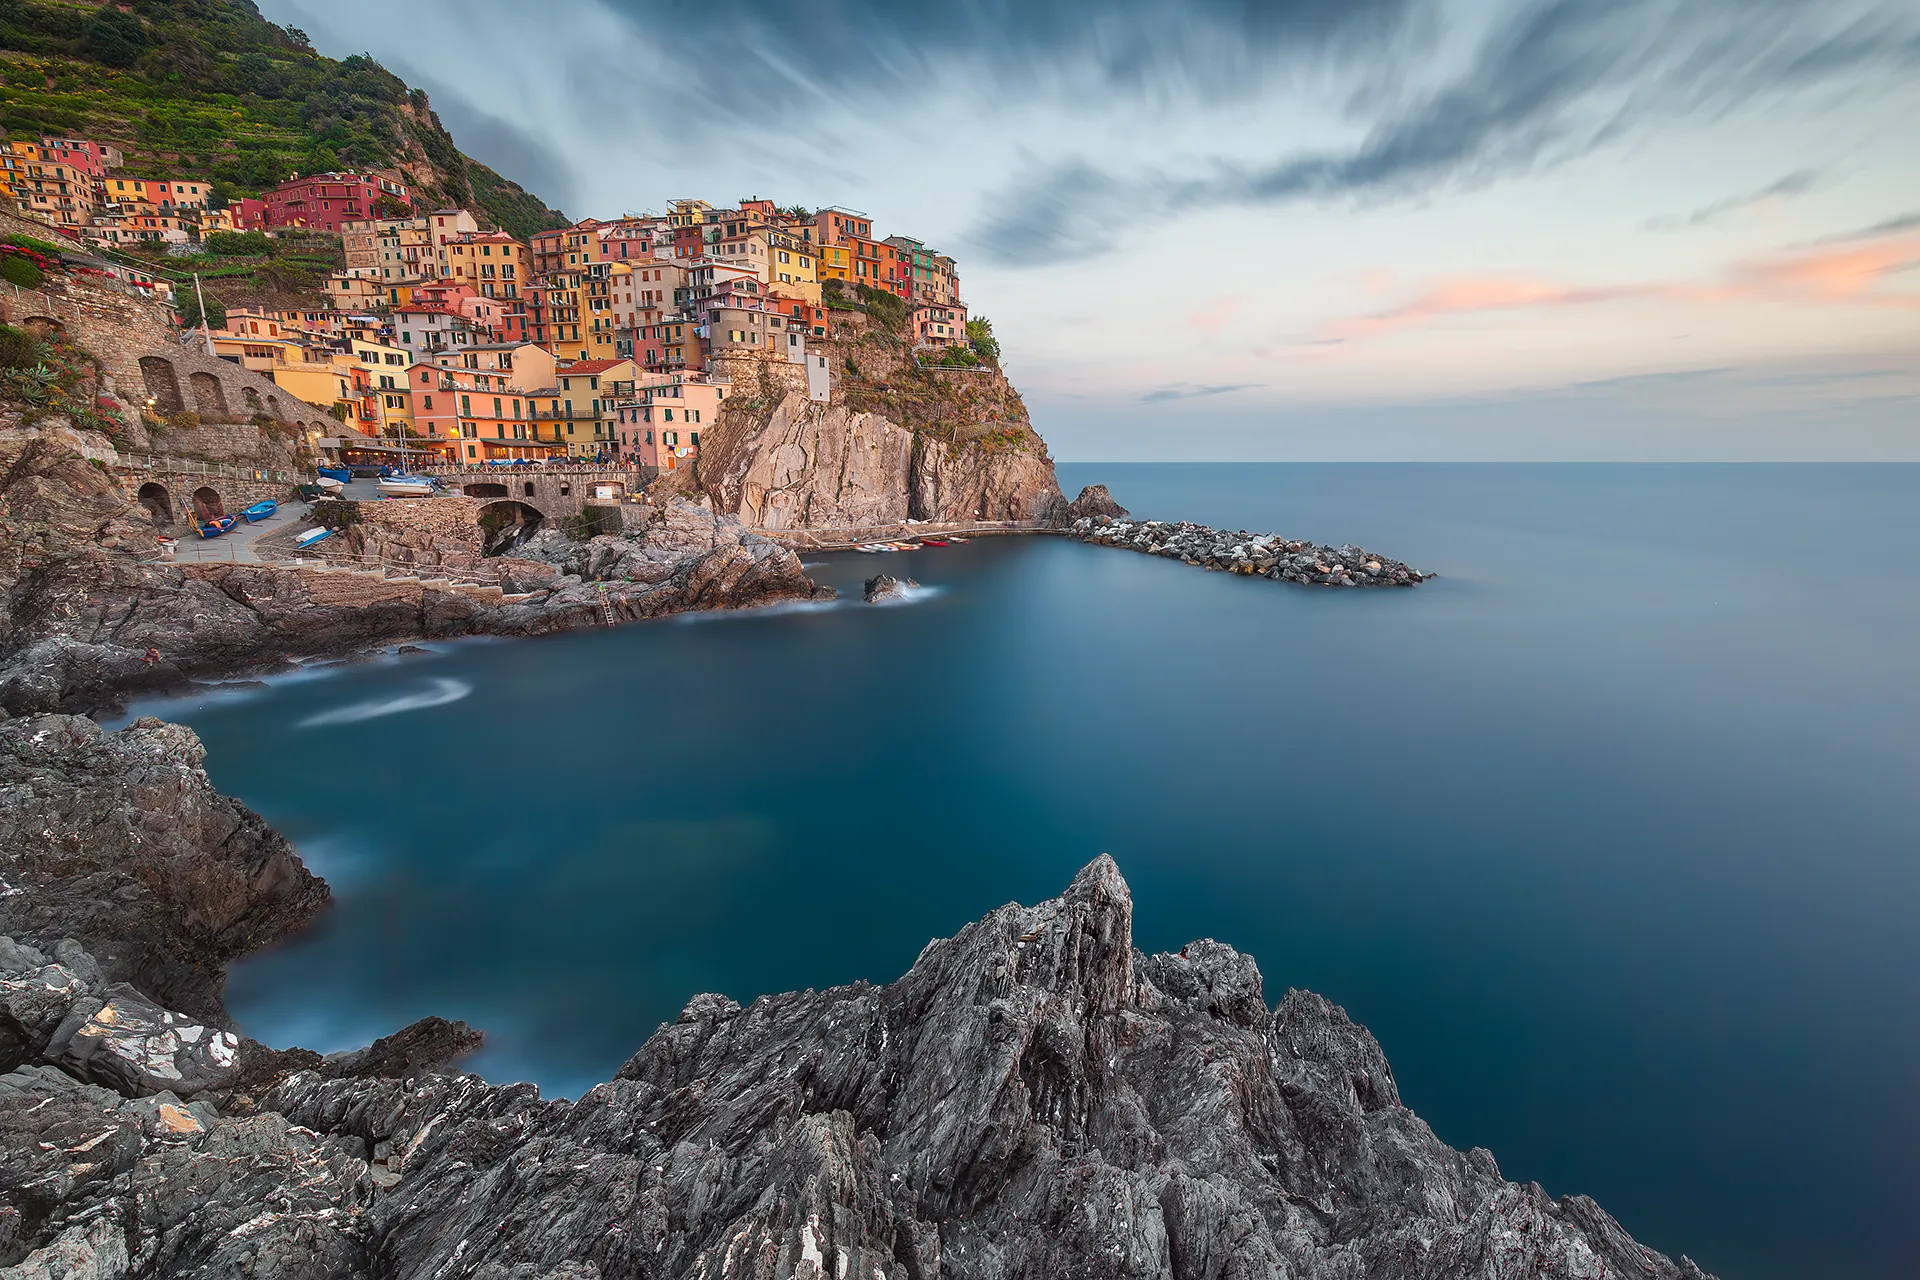
Manarola, Cinque Terre, long exposure seascape © Marco De Maio
6. Use cases: seascape, waterfalls, nightscapes
Seascape and long exposure sea photography
This is the scenario I love most, and the one where long exposure seascape photography delivers its most powerful results, at least for me. Moving water transforms into silk or mist depending on the exposure time, and the warm light of sunrise or sunset adds colours that no post-processing can invent. Shooting the sea with long exposure does require attention though: waves crashing over the filter, rising tides, wind. These are variables you cannot control, you can only be prepared to manage them.
Recommended filter setup for seascape: ND64 (6 stops) as the base choice, at sunrise and sunset, combined with GND and CPL, it gets me to my preferred shutter speeds. ND1000 (10 stops) when I want the full silky water effect with plenty of light remaining, or slow-moving clouds, or to manage midday light. I almost always use the CPL, it removes reflections from the water surface, saturates the colours, and on the sea it also makes the seabed visible.
Typical seascape exposure times: 1-15 seconds if you want to keep visible wave motion. 60-120 seconds for the full silky water effect. Over 2 minutes for particular scenes, this is the range of the photograph awarded an HM at the ND Awards 2016 and the photograph published by the Japanese edition of National Geographic.
Waterfalls
For waterfall long exposure photography you need much shorter shutter speeds than seascape, the water is already moving fast. With 0.5-4 seconds you get a natural, fluid effect that retains detail. Longer times give a veil effect. Go beyond 10 seconds only if the waterfall is very large and you want a painterly result.
Recommended filters for waterfalls: ND8 or ND16 in shade or diffused light, ND64 in full sun. Watch out for spray: near medium to large waterfalls, gear gets wet faster than you expect. Always have a microfibre cloth and lens tissues to hand.
Urban nightscapes and light trails
Light trails, the streaks of light left by moving vehicles during a long exposure in the city, are achieved with shutter speeds of 10-30 seconds. At night, ND filters are generally not needed: low ambient light already allows long shutter speeds naturally, though there are specific situations where using them makes sense. The goal is to capture the path of the lights during the exposure, not the vehicle itself.
Watch out for urban colour casts: city lights have widely different colour temperatures, cold LED, warm sodium, green neon. Auto white balance gets confused in mixed lighting. Shoot RAW and correct in post. Do not waste time trying to find the right preset in-camera.
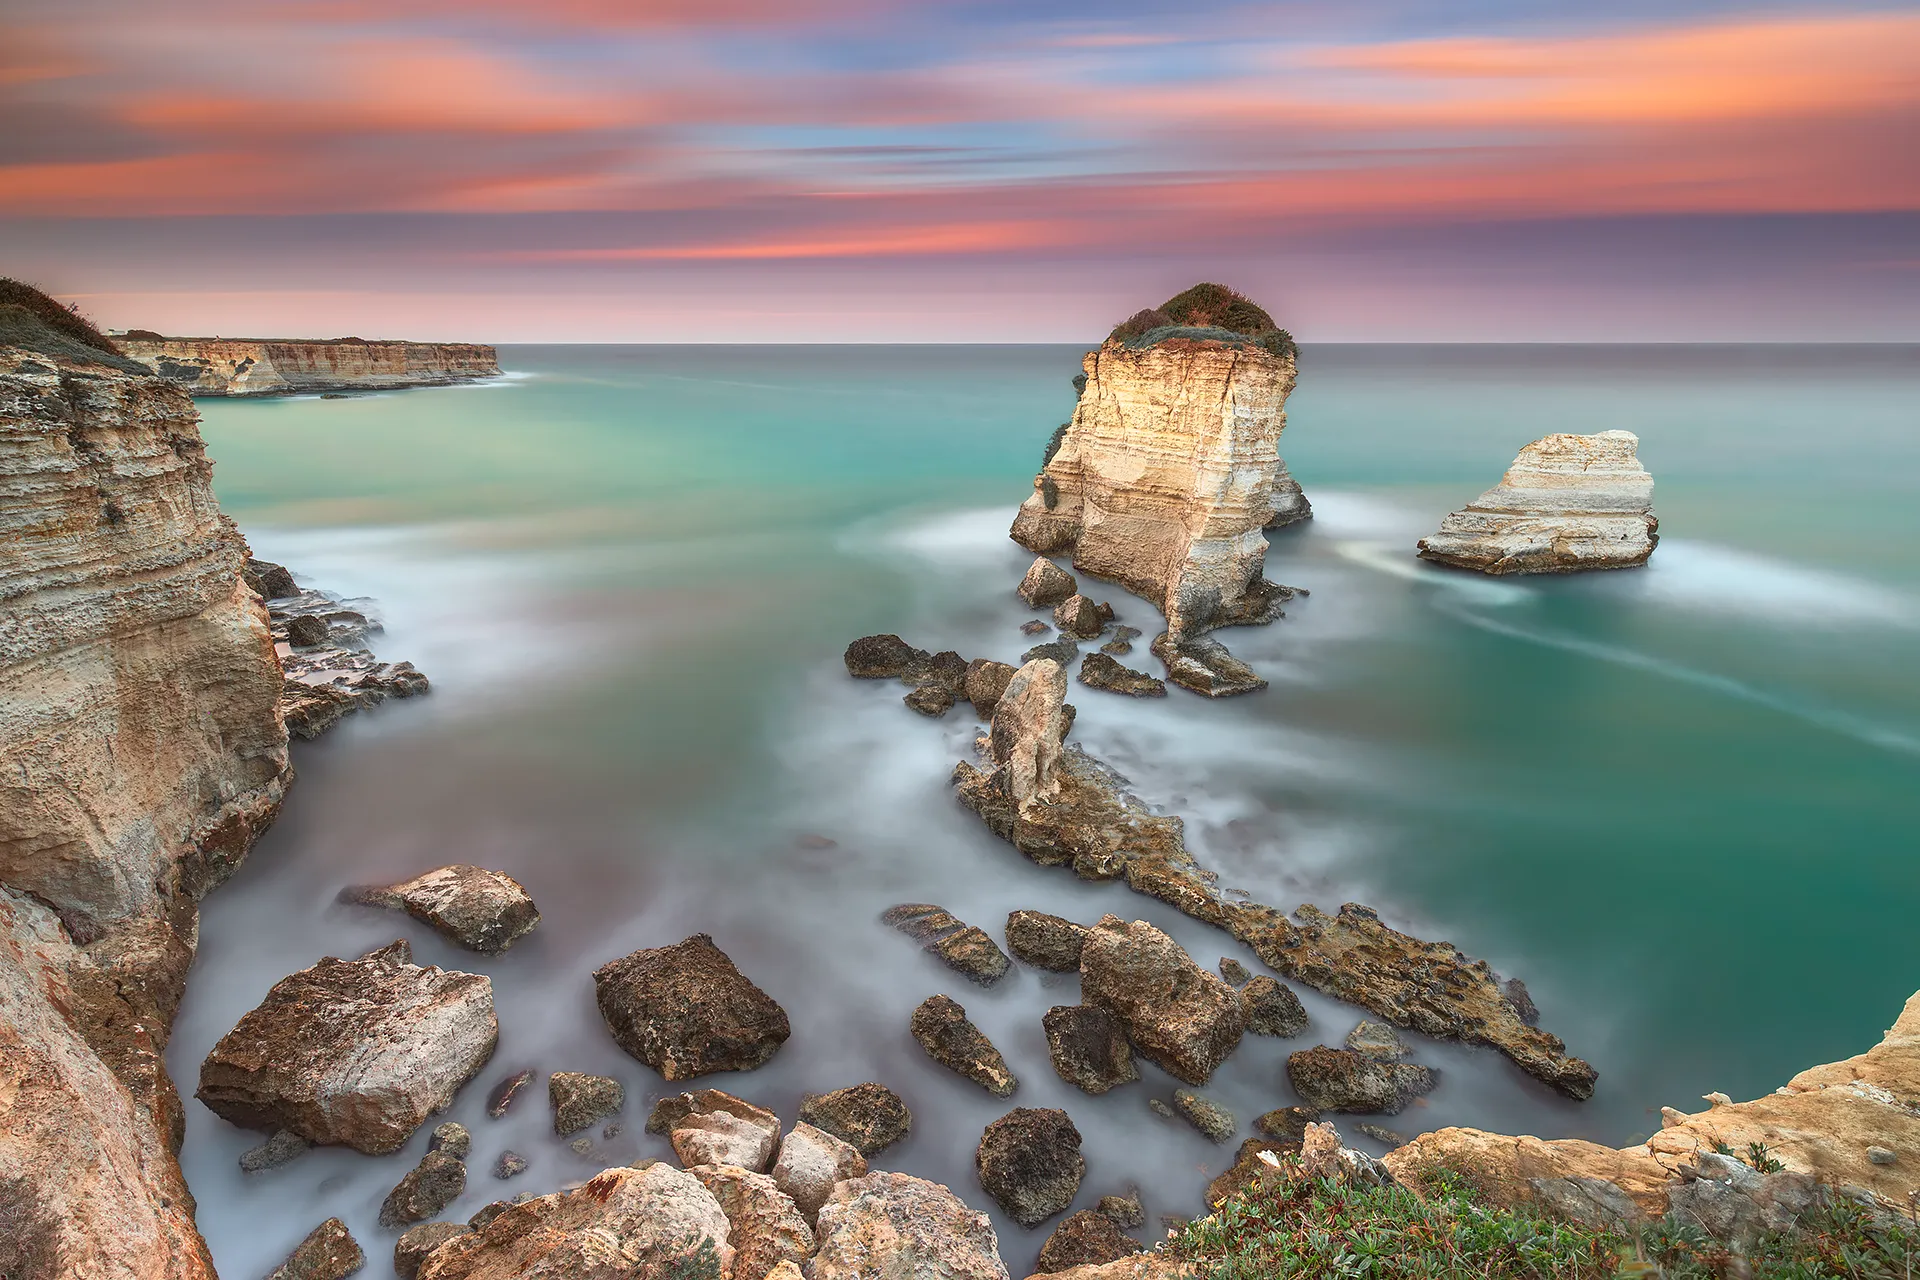
Scogli di S’Andrea, Puglia coast, long exposure seascape at sunset © Marco De Maio
7. Locations: Cinque Terre and Golfo dei Poeti
These are the places I have photographed the most. Eastern Liguria, Cinque Terre, Golfo dei Poeti, Lerici, Tellaro, Portovenere, offers everything you look for in seascape: rocky coastlines, colourful villages on the water, warm Mediterranean light, constant wave motion. And locations close enough to each other to shoot multiple spots in a single day.
Vernazza
The most iconic village of the Cinque Terre. Sunset light is ideal between October and April when the sun drops low and raking across the water. Caution: the rocks at the lowest, front-facing spot are extremely slippery, always check the tide. The photograph published by National Geographic was taken from a higher vantage point further along the path, 180 seconds of exposure at sunset in March. Want to explore the village before you go? 360° virtual tour of Vernazza.
Manarola
The pastel-coloured houses cascading down the cliff are the most recognisable skyline in the Cinque Terre. The classic spot is Punta Bonfiglio, reached via a short path from the harbour, offering a frontal view of the village with rocks and sea in the foreground. I prefer the lower spot, reached by descending the stairs through a small gate. Excellent for both sunset and sunrise: warm light hits the coloured facades directly. If you want to get a feel for the village before arriving, I have made a 360° virtual tour of Manarola.
Riomaggiore
The easternmost village of the Cinque Terre, the first you reach coming from La Spezia. The multicoloured tower houses stack down towards the sea. The most-used spot is the staircase to the left of the boat launch ramp: climb to the top and you have the entire village in front of you. Explore Riomaggiore ahead of your visit with the 360° virtual tour of Riomaggiore.
Tellaro
A small village in the Golfo dei Poeti, far less crowded than Vernazza, a significant advantage for landscape photographers. The pink church directly above the sea and the sheer rock faces offer perspectives you will not find elsewhere. Sunset: westerly light, ideal between October and April. Limited parking, arrive early and watch for the ZTL restricted traffic zone.
Lerici
The medieval castle on the headland is the dominant subject. The rocky shoreline below the castle allows compositions with a foreground of rocks and the village as the backdrop. Early morning: soft easterly light, no tourists. In winter the sun illuminates the castle facade directly.
Portovenere
The Gothic-Genoese Church of San Pietro perched on the headland towards the island of Palmaria is one of the most powerful seascape subjects in all of Liguria. Two completely different shooting spots, both ideal at sunset when the light falls westward onto the church’s black-and-white striped facade. UNESCO World Heritage Site since 1997, together with the Cinque Terre.
The two shooting spots at Portovenere
Terrazza dei Mulini, the most iconic spot. Frontal view of the church and headland with the open sea behind. Perfect for sunset.
Byron’s Grotto, a wilder spot lower down on the rocks. With rough seas the waves can submerge this area, always assess conditions before descending. In heavy swells it is one of the most dramatic shooting spots in all of Liguria.
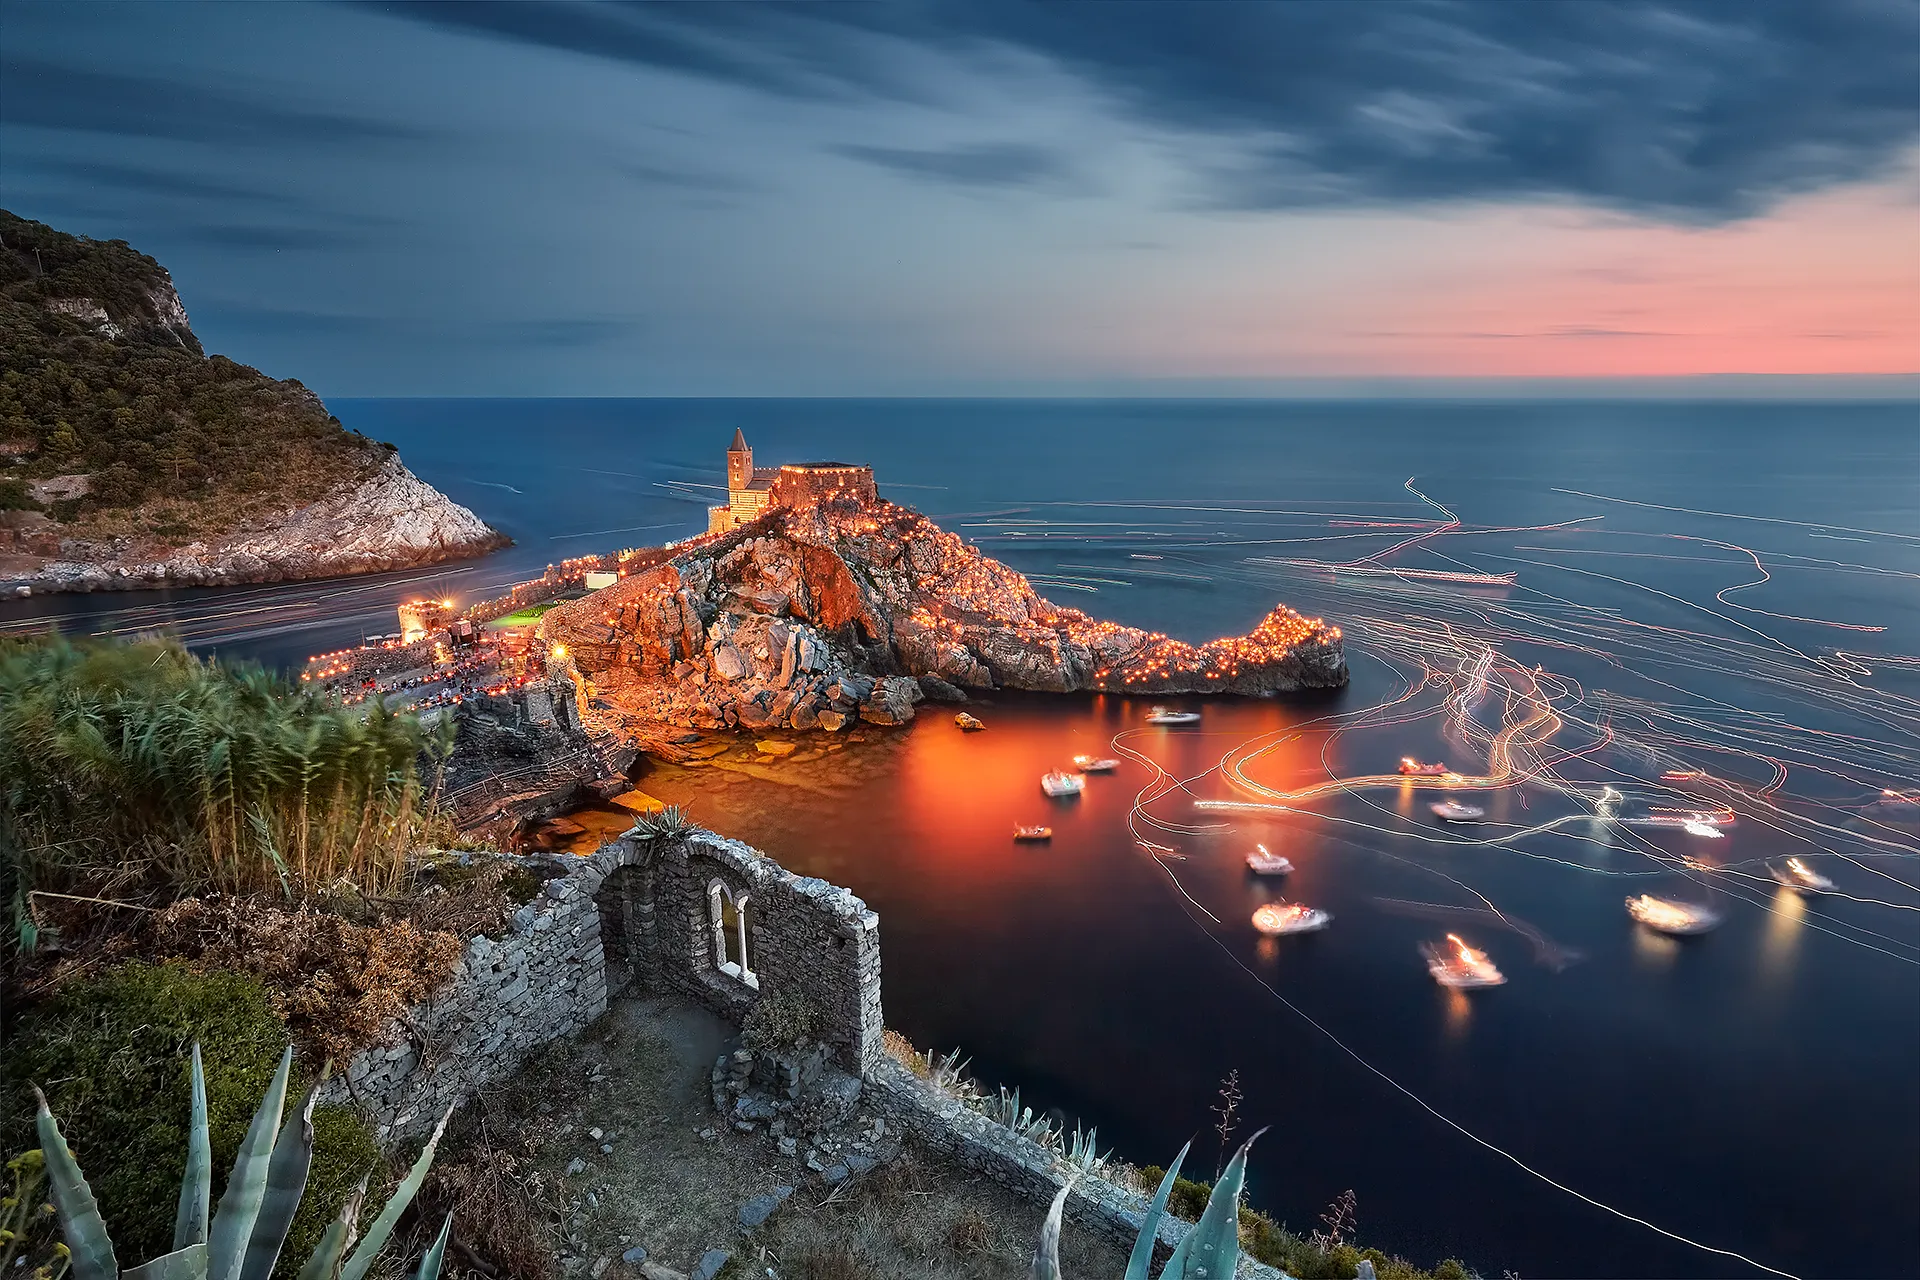
Portovenere, Liguria, Festa della Madonna Bianca, 17 August. Over 2,000 candles illuminate the village and the Church of San Pietro. Long exposure at blue hour © Marco De Maio
Season and weather — what you really need to know
October to April is the best season. Low light even in the morning, dynamic skies, choppy sea. Summer to avoid: flat light, sea as calm as a swimming pool, too many people.
Sirocco vs Tramontana: with the Sirocco, a warm, humid south-easterly wind, the sea is rough and dramatic: high waves, unsettled weather, low light. Perfect conditions for seascape, but keep your microfibre cloth and lens tissues within reach. With the Tramontana, a cold northerly wind, the sky is crystal clear and the air remarkably transparent, it brings stability and improving conditions, but the sea can be intense and field conditions more demanding.
Sunrise and sunset are the golden hours: warm light, raking direction that brings out texture, reflections on the water that midday cannot give you. Always check the weather 24 hours ahead, I use Windy and other apps to understand wind direction and intensity in real time.
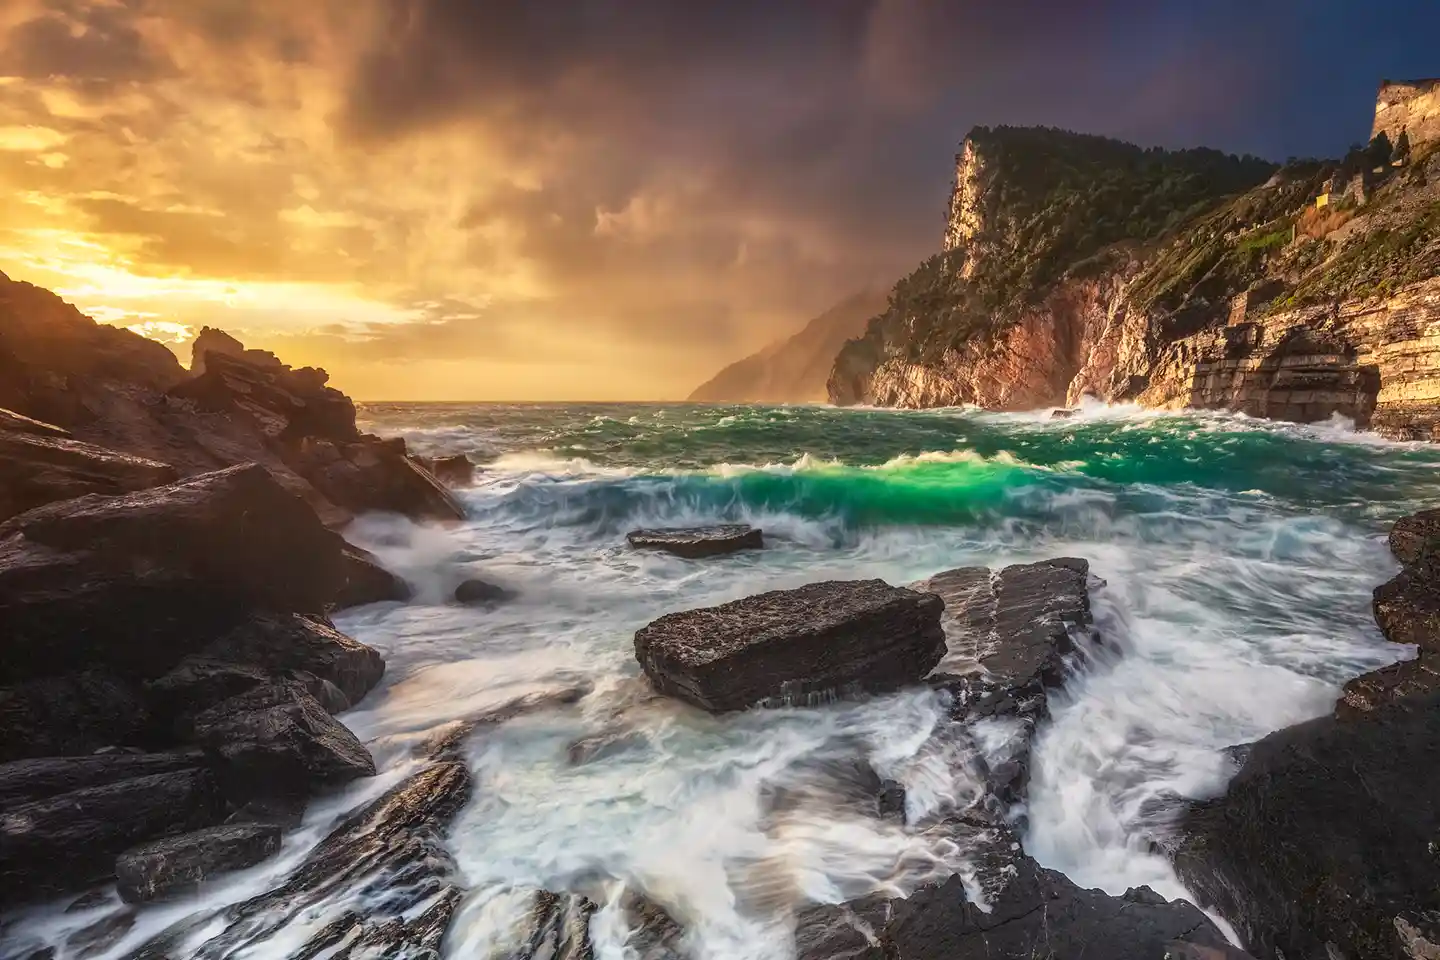
Portovenere, Byron’s Grotto, long exposure seascape during a storm, Gulf of Poets, La Spezia, Italy © Marco De Maio
8. Common mistakes, the ones I made
I have made every one of these at least once, mostly in the early days. Some of them more than once. I am sharing them so you can start with an advantage.
Mistake 0: Not checking your bag before you leave
This comes before all the others because it can undo all of them. You can have perfect technique, the right location, the light you have been waiting months for, and come home without a single usable shot because the battery died on the second frame, the memory card was full of last weekend’s photographs, or you left the remote shutter release on the desk.
The checklist to run through the evening before, not at 4:30am in the dark:
- Batteries charged and in the camera body. Spares in the bag, not still on the charger in the room.
- Memory cards formatted with enough space. If you are shooting RAW long exposures of 3-5 minutes each, calculate how many shots you expect to take.
- Remote shutter release if you forget it you can use the 2-second self-timer, but for Bulb mode exposures it becomes awkward.
- Filter holder and filters all of them, including the correct adapter rings. I once lost an entire session at Portovenere over an 82mm adapter ring left on the table.
- Headtorch essential for sunrise and sunset shoots. You need both hands free for the gear, not for holding a light. Always use red light mode, it does not affect your night vision, does not blind other photographers nearby and does not ruin anyone else’s long exposure shots.
- Tripod obvious, until you find yourself standing in the car park without one.
- Water and something to eat, if you are out in the field from sunrise until 10am, or from sunset until dark, staying sharp matters as much as staying still.
A failed shoot caused by forgetting something is the most frustrating kind. It does not depend on the light, the weather or luck. It depends on preparation, the only variable you control 100%.
Mistake 1: Focusing after fitting the ND filter
With an ND1000 mounted, the camera is nearly blind, autofocus struggles or fails completely. Focus first, then fit the filter. You only discover this mistake after waiting 2 minutes for the exposure to finish: wrong focus, wasted shot.
Mistake 2: Trusting the LCD preview
The LCD display renders a JPEG preview, not the RAW file. Its apparent brightness varies with the ambient light around you, not with the actual exposure. The only reliable reference is the histogram.
Mistake 3: Leaving image stabilisation on when using a tripod
On a tripod, the stabilisation system hunts for movement where there is none, and introduces it. The result is micro-blur you would never have had otherwise. Always disable stabilisation when shooting from a tripod, regardless of brand or system.
Mistake 4: Underestimating light leaks
In long exposures, light infiltrates through any gap, however small, the result is coloured flares or banding that ruin the shot beyond recovery. There are three critical entry points.
DSLR viewfinder: on DSLRs with an optical viewfinder, light enters through the eyepiece during the exposure. The typical symptom is a strange purple halo in the shadows. Use the eyepiece cover that comes with the camera strap, or a piece of black gaffer tape over the eyepiece before shooting. On mirrorless cameras this problem does not exist, the viewfinder is electronic and does not create this type of light leak.
Filter holder edges: the rubber seals help but do not eliminate the problem entirely, especially on worn holders or in very bright conditions. A strip of black gaffer tape along the edges solves it simply and cheaply.
Gaps between stacked filters: when stacking ND + GND, the gap between the two filter slots can allow light in from the side. If you notice coloured lines on the side facing away from the sun, this is the entry point. Again, black gaffer tape is the solution.
Mistake 5: Not bringing a microfibre cloth
In seascape photography, spray on filters and camera is unavoidable. Even with a relatively calm sea, salt crystals deposit on the glass within minutes, when they dry they leave halos that are hard to ignore in post-processing. A microfibre cloth or lens tissues in your pocket make the difference between a productive session and one to forget.
Mistake 6: Not observing the scene before shooting
Before fitting any filter I stop and look at the scene for a few minutes. This is not wasted time, it tells me which ND filter to choose. The clouds: where are they moving, how fast? The sea: how rough is it, what kind of waves are coming in? With fast clouds, 30-60 seconds is enough for visible sky movement. With slow clouds, 2-4 minutes. With very rough seas, short exposures preserve wave dynamics; long ones flatten everything completely. Your exposure time does not only depend on the light, it depends on what is moving in front of you. Choose the result you want first, then choose the filter.
Mistake 7: Not checking where the sun will be at the end of the exposure
In a 2-minute exposure the sun moves. Any surface it illuminates directly during the exposure risks being blown out in a way that is unrecoverable even in RAW. Before shooting I always check where the sun will be by the end of the exposure, not just where it is now. I use PhotoPills or a weather app with solar position tracking to plan this, especially at locations I do not know well.
Mistake 8: Unstable tripod in wind
A few seconds of strong wind can compromise a 2-minute exposure. When wind is present I hang my camera bag from the central hook on the tripod as a counterweight, it lowers the centre of gravity and reduces micro-vibrations that you cannot feel but the camera records.
If the wind is coming from a consistent direction, usually from the side, I position myself between the gusts and the tripod, using my body as a windbreak. It does not eliminate the problem, but reduces it significantly. If the wind is directly head-on relative to the shooting direction, there is little you can do: assess whether to wait, attempt the shot anyway, or change position.
Lerici, La Spezia, long exposure seascape, blue hour with storm © Marco De Maio
Before setting up the tripod on the rocks
Technique is the easy part. Planning is what separates the photographers who come home with the shot from those who come home with frustration.
Before I put the tripod on the rocks, I have already decided three things: where the sun is, what the sea is doing, and what the tide will cover or expose. These three factors together determine whether it is worth going out, which location to go to, and at what time.
Sun position, I use PhotoPills or The Photographer’s Ephemeris to know exactly where the sun sets or rises relative to my location on that specific date. This is not a minor detail: shifting the outing by one week can completely change the angle of light on the scene.
Sea conditions and weather, Windy.com is the most accurate tool I have found. It shows wave direction and height, wind speed by the hour, and cloud cover. A sea that is too rough on certain stretches of the Ligurian coast makes shooting impossible, and sometimes dangerous. A flat sea at certain spots produces reflections you could not achieve any other way.
Tides, in Liguria the tidal range is modest compared to other coastlines, but it still matters. The rocks at Portovenere and Tellaro change their character completely with the water level. I prefer to scout at low tide to find the subject, then return to shoot in the conditions I have planned for.
Planning deserves a guide of its own, composition included. Coming soon on this site.
9. RAW post-processing for long exposure photography
Post-processing long exposure files has a few specific characteristics: filter colour casts, thermal noise in the shadows, and highlight management in the sky. None of it is complicated if you know what to look for.
White balance
ND filters introduce colour casts, magenta with some glass, green with others. I correct these in Lightroom or Camera RAW after import. With high-quality optical glass filters the problem is far less visible, one more reason not to cut corners on filter quality.
Thermal noise reduction
Long exposures heat the sensor, and that heat generates thermal noise in the shadows, visible as coloured hot pixels in dark areas. Between shots I wait a few moments before firing again: just a few seconds are enough to lower the sensor temperature and reduce the problem.
For noise reduction in post I use Lightroom’s AI Denoise function, it delivers very good results, but do not overdo it: excessive noise reduction softens texture detail.
Some cameras offer in-camera noise reduction via automatic dark frame subtraction: after the main shot the camera takes a second “dark” exposure of the same duration and subtracts it. It works, but it doubles the waiting time. For seascape I do not use it, during a sunset you cannot afford to wait another 2 minutes.
Colour management for web
I always export in sRGB for web and social media, with the ICC profile embedded for colour consistency across devices. For print I convert to Adobe RGB; during editing I work with a ProPhoto RGB profile.
Related guides
To go deeper into RAW post-processing for landscape photography:
→ Colour management in Photoshop: ICC profiles and the correct workflow
→ RAW vs JPEG: why you should always shoot RAW for long exposure
→ Sharpening in Photoshop without halos
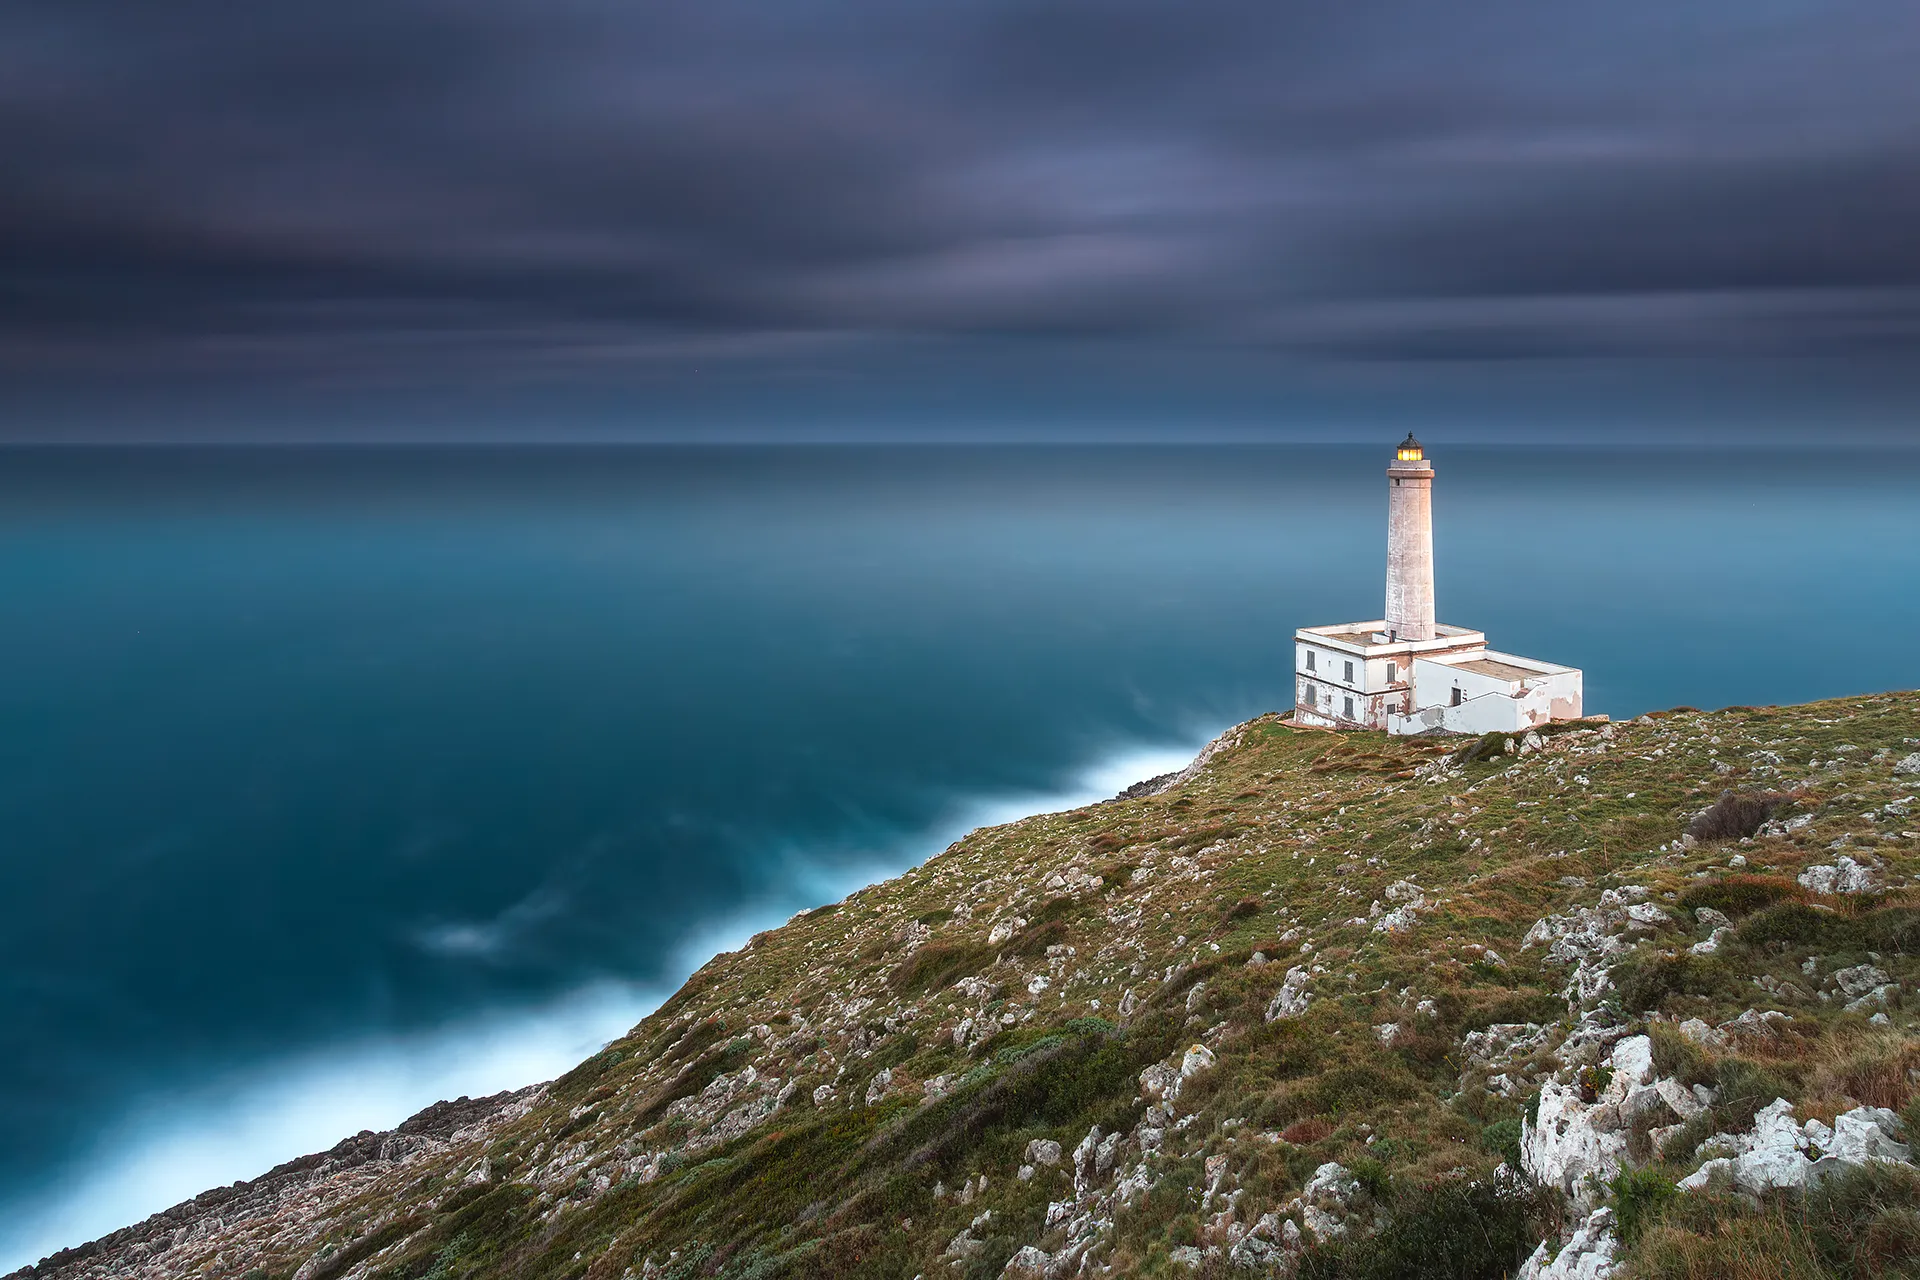
Punta Palascia Lighthouse, Otranto, the easternmost point of Italy, where the Adriatic meets the Ionian Sea. Long exposure at blue hour after the storm © Marco De Maio
FAQ – Frequently asked questions about long exposure photography
Field workshop
Learn seascape photography directly on the cliffs of the Cinque Terre.
Cinque Terre · Golfo dei Poeti
Sunrise · Sunset · Blue hour
ND filters, seascape composition and RAW post-processing on your own shots, in real time. The same coastline where the National Geographic photograph was born.
Discover the private workshop →
I reply within 24 hours · No commitment
This guide collects what I have learned over years of field sessions, from the Cinque Terre to the Gulf of Poets, but also elsewhere in Italy and Europe. Nothing held back. Mistakes included. Use it as a reference, adapt it to your style and your locations.
If it was useful, share it.
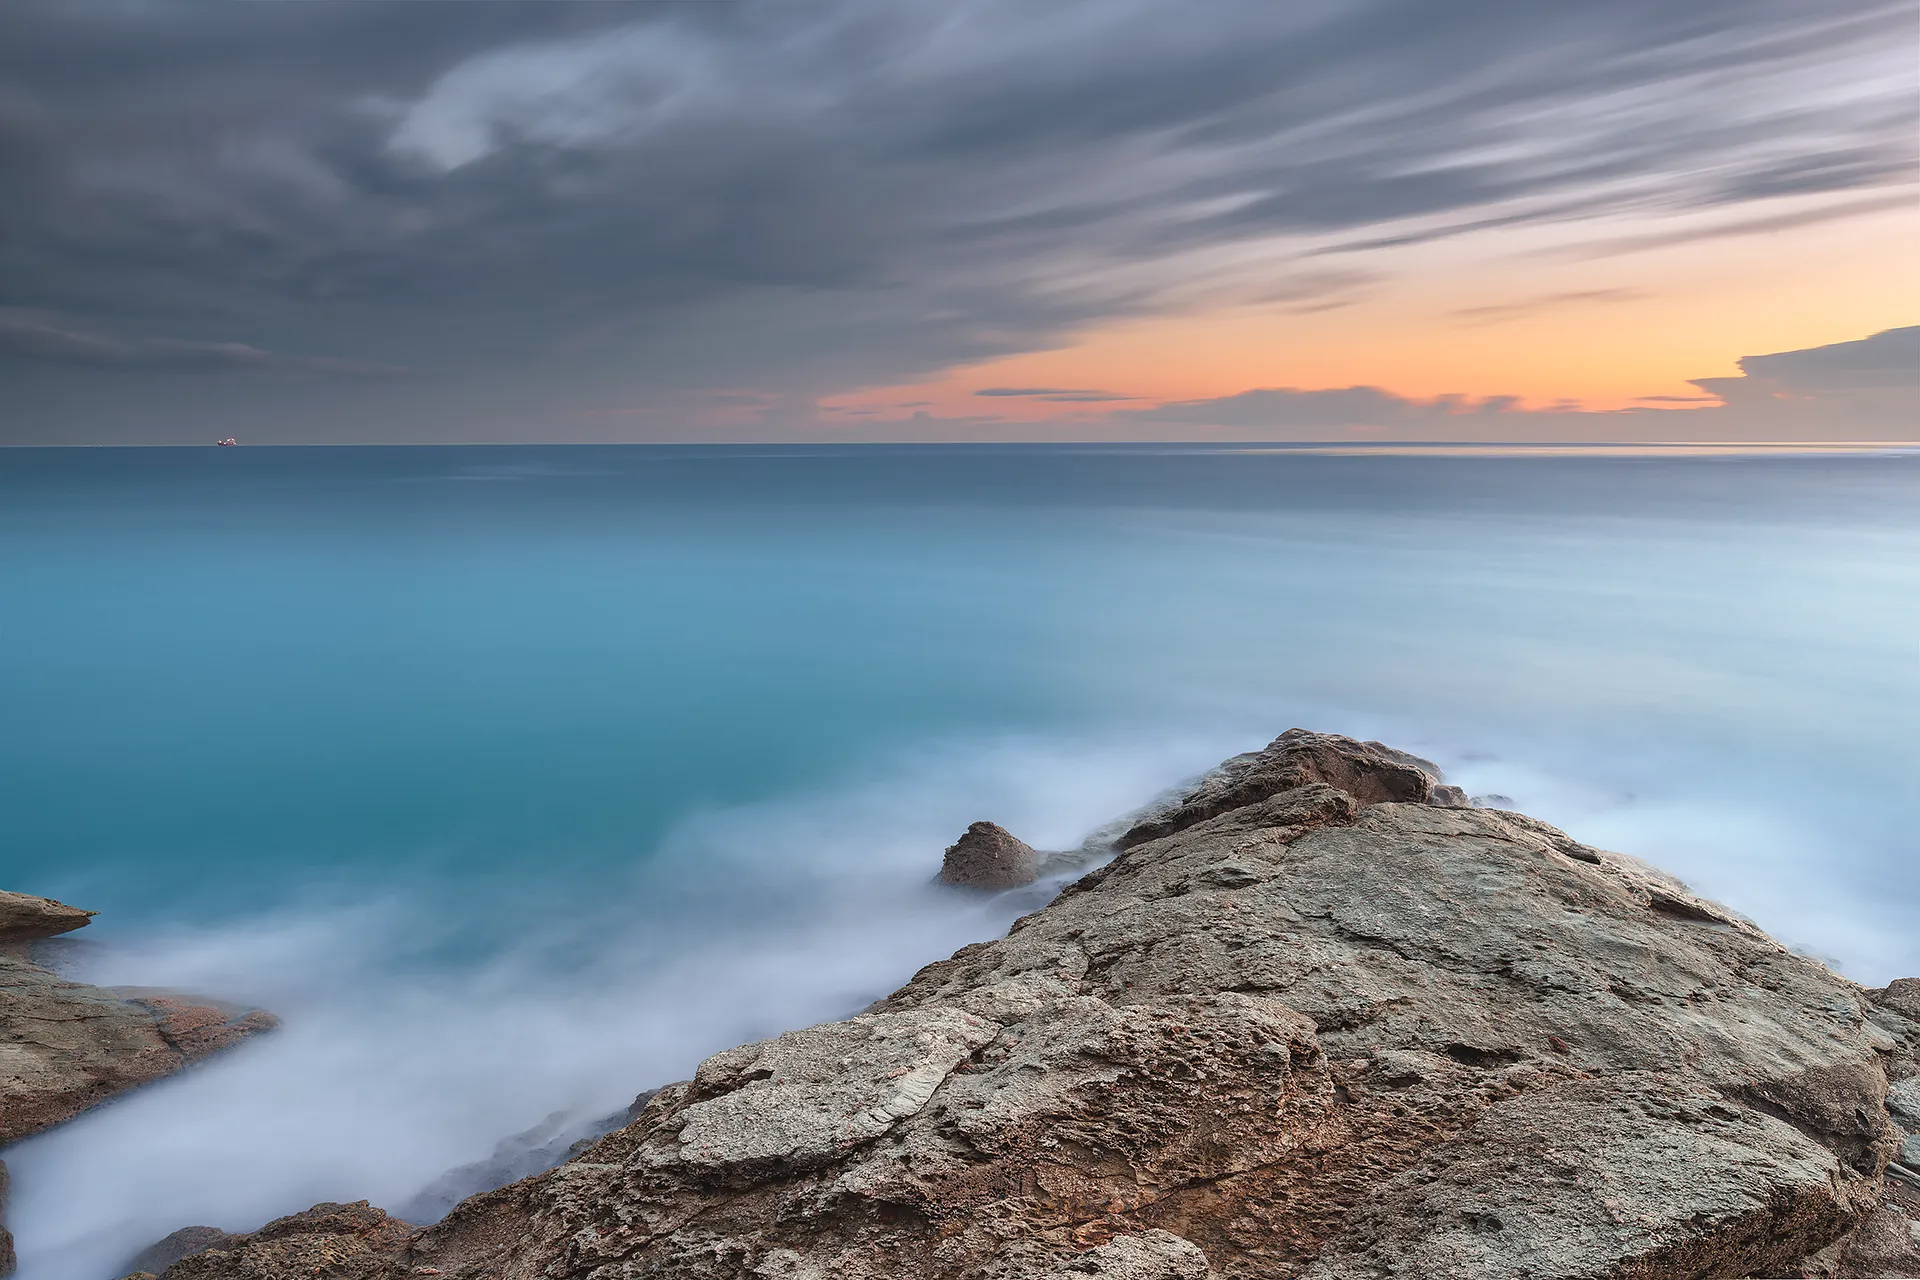
Punta Bianca, Liguria, long exposure seascape at blue hour © Marco De Maio