Versione italiana disponibile:
leggi la guida in Italiano
WebP export in Lightroom Classic:
batch export with my plugin (macOS & Windows)
Adobe Lightroom Classic currently doesn’t offer WebP among its export formats. If you work for the web, this often becomes a forced extra step through Photoshop or external converters.
Annoying problem. How do you fix it?
In this guide I’ll show you a practical way to export WebP directly from Adobe Lightroom Classic, so you can convert many photos at once (batch), without switching to Photoshop or external converters.
It’s a typical situation: you finish the selection, do your edits, and you’re ready to export the final images… Then you realize the most convenient format for web performance (WebP) isn’t available in Lightroom Classic export. The result? Export JPEG/PNG, open, convert, re-check, repeat. And when you have 200 photos, it becomes wasted time.
The solution I use in my workflow: I personally developed this Lightroom Classic WebP export plugin to add WebP export directly to Lightroom Classic. cwebp, the WebP encoder, is already included in the plugin: no separate installation needed.
Why you can trust it: it’s not a “hack”. It’s a safe workflow. Download the plugin, install it in Lightroom and you’re ready to export. If you know how to use Export in Lightroom, you already know 90% of the process.
“Native” Lightroom vs Lightroom with WebP export
✅ Without a plugin
You export to available formats (JPEG/PNG/TIFF, etc.). If you need WebP, you must add an extra step, Photoshop or external converters.
🚀 With my WebP (cwebp) plugin
In Export, choose “WebP (cwebp)”: Lightroom renders and the plugin automatically converts to .webp. Result: WebP directly from batch export, no extra steps.
In two words: fewer steps, fewer mistakes, more speed. This is the most practical Lightroom Classic WebP batch export solution available, when you have 200/500 photos, nothing changes. You export them all to WebP like you would to JPEG. 🙂
Download and installation v1.2.2
Free plugin · macOS and Windows
Lightroom Classic WebP export plugin “WebP (cwebp)”
Version 1.2.2
Plugin file: lightroomwebpexport.lrplugin · lightroom classic export webp · lightroom webp export plugin
.zip file — unzip before installing · compatible with Lightroom Classic on macOS and Windows
⚠️ Before installing: read the full guide below, it covers macOS quarantine setup, recommended export settings and common issues. It takes 2 minutes and saves you a lot of time and probable headaches! 🙂
Found the plugin useful?
Follow me on Instagram — I share the work behind it:
seascape, long exposure and landscape photography.
Photography · no ads, no spam
Windows
Download the plugin, install it in Lightroom Classic via File → Plug-in Manager → Add, launch Lightroom and you’re ready. No additional steps needed.
macOS — Apple Silicon (M1/M2/M3/M4/M5)
After downloading and copying the plugin to your folder, open Terminal and run these two commands. Replace ~/path/to/ with the full path to the folder where you copied the plugin.
xattr -d com.apple.quarantine ~/path/to/LightroomWebPExport.lrplugin/bin/mac/arm64/cwebp
These commands are needed once only to release the cwebp binary from macOS quarantine — nothing external is installed.
macOS — Intel
Same procedure, use these commands with your folder path:
xattr -d com.apple.quarantine ~/path/to/LightroomWebPExport.lrplugin/bin/mac/x86_64/cwebp
These commands are needed once only to release the cwebp binary from macOS quarantine — nothing external is installed.
Install the plugin in Lightroom Classic
- Unzip the plugin archive: you should get a folder ending with .lrplugin (e.g. LightroomWebPExport.lrplugin).
- Open Lightroom Classic → File → Plug-in Manager…
- Click Add and select the .lrplugin folder.
- Go to File → Export… and verify that WebP (cwebp) appears in the export list.
Verify everything works
In Lightroom Classic, open File → Export, select “WebP (cwebp)” and click the ▶ Test cwebp button. If you see the confirmation message, you are ready to export! 🙂
Batch WebP export:
many photos at once (without changing your habits)
This is the “best part”: once setup is done, the Adobe Lightroom WebP export becomes just a preset. Select 50, 200 or 1000 images and Lightroom processes them in sequence as usual, the plugin automatically converts each file to WebP.
Simple workflow
- Select your photos.
- Go to File → Export…
- Select WebP (cwebp).
- Set destination, file naming, resize, etc.
- Click Export.
Workflow tip: create 2 WebP presets and save them (e.g. “WebP q80” and “WebP q70”) so you can choose quickly depending on use (portfolio / blog / e-commerce). Whether you’re setting up Adobe Lightroom export WebP for a client gallery or a website, the workflow stays exactly the same.
Recommended WebP settings for photos
(balanced quality / file size)
- Mode: Lossy
- Quality: 80 (recommended starting point)
- Preset: photo
- Method: 4 (balanced)
- Metadata: icc,exif,xmp (if you want to keep profile and data)
- Color space: sRGB (recommended for web)
If you want smaller files: try Quality 75 or 70. For images with lots of micro-texture (leaves, hair, fabric), q80 is often a solid compromise.
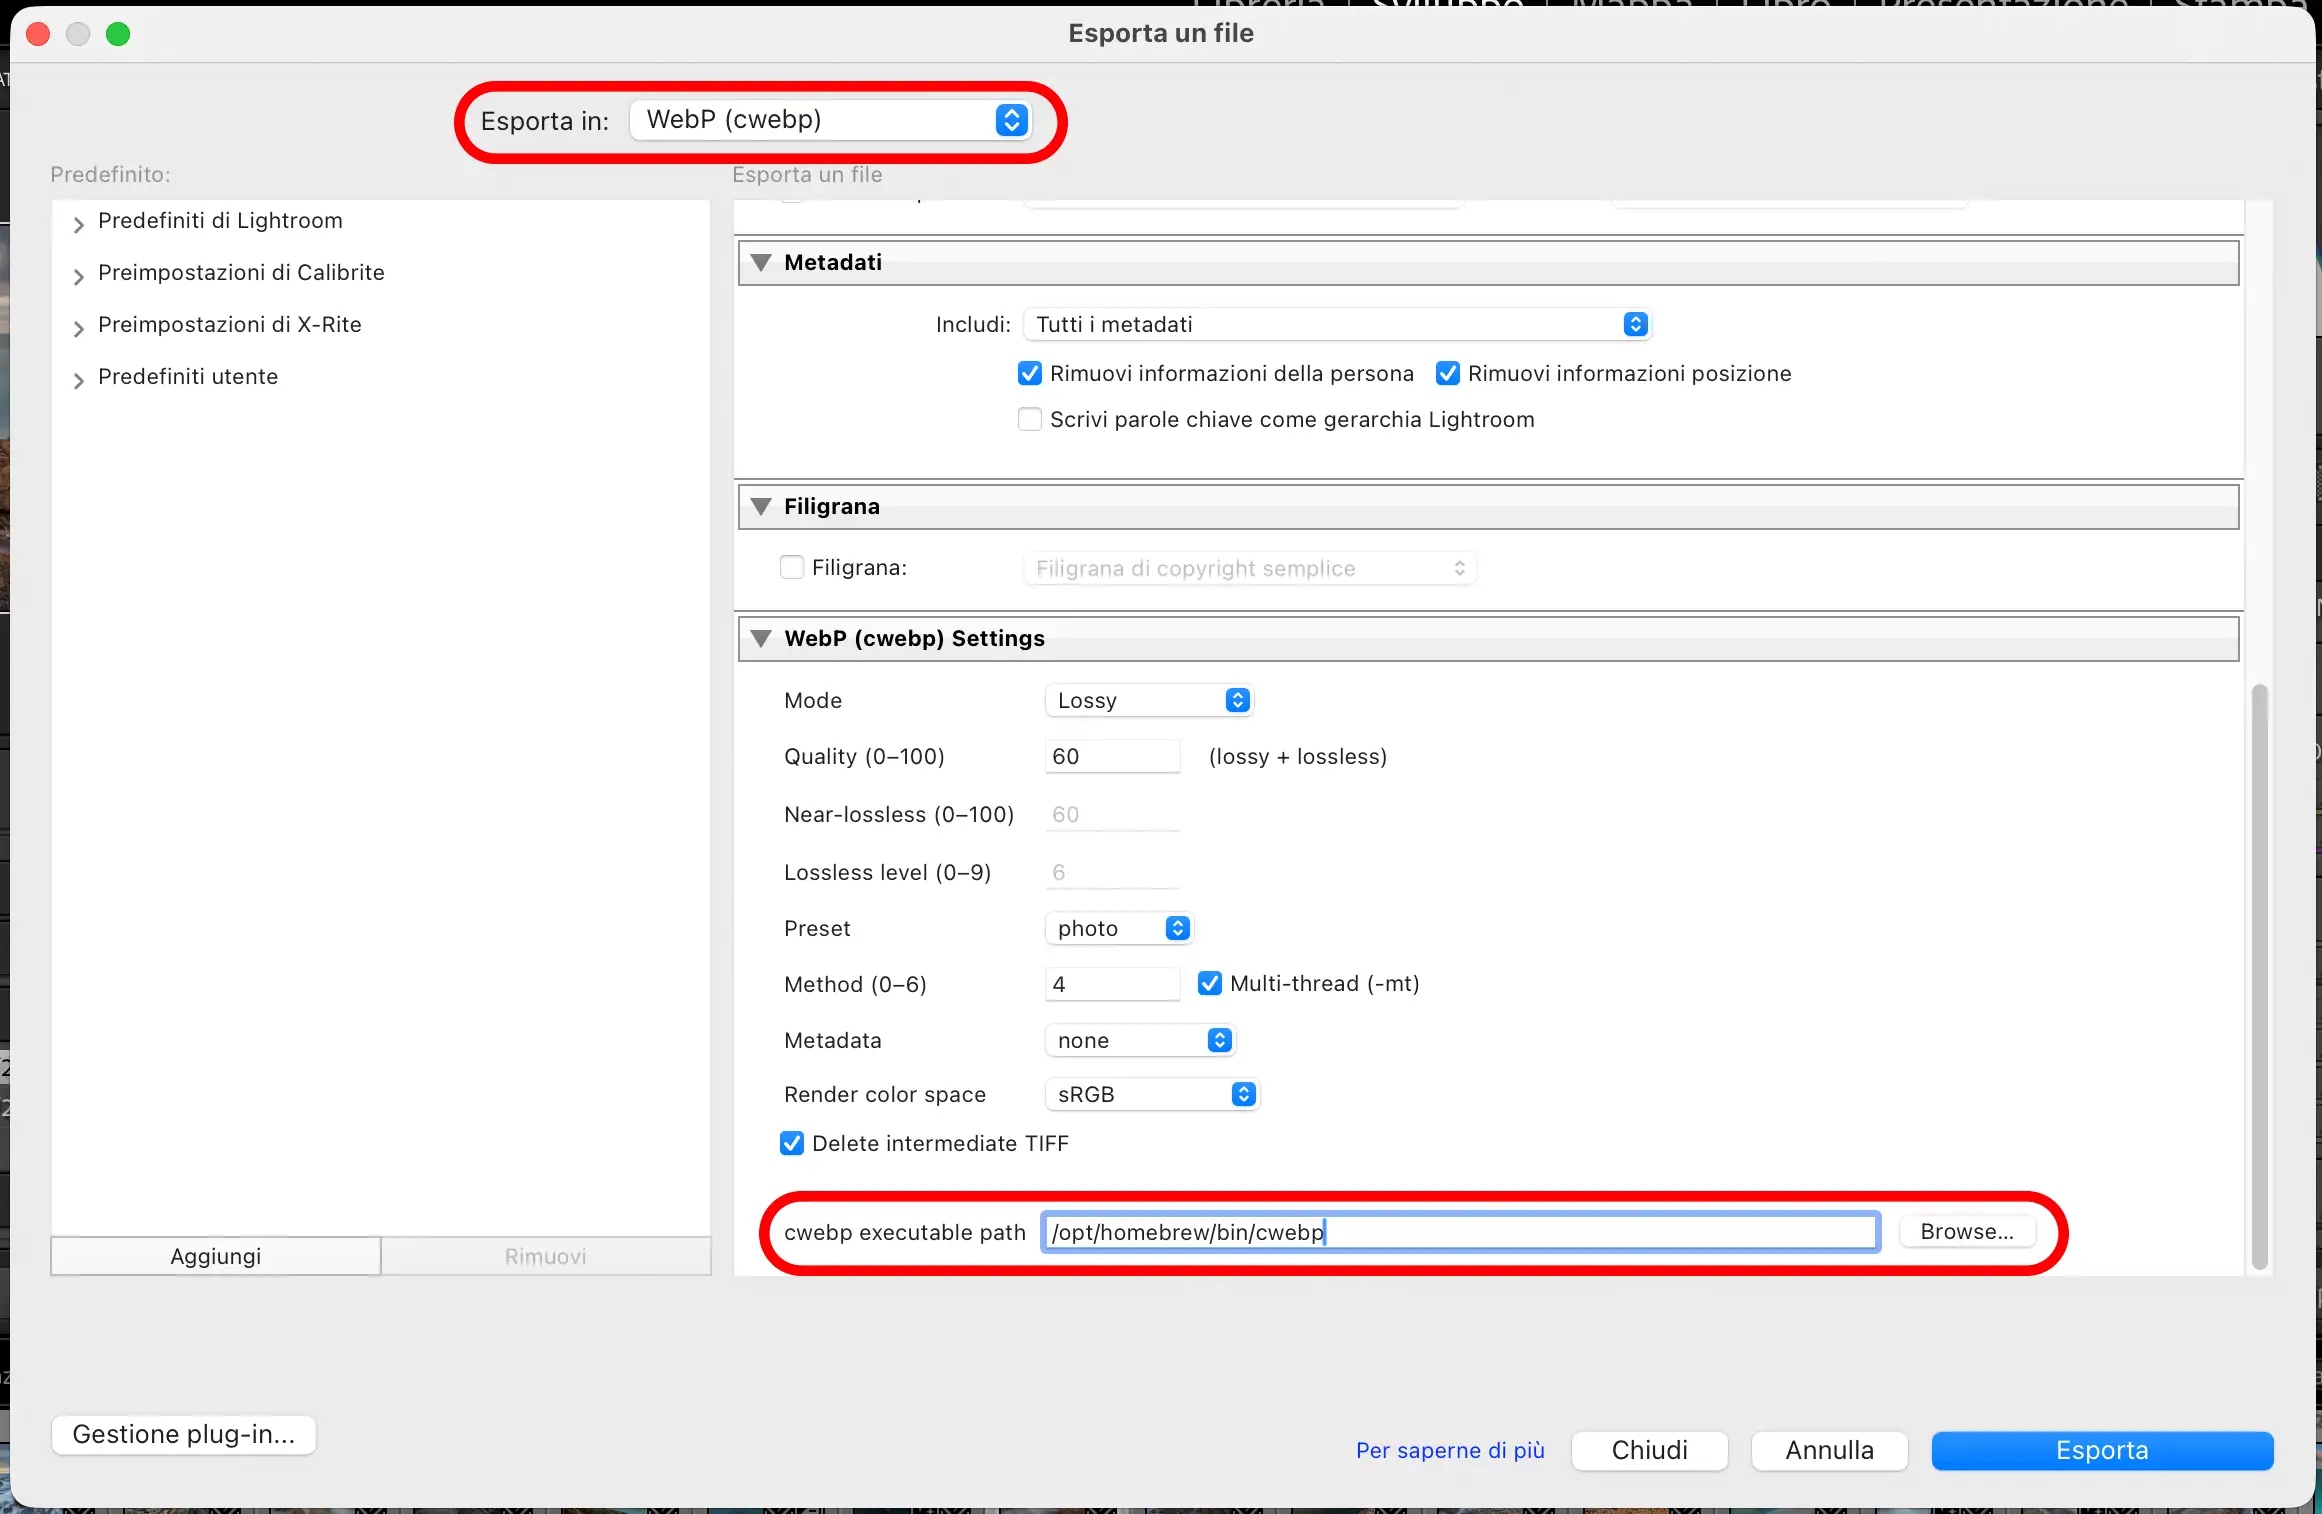
How to set up the WebP (cwebp) plugin: what each option means
These options control how cwebp compresses the image and which metadata are kept. For a “safe” web result, start with Lossy, Quality 80, Preset: photo, Method 4, Render Color Space: sRGB.
Mode (Lossy / Lossless)
Lossy = compression with some loss (smaller file). Typical choice for web.
Lossless = no quality loss (bigger file), useful for graphics, UI, logos.
Tip: for photos, use Lossy most of the time.
Quality (0–100)
Practical values: 70–75 (very small), 80 (balanced), 85–90 (high quality).
Preset (photo / picture / drawing / icon / text)
photo = recommended for photography.
drawing / icon / text = better for graphics, logos, UI elements.
Method (0–6)
Tip: 4 is a great balance. For large batch exports, stay around 3–4.
Metadata (icc / exif / xmp)
icc = color profile. exif = camera/lens data. xmp = metadata/copyright.
Tip: keep icc,exif,xmp for everything. Only icc for maximum lightness.
Render Color Space
sRGB = most compatible for web and social (recommended).
Adobe RGB / ProPhoto = not recommended for generic web output.
Ready-to-use presets
WebP “Standard Web”: Lossy · Quality 80 · Preset photo · Method 4 · Metadata icc,exif,xmp · sRGB
WebP “Lightweight”: Lossy · Quality 75 · Preset photo · Method 3–4 · Metadata icc · sRGB
WebP “Graphics/Logo”: Lossless · Preset icon/drawing · Metadata icc · sRGB
Common issues (quick fixes)
1) macOS, the cwebp binary is blocked by quarantine
Open Terminal and run the two commands from the installation section (chmod + xattr). Needed once only.
2) Export finishes but you don’t see .webp files
Export just 1 photo to Desktop with a simple filename, then check the destination folder set in Export.
3) Have a problem not listed here?
Use the form at the bottom of the page, describe your OS, Lightroom version and the error message you see. I’ll get back to you as soon as possible.
FAQ
Is the plugin enough by itself?
Yes. From version 1.2.2, cwebp is included in the plugin, no separate installation needed. On macOS you need to release the binary from quarantine with two Terminal commands (described above). On Windows, just download the plugin and install it in Lightroom.
Can I convert 200 photos at once?
Yes. If Lightroom can export 200 photos in batch, the plugin converts them to WebP one by one during the same export.
Which color space should I use?
For the web, sRGB is the most compatible choice. Keep icc in metadata for consistent color across devices.
If something doesn’t work, can I contact you?
Yes. Use the form at the bottom of the page, describe your OS, Lightroom version and the error message. I’ll get back to you as soon as possible.
If you’ve made it this far, you now have a concrete method to set up Adobe Lightroom Classic WebP export directly from your workflow, without extra steps and without changing your habits. This is exactly the kind of solution I decided to build when I ran into the same limitation: a real need, solved in a practical way. Use this guide as a reference, adapt it to your needs and if you found it useful, feel free to share it. It’s also thanks to these exchanges that I can keep developing tools and content for people who truly work with images.
Would you like to leave a comment, suggestion or feedback about this guide?
Write below, I always enjoy reading it.