Read this guide in another language
You’re reading the English version. Prefer Italian?
Open RAW vs JPEG (IT)
RAW vs JPEG: Which Format to Use and When
REAL DIFFERENCES, SIDE BY SIDE EXAMPLES, AND WHEN TO CHOOSE THE RIGHT FORMAT
You shot in challenging conditions; the photo looked perfect on the camera’s LCD screen, but then, in Lightroom, it couldn’t handle the adjustments.
This isn’t necessarily a technical error, but rather a consequence of choosing the wrong file format and the amount of data the file retains.
Your camera display shows a pre-processed preview: contrast, color, and sharpness are applied automatically. However, the file you open on your computer can be a completely different story, especially if you shot in JPEG.
A JPEG is already processed and compressed, leaving you with very little latitude (or headroom) to work with.
RAW, on the other hand, is designed to be processed (the Digital Negative): it preserves significantly more data and grants you greater control over exposure, white balance, and tonal transitions.
In this guide, you will understand the real-world difference between RAW and JPEG, when to use each, and how to choose the right format before you even press the shutter, with practical examples and zero fluff.
Quick decision
Choose RAW if:
- the light is difficult or mixed (e.g., backlight, interiors with windows, stage lighting, landscapes, night scenes);
- you expect significant corrections (WB, skin tones, highlight/shadow recovery);
- the shot is critical (client work, printing, portfolio).
Choose JPEG if:
- you need to deliver or publish immediately;
- the light is simple and repeatable;
- you want smaller files and a faster workflow.
Choose RAW+JPG if:
- you want a ready-to-share JPEG and RAW as a “parachute” for your best frames or the ones that are harder to correct.
What a RAW really is
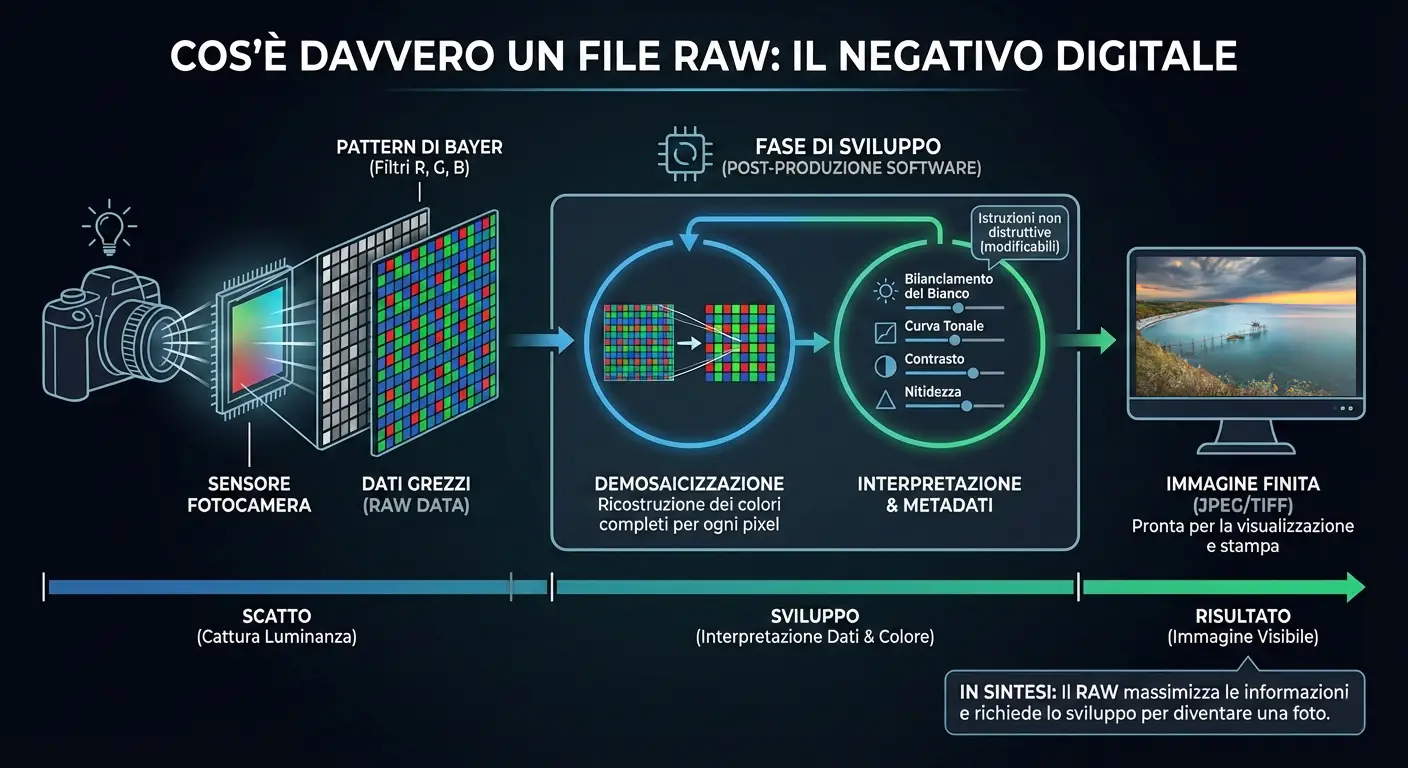
A RAW file is the “raw” recording of the data captured by the camera sensor.
It’s important to understand (simplifying for practicality) that the sensor doesn’t directly record colors: color is reconstructed during the development stage.
To turn this data into a visible full-color image, a process called demosaicing is required: the software analyzes the sensor data and reconstructs full color for each pixel.
This doesn’t happen at capture time, but during the development phase.
That’s why a RAW file is not a “finished photo” yet: to become a ready image it must be interpreted by software (Lightroom, Camera Raw, Capture One, or the manufacturer’s software).
Each program uses its own demosaicing, color management, and tone rendering algorithms, which is why the same RAW can look different depending on the software used.
In a RAW file, many settings that are final in JPEG (like white balance, tone curve, contrast, and sharpening) are saved as metadata: development instructions.
That means they can be changed in post without degrading the image, because the original sensor data remains intact.
In short, RAW is designed to maximize the amount of available information and postpone technical and creative decisions to the development stage.
That’s why it offers more headroom for exposure, color, and tonal transitions, but it necessarily requires a post-production step.
- There isn’t a single RAW standard: each brand uses different formats and interpretations.
- WB and “look” are not final: they’re development instructions (metadata), not changes baked into the file.
- Real advantage: more headroom in exposure, color, and tonal transitions when you truly need to push adjustments.
What a JPEG really is
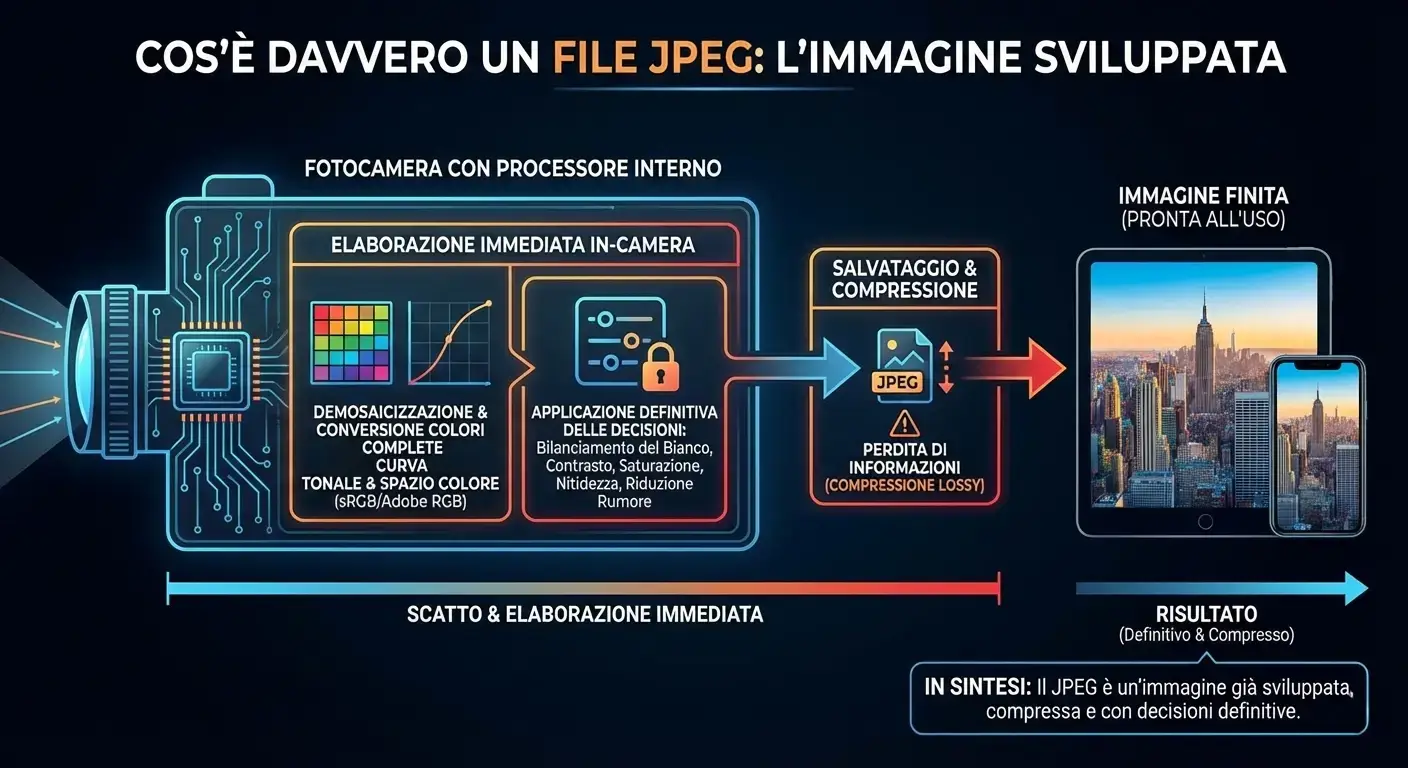
A JPEG file is an image that has already been developed by the camera.
After capture, the sensor data is immediately processed by the internal processor:
demosaicing happens, full color is generated,
a tone curve is applied, and the image is transformed into a standard color space (sRGB / Adobe RGB).
At this stage, the camera automatically applies a series of decisions:
white balance, contrast, saturation, sharpening,
noise reduction, and picture profile.
The result is a ready-to-use photo, designed to be viewed,
shared, or delivered immediately, without manual development.
Once in-camera processing is completed, the image is saved as JPEG using lossy compression to reduce file size.
This means part of the original information is discarded and irreversibly lost
to make the file smaller and broadly compatible with virtually any device.
Unlike RAW, in JPEG the choices made at capture time
become final:
white balance is no longer an instruction but a baked-in value,
highlights and shadows are already compressed,
and heavy post adjustments have less headroom before degrading the image.
- JPEG is a “finished” file: development happens in-camera, not in post-production.
- WB and look are final: contrast, color, and sharpening are already applied and not reversible.
- Real advantage: lightweight files, immediately ready, ideal for fast delivery, reportage, events, and online publishing.
RAW vs JPEG: the differences that actually matter
The real difference between a RAW image and a JPEG is not “quality” in the abstract: it is how much headroom you keep for corrections after the shot.
Post headroom
RAW: high headroom for corrections and recovery in post-production.
JPG: more limited headroom because it’s already developed and compressed.
Highlight/shadow recovery
RAW: cleaner recovery (within the sensor’s limits).
JPG: higher risk of banding and artifacts if you push too far.
White balance
RAW: very flexible during development, useful in mixed light.
JPG: strong corrections are riskier (color casts and skin tones are more delicate).
Ready-made look vs built look
RAW: more neutral; you build the look in development.
JPG: look is decided by the camera and ready immediately.
File size & management
RAW: larger files; more storage and more time in post.
JPG: lighter files; faster delivery and publishing.
When it makes sense
RAW: critical work, printing, difficult light, significant corrections.
JPG: fast delivery, high volume, immediate publishing.
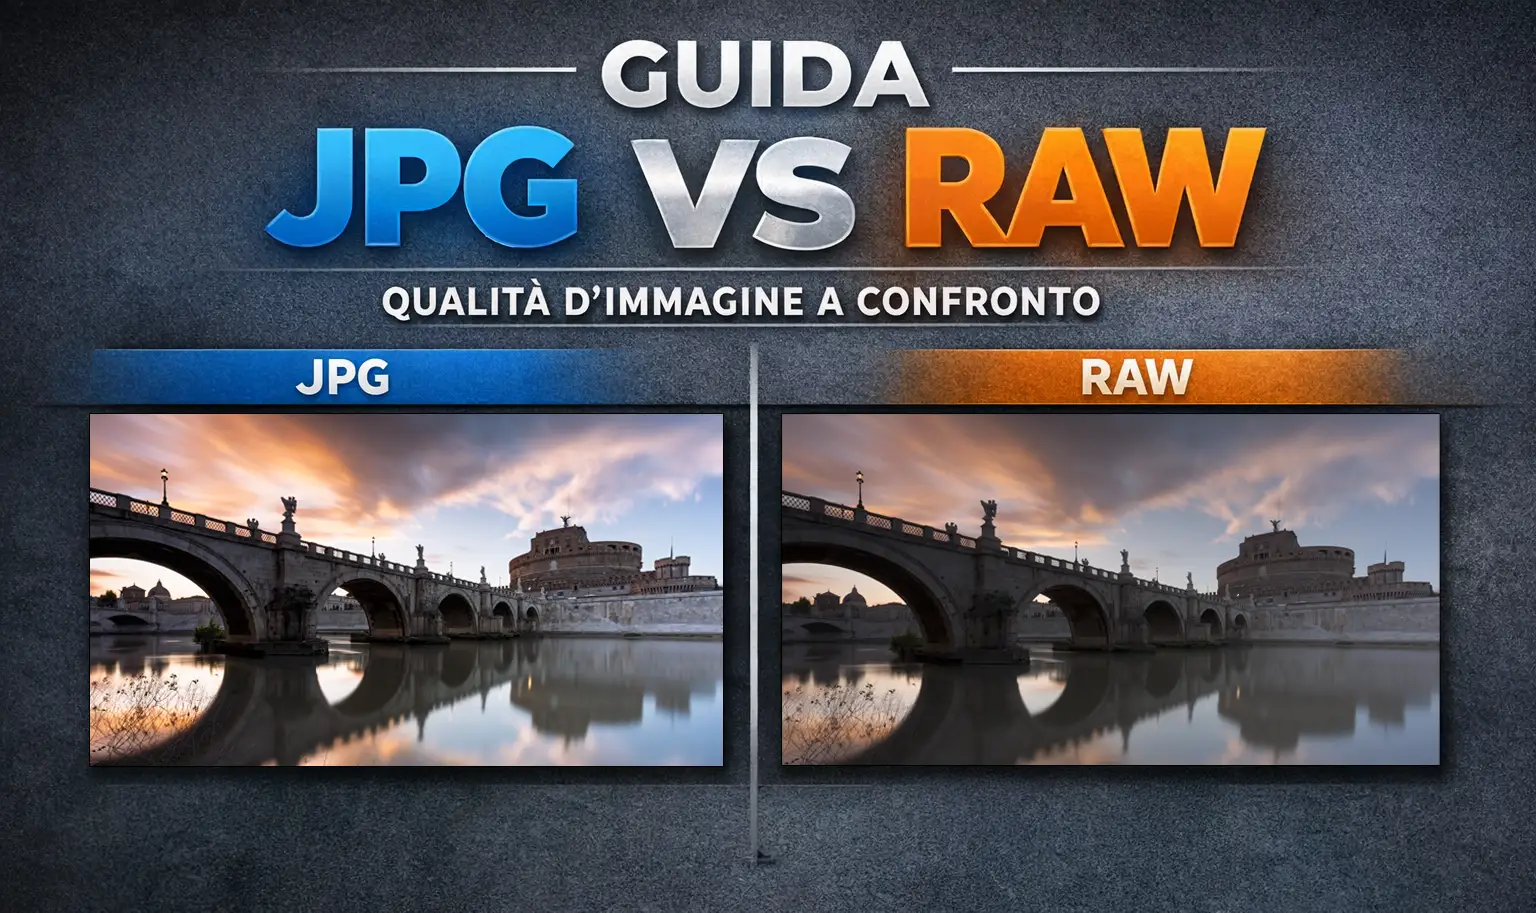
The correct comparison is a developed RAW vs a finished JPEG, aiming for a similar intent.
Practical example (30 seconds): what “it can’t handle it” means
Open the same scene shot in RAW and JPEG (RAW+JPG is perfect).
Raise Shadows and lower Highlights in an obvious way.
With RAW it’s easier to keep the result clean; with JPEG it’s easier to see degradation if the correction is strong.
Which one to choose: real-world scenarios
LANDSCAPE
In landscape photography, RAW is often the most sensible choice: skies and shadows need clean transitions, and recovery is common.
If the light is uniform and you want a fast web workflow with minimal editing, JPEG can be enough.
For seascape and long exposure photography with ND filters, RAW is especially critical: long exposures introduce color casts that only RAW allows you to correct cleanly. Complete guide to long exposure photography with ND filters
To calculate exposure times with single ND, stacking and CPL in one step: Free ND Calculator
PORTRAIT
In portrait work, RAW helps because skin and white balance are delicate: heavy JPEG corrections degrade more easily.
In a controlled, repeatable setup with a defined look and fast delivery, JPEG can also be a pragmatic choice.
REAL ESTATE & INTERIORS
In real estate and interior photography, mixed light (window + lamps) is common, and consistency across rooms is often required.
RAW is frequently preferable because it allows cleaner WB, color-cast, and tonal-range corrections, especially when you need to match a whole series of images.
RAW+JPG: the smart compromise
Shooting RAW+JPG is useful when you want a ready-to-send/publish JPEG, while keeping RAW as a backup for your best or more complex frames
(tricky WB, significant recovery, “critical” series).
Practical settings
IF YOU SHOOT JPEG (MAXIMUM QUALITY IN-CAMERA)
Exposure & WB: nail the shot, because JPEG tolerates heavy corrections less.
Moderate profiles: avoid excessive sharpening/NR (plastic skin, lost micro-detail).
Consistency: keep settings consistent to work faster on a series.
IF YOU SHOOT RAW (A SOLID WORKFLOW)
Protect important highlights: they’re the first to disappear.
Keep WB consistent when you can: even if you refine it later, it speeds up post.
Workflow: import → backup → cull → develop → export (JPEG/TIFF for delivery).
Common mistakes to avoid
1) “RAW = I can save everything”
RAW helps, but it doesn’t perform miracles: if an area is completely blown, you can’t recreate it. The advantage is headroom when the correction is reasonable.
2) “JPEG = a beginner format”
JPEG is an efficient delivery format. The real question is: does it give you enough correction headroom for your scenario?
3) A bad RAW vs JPEG comparison
Undeveloped RAW vs finished JPEG is misleading. Correct comparison: developed RAW vs finished JPEG.
4) Shooting RAW but treating it like JPEG
If you don’t leverage development (tones, color, WB, recovery), you lose much of the reason you chose RAW.
FAQ
Not always: RAW offers more flexibility, but it requires more management (large files, culling, development). The right choice depends on delivery, light, and workflow.
You can do light corrections. If you push hard (WB, shadows, color), the risk of degradation increases compared to RAW.
Yes: when you need a ready JPEG for fast delivery, but want RAW as backup for your best or hard-to-correct frames.
If speed is the priority: JPEG. If the light is complex and you want the best result before export: RAW (then export correctly for the web, usually in sRGB).
Conclusion
RAW and JPEG aren’t “better/worse” in absolute terms: they’re different tools. JPEG maximizes speed and practicality; RAW maximizes control and headroom when the scene, or the job, demands it.
The most professional choice is the one that makes your results predictable: consistent quality when needed, speed when it matters.
Quick tip: if you shoot landscapes, events, or portraits, a small workflow optimization (format → develop → export)
makes a bigger difference than any “preset”.
Go deeper: related guides and post-production course
RAW/JPG is only the starting point: for consistent results, color profiles, software settings, and export practices matter too. Here are the key guides (plus a practical path to apply everything to your files).
sRGB vs Adobe RGB vs ProPhoto RGB: complete guide
Color management in Photoshop: settings, ICC profiles, and a correct workflow
Long exposure photography: complete guide to ND, GND, CPL filters and field technique
Do you have a question about your specific case?
Write to me here